# Seamless Developer Portal — guides, concepts, and resources
> The complete prose documentation for Seamless OS in one document, in navigation order: getting started, task guides, concept pages, and per-resource lookup tables. The generated API endpoint reference is not included — fetch https://docs.telnesstech.com/llms-full-api.txt for that, or https://docs.telnesstech.com/bundled_openapi.json for exact schemas.
## Get started
### Intro to Seamless OS
Canonical URL: https://docs.telnesstech.com/developer-guide/intro
Seamless OS is a telecom platform. With it a business can launch as a mobile operator, upgrade
an existing operation, or add connectivity to what it already sells. It carries everything a
startup needs to enter telecom, and everything an established business needs to add mobile
services.
- [New: MCP server](/developer-guide/mcp.md) — Let Claude, Cursor, or your own agent manage customers and subscriptions in natural language.
#### Why Seamless OS?
- **Launch in 3 weeks** — Go from a concept to a live mobile operator in a few weeks. The platform is fully automated.
**Playfully easy, infinitely scalable.** Seamless OS makes telecom manageable. Operational
costs decrease by up to 80%, and the platform still carries what a large operator needs.
#### Key benefits
- **80% cost reduction** — Automated systems and shorter processes decrease operational cost.
- **200+ pre-built journeys** — Use more than 200 customer journeys that are built and tested already.
- **300% ARPU increase** — Our clients report a large increase in average revenue per user.
- **80% fewer support tickets** — Automation and a clear interface decrease the load on customer support.
#### Complete platform features
Seamless OS carries a full BSS and OSS stack. BSS is Business Support Systems. OSS is
Operational Support Systems.
- **Billing systems** — Billing and payment processing, on more than one payment gateway.
- **Mobile applications** — Native iOS and Android apps that carry your own brand.
- [AI-ready infrastructure](/developer-guide/mcp.md) — Built-in AI, and a Model Context Protocol (MCP) server.
- **Open APIs** — APIs across the platform, for your own integrations and for a third party.
#### Platform editions
Select the edition for your business:
- **Seamless OS**: For a startup and for a new entrant to the market.
- **Seamless OS+**: For an established telecom provider.
- **Seamless OS enterprise**: For a large business outside telecom that adds connectivity.
#### Get started
- [Get started guide](/api-reference/choose-your-integration.md) — Select your integration style, then place your first order.
### Get started
Canonical URL: https://docs.telnesstech.com/api-reference/get-started
#### Get your first order
This guide takes you through your **first order** on the Seamless OS API. You authenticate,
read the products, create an order, collect the payment, and submit the order for
provisioning.
#### Authentication
Every request needs an API key in the `X-API-Key` header. For the full rules, read the
[Authentication guide](/api-reference/authentication.md).
#### Quick path
**1. List product offerings**
Get the offerings that you can show to a customer.
**2. Create order**
Start an order with the customer, the subscriber, and the product.
**3. Calculate price**
Calculate the taxes and the total before the payment.
**4. Create payment link**
Generate a payment link to collect the prepaid funds.
**5. Submit order**
Lock the paid order for provisioning.
#### 1. List product offerings
Get the product offerings that you can present to your customers. The response gives the
plans, the prices, and the features that a customer can buy.
```bash
curl "{BASE_URL}/products/offerings" \
-H "X-API-Key: $API_KEY"
```
See [List Product Offerings](/api-reference/product-offerings.md#tag/product-offerings/GET/product-offerings)
#### 2. Create order
Create a draft order with the customer, the subscriber, and the selected product offering. A
draft order carries no price and no confirmation yet.
```bash
curl -X POST "{BASE_URL}/orders" \
-H "X-API-Key: $API_KEY" \
-H "Content-Type: application/json" \
-d '{
"customer": {
"customerId": "123e4567-e89b-12d3-a456-426614174000"
},
"lineItems": [
{
"type": "SUBSCRIPTION",
"lineItemId": "line-1",
"productOfferingId": "456a789b-cd12-34ef-567g-890123456789",
"subscriber": {
"name": "John Doe",
"email": "john@acme.com"
},
"sim": {
"esim": true
}
}
]
}'
```
See [Create Order](/api-reference/orders.md#tag/orders/POST/orders)
#### 3. Calculate order price
Calculate the taxes and the total for the order before you collect the payment. On a US
purchase, the price is calculated per tax jurisdiction.
```bash
curl -X POST "{BASE_URL}/orders/{orderId}/calculate-price" \
-H "X-API-Key: $API_KEY" \
-H "Content-Type: application/json"
```
See [Calculate Order Price](/api-reference/orders.md#tag/orders/POST/orders/{orderId}/calculate-price)
#### 4. Create payment link
Create a payment link for the order. The amount comes from the calculated price of the order,
so you never send an amount yourself. The link opens a hosted page where the customer pays.
```bash
curl -X POST "{BASE_URL}/payment-links" \
-H "X-API-Key: $API_KEY" \
-H "Content-Type: application/json" \
-d '{
"orderId": "{orderId}",
"returnUrl": "https://yourapp.com/payment/success",
"cancelUrl": "https://yourapp.com/payment/cancel"
}'
```
See [Create Payment Link](/api-reference/payment-links.md#tag/payment-links/POST/payment-links)
#### 5. Submit order
After the payment succeeds, submit the order. The submit locks the price and starts
provisioning.
```bash
curl -X POST "{BASE_URL}/orders/{orderId}/submit" \
-H "X-API-Key: $API_KEY"
```
See [Submit Order](/api-reference/orders.md#tag/orders/POST/orders/{orderId}/submit)
#### 6. Read the result
Get the new subscription and make sure that it is active:
```bash
# Fetch the full subscription details
curl "{BASE_URL}/subscriptions/{subscriptionId}" \
-H "X-API-Key: $API_KEY"
```
You placed your first order on the Seamless OS API.
#### Next steps
- [Conventions](/api-reference/conventions.md) — The design principles and the naming patterns of the API.
- [Authentication](/api-reference/authentication.md) — API keys, user tokens, and how to keep them safe.
- [Payment links](/resources/payment-links.md) — The payment flow in full.
- [Webhooks](/api-reference/webhooks.md) — Configure event notifications for an order.
- [Contact support](https://telnesstech.com/contact) — Write to our support team.
### Choose your integration
Canonical URL: https://docs.telnesstech.com/api-reference/choose-your-integration
You can integrate with the Seamless OS API in three styles. Each style draws the line between
what you own and what we run in a different place. Pick the one that matches your technical
setup and your business model.
#### Integration styles
- [Platform](#platform-integrators) — Seamless OS as the platform: you own the end-user flows (shop, checkout, app), and we run payments and user management.
- [Embedded](#embedded-integrators) — Seamless OS for telecom fulfillment: you own the whole customer experience (users, payments, ordering), and we provide the connectivity.
- [Embedded+](#embedded-integrators-1) — Mix-and-match: you own the journey, and we provide connectivity and the other modules that you select.
---
#### Platform integrators
A `platform` integrator does this:
- Builds and maintains its own checkout, landing pages, and self-service apps.
- Owns the end-user experience, but leaves payments and user management to us.
- Connects its own flows to our backend through the Seamless OS APIs.
Your customers are our customers, and your users are our users. Your frontend calls your own
backend, and your backend calls the Seamless OS API with your API key. An API key never
belongs in frontend code — read [Authentication](/api-reference/authentication.md).
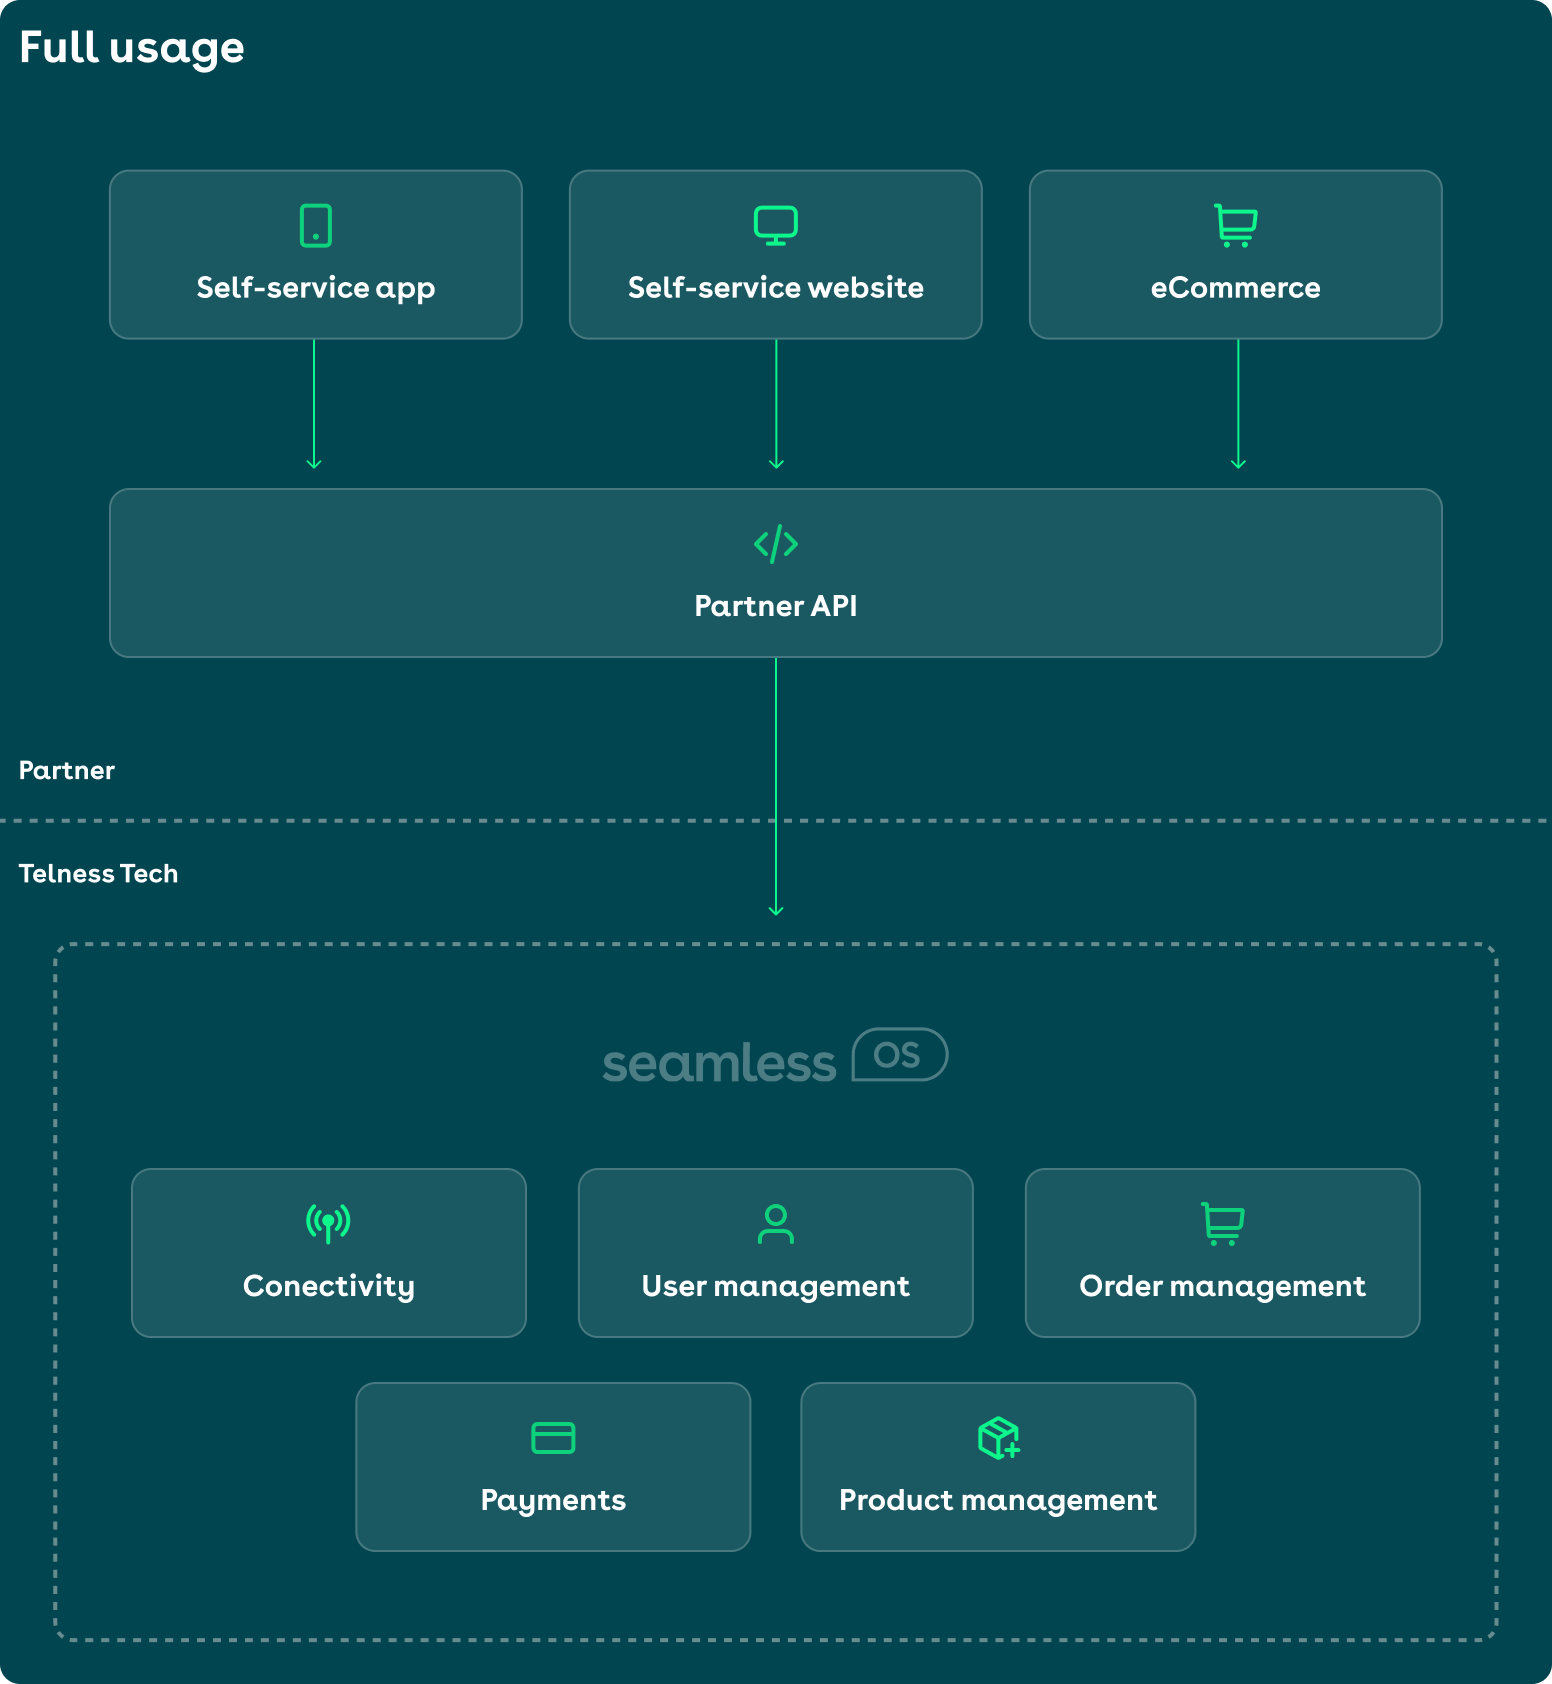
Platform integration example:
---
#### Embedded integrators
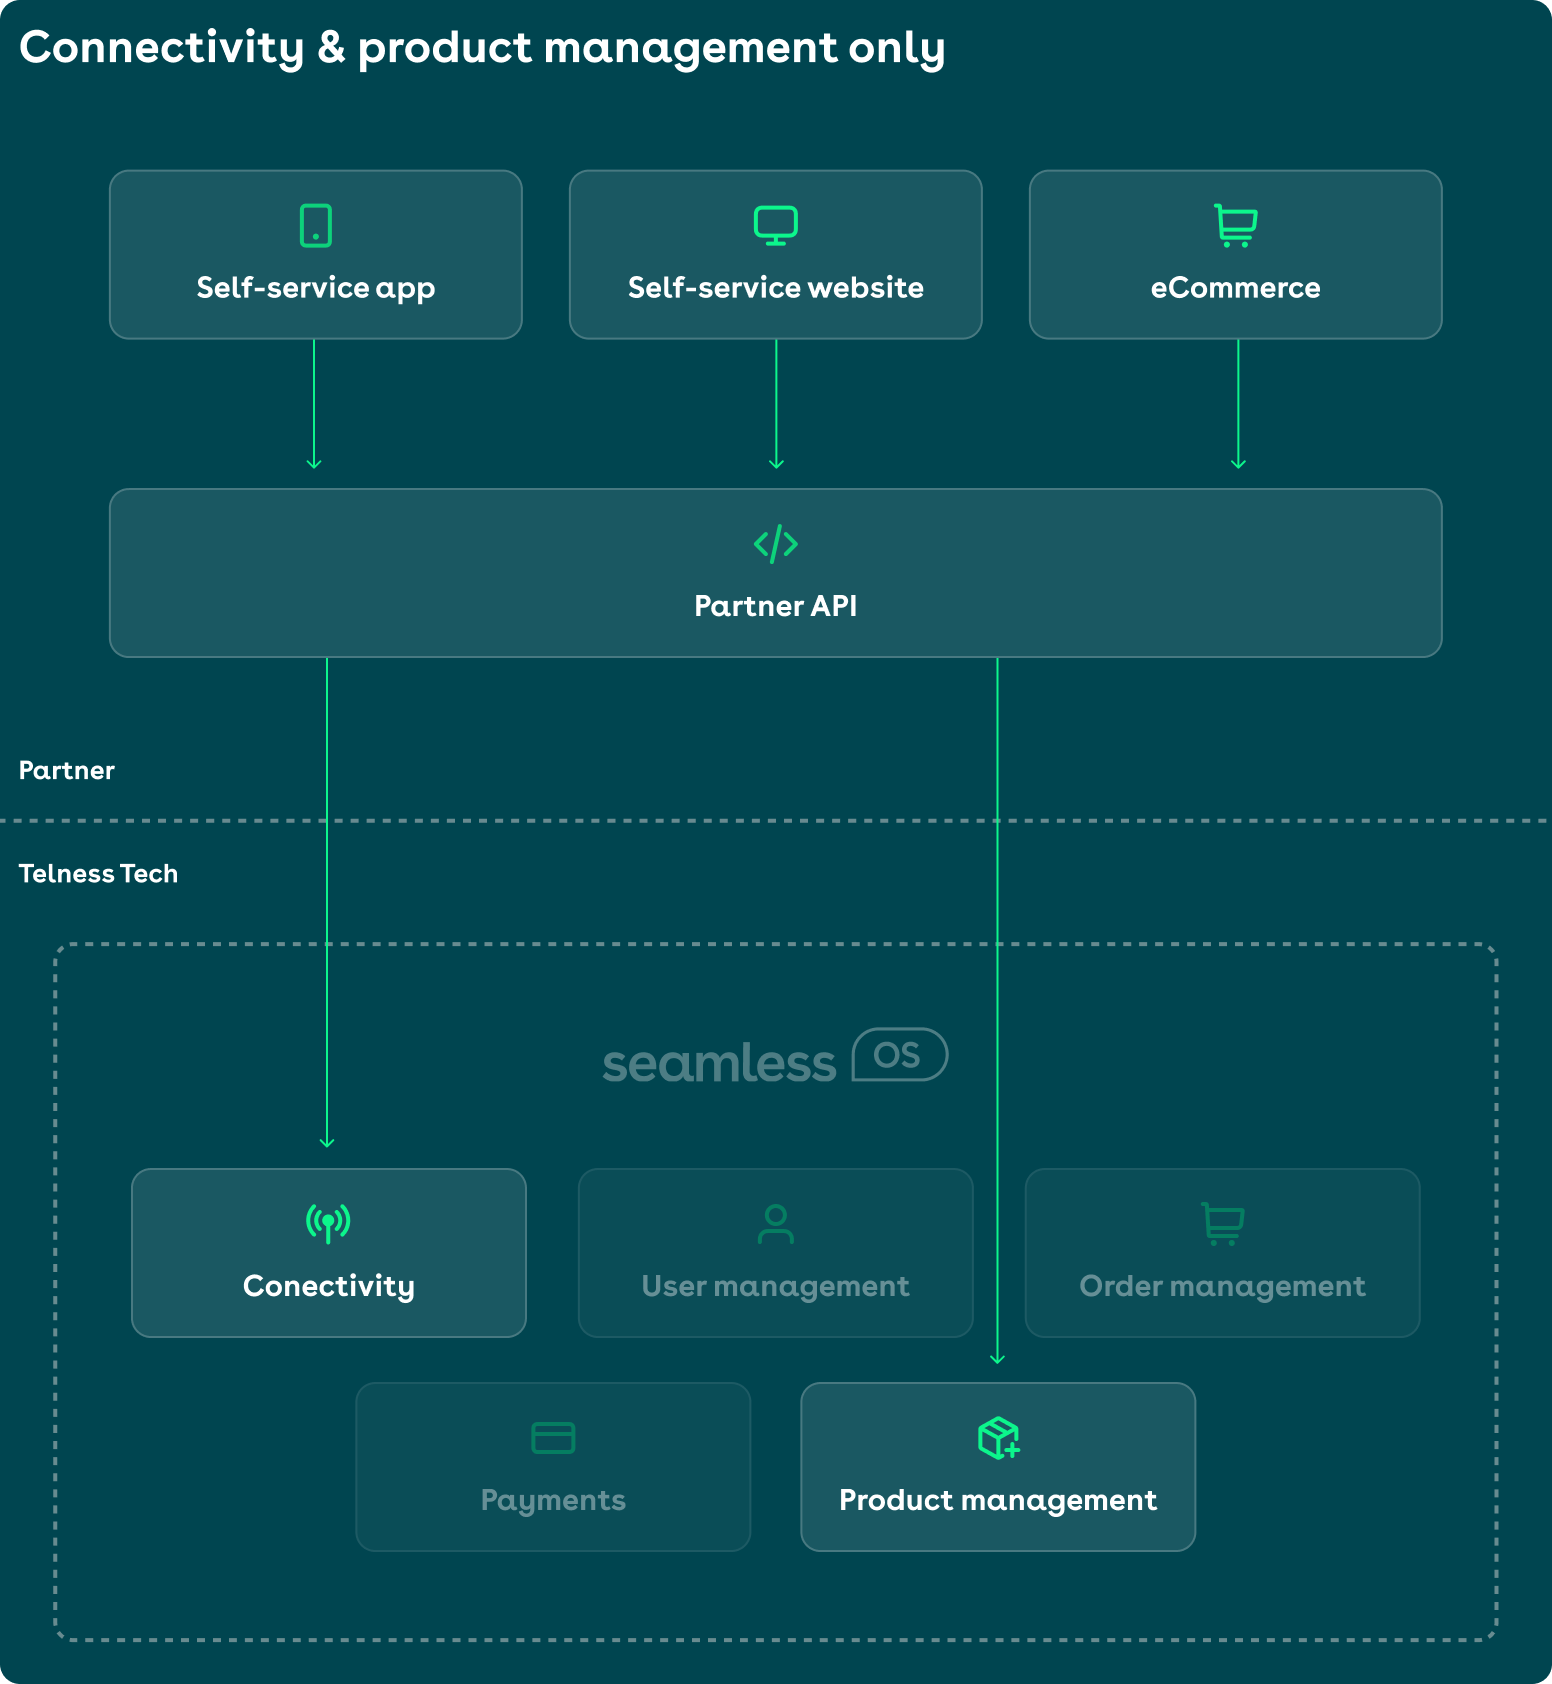
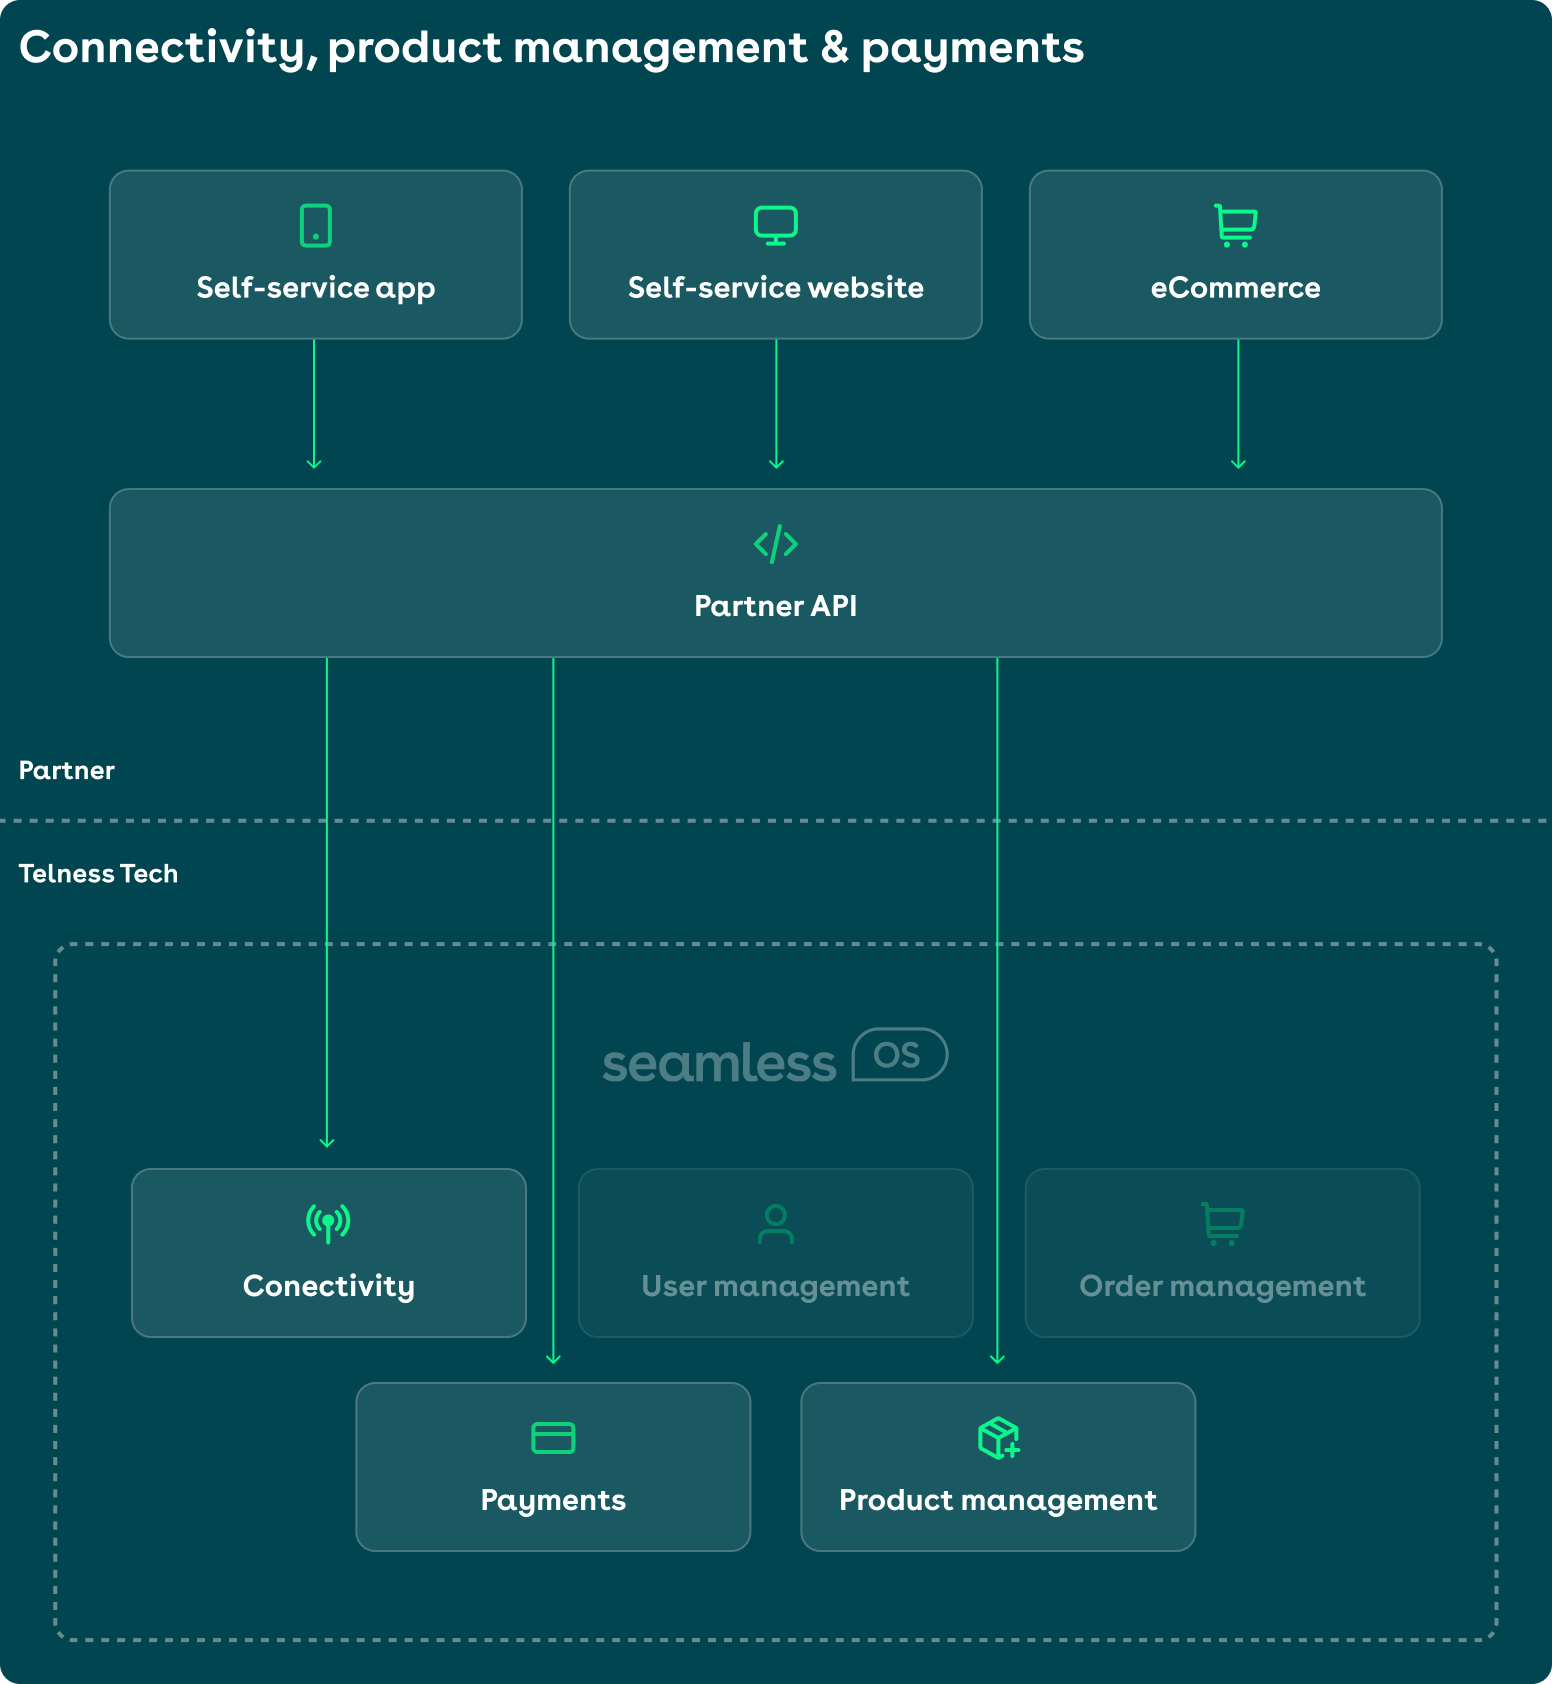
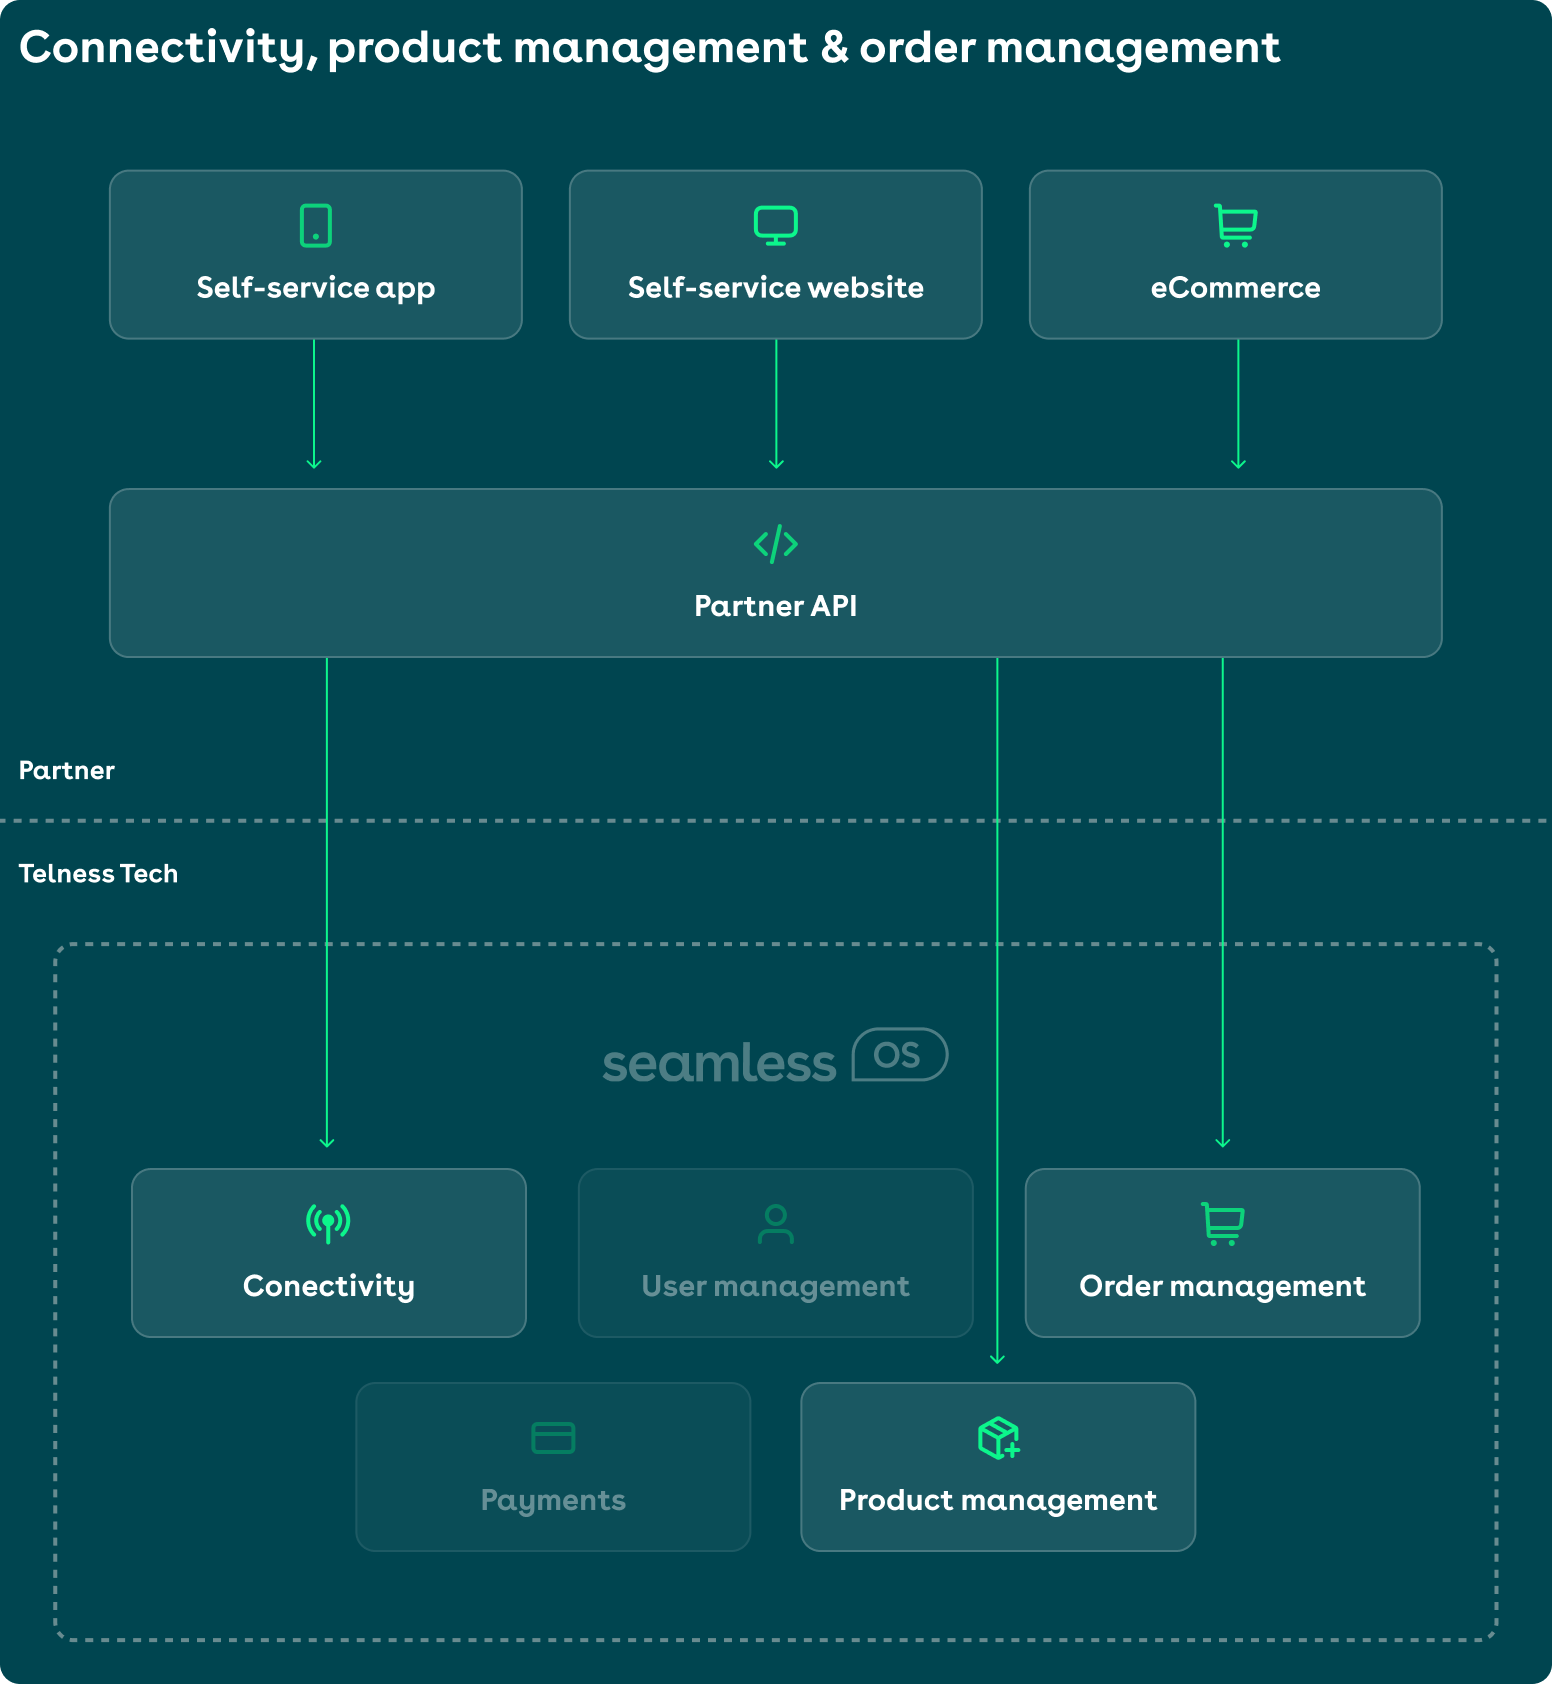
`embedded` and `embedded+` are modular. You select the parts of Seamless OS that you use.
##### Available modules
- **Connectivity** — Subscription management: create, update, delete, upgrade, downgrade, topup, addon, and port-in.
- **User management** — User management: create, update, and delete.
- **Payments** — Our payment APIs take billing and payments off your side.
- **Order management** — Manage customer orders and fulfillment.
- **Product management** — Configure your products and your offers with our product catalog APIs.
##### Example setups
**Connectivity and product management only**
**Connectivity, product management, and payments**
**Connectivity, product management, and order management**
#### Embedded+ integrators
`embedded+` gives you the most control. You own the whole customer journey, and you select the
parts that we run for you.
This is the **mix-and-match integration**. Select connectivity, payments, order management,
product management, or any combination of them.
#### Next steps
- [Get started](/api-reference/get-started.md) — Place your first order with the Seamless OS API.
## Guides
### Place an order
Canonical URL: https://docs.telnesstech.com/developer-guide/use-cases/place-an-order
Orders are the API's shopping cart. You create a draft order, configure it step by step with line items and customer details, price it, and submit it for fulfillment. Until submission, everything is editable — nothing is provisioned and nothing is charged.
This guide takes you through one complete integration. A US consumer, Jane Smith, orders a new
mobile subscription with a new phone number. The subscription is delivered as an eSIM to her
iPhone.
On the way, the guide covers every decision that you meet. An existing customer or a new one.
The pre-order validation tools. The price calculation, the submission requirements, and
cancellation.
#### Prerequisites
You need all of these before you start:
- **API credentials**: Every request carries both an `Authorization: Bearer` access token and an `X-API-Key` header
- **Product offerings**: At least one `AVAILABLE` product offering to sell — see [Product Management](/developer-guide/use-cases/product-management.md)
- **Payment integration**: If your orders require payment, a way to run payment sessions — see [Payment Processing](/developer-guide/use-cases/payment-processing.md)
#### Overview
**1. Choose a product offering**
List product offerings and pick the plan the customer is buying.
**2. Verify customer input with the order tools**
Validate the address, read the network coverage, and make sure that the device supports an eSIM.
Do all three before you build the order.
**3. Create a draft order**
Start an order for an existing customer or create the customer together with the order.
**4. Add a subscription line item**
Attach the product offering, subscriber details, and SIM configuration.
**5. Review the validation state**
Fetch the order and resolve any missing fields or validation errors.
**6. Calculate the price**
Get the exact total including jurisdiction-level US taxes before asking the customer to pay.
**7. Meet the requirements and submit**
Complete payment, payment profile, or signing requirements, then submit the order.
**8. Track the order to completion**
Watch the order state until the subscription is created and activated.
#### The order lifecycle
An order's `state` tells you exactly what you can do with it:
| State | Meaning |
| ------------------ | ------------------------------------------------------------------------------------------------------- |
| `PENDING` | Draft (cart) state. The order can be modified, priced, and submitted. |
| `PENDING_PAYMENT` | The order is locked and awaiting payment completion. |
| `SUBMITTED` | You submitted the order for processing. |
| `PENDING_APPROVAL` | The order needs admin or manager approval through `POST /orders/{orderId}/approve` before it continues. |
| `PROCESSING` | The order is in fulfillment. |
| `COMPLETED` | The order was successfully fulfilled. |
| `CANCELLED` | The order was canceled before completion. |
| `EXPIRED` | The order expired due to inactivity. |
| `FAILED` | Order fulfillment failed. |
> **Note**
>
> A draft order expires. Every order carries an `expiresAt` timestamp, and each update moves it
> forward. A cart that nobody touches goes to `EXPIRED`.
#### Step-by-step implementation
> **Info**
>
> Example responses in this guide are trimmed to the fields relevant to each step. The API always
> returns the complete object.
##### Step 1: Choose a product offering
List the product offerings available to your customer type. The `productOfferingId` you pick here is what you attach to the order's line item. Filter by `types=SUBSCRIPTION` to only see plans that create a mobile subscription.
```bash
curl -X GET "{BASE_URL}/product-offerings?customerType=CONSUMER&types=SUBSCRIPTION" \
-H "Authorization: Bearer YOUR_ACCESS_TOKEN" \
-H "X-API-Key: YOUR_API_KEY"
```
Jane picks the 10 GB plan:
```json
{
"items": [
{
"productOfferingId": "3f2504e0-4f89-41d3-9a0c-0305e82c3301",
"status": "AVAILABLE",
"name": "Seamless 10GB",
"description": "10GB of high-speed data with unlimited calls and texts",
"customerType": "CONSUMER",
"product": {
"productId": "9b2f80c4-6a1d-4e3b-8c5f-7d9e0a1b2c3d",
"internalName": "seamless_cell_10gb_us",
"type": "SUBSCRIPTION",
"category": "PRODUCT_CATEGORY_SUBSCRIPTION_CELL",
"networkProviderId": "tmobile-us",
"features": {
"dataMb": 10240,
"includedCallSeconds": 3600,
"includedSms": 500
}
},
"price": {
"netPriceMinor": 2999,
"currency": "USD",
"priceType": "RECURRING",
"billingCycle": {
"period": "MONTHLY",
"interval": 1
},
"standardDiscount": { "amountMinor": 500 },
"bindingContract": {
"duration": {
"unit": "MONTHS",
"value": 12
},
"discount": {
"amountMinor": 200
}
},
"customUpfrontPayment": {
"billingCycles": 3,
"discount": {
"amountMinor": 300
}
},
"currencyOptionsMinor": {
"USD": 2999,
"SEK": 29900
}
}
}
],
"pagination": {
"nextCursor": null
}
}
```
##### Step 2: Verify customer input with the order tools
With the order tools you validate customer input at form time, before it becomes a validation error on the order. All four are stateless `POST` endpoints — call them as often as you like.
###### Validate the service address
In the US, the subscriber's address doubles as the E911 emergency address, so it must be precise. Validate it as soon as the customer types it.
```bash
curl -X POST "{BASE_URL}/tools/validate-address" \
-H "Authorization: Bearer YOUR_ACCESS_TOKEN" \
-H "X-API-Key: YOUR_API_KEY" \
-H "Content-Type: application/json" \
-d '{
"address": {
"street1": "826 Valencia St",
"city": "San Francisco",
"state": "CA",
"zip": "94110",
"country": "US"
}
}'
```
```json
{
"valid": true
}
```
> **Note**
>
> A response can carry a `suggestedAddress` for a valid input, when the network registry holds a
> more exact form of the address. Take that form. The formatting of the network prevents a
> provisioning fault later.
###### Check network coverage
Make sure that the customer gets service at their address. Show them the quality to expect on each technology.
```bash
curl -X POST "{BASE_URL}/tools/check-network-coverage" \
-H "Authorization: Bearer YOUR_ACCESS_TOKEN" \
-H "X-API-Key: YOUR_API_KEY" \
-H "Content-Type: application/json" \
-d '{
"address": {
"street1": "826 Valencia St",
"city": "San Francisco",
"state": "CA",
"zip": "94110",
"country": "US"
}
}'
```
The `coverageLevel` is one of `EXCELLENT`, `GOOD`, `FAIR`, `POOR`, or `NO_COVERAGE`:
```json
{
"address": {
"street1": "826 Valencia St",
"city": "San Francisco",
"state": "CA",
"zip": "94110",
"country": "US"
},
"coverageLevel": "EXCELLENT",
"networkProviderId": "tmobile-us"
}
```
###### Check device eSIM support
Jane wants an eSIM, so look up the IMEI of her phone. The response says whether the device supports an eSIM. Some networks also need the IMEI later, to activate the eSIM, so collect it now.
```bash
curl -X POST "{BASE_URL}/tools/get-device-info" \
-H "Authorization: Bearer YOUR_ACCESS_TOKEN" \
-H "X-API-Key: YOUR_API_KEY" \
-H "Content-Type: application/json" \
-d '{
"imei": "356938035643809"
}'
```
```json
{
"imei": "356938035643809",
"tac": "35693803",
"esim": true,
"manufacturer": "Apple",
"model": "A2653",
"marketingName": "iPhone 15 Pro"
}
```
###### Check porting eligibility (port-ins only)
Jane takes a new number, so this step does not apply to her. If your customer wants to bring
their own number, make sure that the number is portable before you collect the porting
details.
```bash
curl -X POST "{BASE_URL}/tools/check-porting-eligibility" \
-H "Authorization: Bearer YOUR_ACCESS_TOKEN" \
-H "X-API-Key: YOUR_API_KEY" \
-H "Content-Type: application/json" \
-d '{
"msisdn": "+14155550188"
}'
```
```json
{
"msisdn": "+14155550188",
"eligible": true,
"networkProviderId": "att-us"
}
```
##### Step 3: Create a draft order
Every order needs a `customerType` (`CONSUMER` or `BUSINESS`). Everything else can be added later, but the `customer` field is where you make your first real decision:
- **Existing customer** — pass `"customer": { "customerId": "..." }`. The `customerId` accepts
the internal UUID and your own external reference ID. An external reference ID needs the
`rid_` prefix, as in `rid_crm-customer-12345`, so that the API can tell it from a UUID.
- **New customer** — pass the details of the customer. `name` and `customerType` are required.
The API creates the customer as part of order fulfillment. If you also pass a `referenceId`
that a customer already carries, the API takes that customer and creates no duplicate. You
can call this from a flow that does not know whether the customer exists.
The `user` field names the person who uses the services. It follows the same pattern. Pass
`userId` for a returning user, or `name` and `email` to create one.
Jane is new, so we create both the customer and the user with the order:
```bash
curl -X POST "{BASE_URL}/orders" \
-H "Authorization: Bearer YOUR_ACCESS_TOKEN" \
-H "X-API-Key: YOUR_API_KEY" \
-H "Content-Type: application/json" \
-d '{
"customerType": "CONSUMER",
"customer": {
"name": "Jane Smith",
"customerType": "CONSUMER",
"referenceId": "crm-cust-84321",
"contact": {
"email": "jane.smith@example.com",
"msisdn": "+14155550123"
},
"billing": {
"method": "EMAIL_INVOICE",
"email": "jane.smith@example.com",
"currency": "USD",
"address": {
"street1": "826 Valencia St",
"city": "San Francisco",
"state": "CA",
"zip": "94110",
"country": "US"
}
}
},
"user": {
"name": "Jane Smith",
"email": "jane.smith@example.com",
"msisdn": "+14155550123"
},
"billing": {
"name": "Jane Smith",
"email": "jane.smith@example.com",
"address": {
"street1": "826 Valencia St",
"city": "San Francisco",
"state": "CA",
"zip": "94110",
"country": "US"
}
}
}'
```
The response is a draft order in `PENDING` state. Note `newCustomer: true` — the customer record itself is created during fulfillment, so it has no `customerId` yet:
```json
{
"orderId": "296af5b6-f3b3-4128-b307-5ddc9190502f",
"state": "PENDING",
"customer": {
"customerType": "CONSUMER",
"name": "Jane Smith",
"newCustomer": true
},
"user": {
"userId": "c47ac10b-58cc-4372-a567-0e02b2c3d479",
"name": "Jane Smith",
"newUser": true
},
"lineItems": [],
"validation": {
"isValid": false,
"missingFields": ["lineItems"]
},
"requirements": {
"requiresPayment": "REQUIRED",
"requiresPaymentProfile": "NOT_REQUIRED",
"requiresSigning": "NOT_REQUIRED"
},
"createdAt": "2026-07-12T17:00:00Z",
"updatedAt": "2026-07-12T17:00:00Z",
"expiresAt": "2026-07-19T17:00:00Z"
}
```
For an existing customer, the request collapses to:
```json
{
"customerType": "CONSUMER",
"customer": {
"customerId": "b47ac10b-58cc-4372-a567-0e02b2c3d479"
}
}
```
> **Note**
>
> You can also pass initial `lineItems` and a `promoCode` directly in the create request. This guide
> adds line items separately to show the progressive flow, but a single create call with everything
> inline is equally valid.
##### Step 4: Add a subscription line item
Add the plan to the order with `POST /orders/{orderId}/line-items`. A `SUBSCRIPTION` line item requires `type`, a `lineItemId` you choose (unique within the order), and the `productOfferingId`. The `subscriber` and `sim` objects are required eventually — provide them here or fill them in later with an update.
For the phone number, you have three options:
- **Leave `msisdn` empty** to have a number assigned automatically (what Jane does).
- **Pick a number from the number pool** and pass both the `msisdn` and the `leaseToken` you received when leasing it.
- **Port in an existing number** by setting the `msisdn`, `portingRequested: true`, and `porting.details`.
```bash
curl -X POST "{BASE_URL}/orders/296af5b6-f3b3-4128-b307-5ddc9190502f/line-items" \
-H "Authorization: Bearer YOUR_ACCESS_TOKEN" \
-H "X-API-Key: YOUR_API_KEY" \
-H "Content-Type: application/json" \
-d '{
"lineItem": {
"type": "SUBSCRIPTION",
"lineItemId": "line-item-1",
"productOfferingId": "3f2504e0-4f89-41d3-9a0c-0305e82c3301",
"subscriber": {
"name": "Jane Smith",
"email": "jane.smith@example.com",
"address": {
"street1": "826 Valencia St",
"city": "San Francisco",
"state": "CA",
"zip": "94110",
"country": "US"
}
},
"sim": {
"esim": true,
"imei": "356938035643809"
}
}
}'
```
The response echoes the line item with its server-resolved fulfillment `status`:
```json
{
"type": "SUBSCRIPTION",
"lineItemId": "line-item-1",
"productOfferingId": "3f2504e0-4f89-41d3-9a0c-0305e82c3301",
"subscriber": {
"name": "Jane Smith",
"email": "jane.smith@example.com",
"address": {
"street1": "826 Valencia St",
"city": "San Francisco",
"state": "CA",
"zip": "94110",
"country": "US"
}
},
"sim": {
"esim": true,
"imei": "356938035643809"
},
"status": "PENDING"
}
```
A line item for a port-in looks like this instead. US porting details require `firstName`,
`lastName`, and `address`. With `tempNumber: true` the customer gets a temporary number to use
until the port completes.
```json
{
"type": "SUBSCRIPTION",
"lineItemId": "line-item-1",
"productOfferingId": "3f2504e0-4f89-41d3-9a0c-0305e82c3301",
"msisdn": "+14155550188",
"portingRequested": true,
"tempNumber": true,
"porting": {
"details": {
"firstName": "Jane",
"lastName": "Smith",
"accountNumber": "7724318842",
"passcode": "4821",
"address": {
"street1": "826 Valencia St",
"city": "San Francisco",
"state": "CA",
"zip": "94110",
"country": "US"
}
}
},
"subscriber": {
"name": "Jane Smith",
"email": "jane.smith@example.com"
},
"sim": {
"esim": true,
"imei": "356938035643809"
}
}
```
To change a line item while the order is still `PENDING`, use `PUT
/orders/{orderId}/line-items/{lineItemId}`. To remove one, use `DELETE
/orders/{orderId}/line-items/{lineItemId}`.
> **Warning**
>
> If the order carries anything to ship, add a `shipping` object with a recipient `name` and
> `address`. A physical SIM (`"esim": false`) and hardware both ship. Jane takes an eSIM, so this
> order needs no `shipping` object.
##### Step 5: Review the order's validation state
Line items are returned as part of the order, so `GET /orders/{orderId}` is your single read for everything: line items, validation, requirements, and pricing.
```bash
curl -X GET "{BASE_URL}/orders/296af5b6-f3b3-4128-b307-5ddc9190502f" \
-H "Authorization: Bearer YOUR_ACCESS_TOKEN" \
-H "X-API-Key: YOUR_API_KEY"
```
Jane's order is now complete and ready to submit:
```json
{
"orderId": "296af5b6-f3b3-4128-b307-5ddc9190502f",
"state": "PENDING",
"customer": {
"customerType": "CONSUMER",
"name": "Jane Smith",
"newCustomer": true
},
"lineItems": [
{
"type": "SUBSCRIPTION",
"lineItemId": "line-item-1",
"productOfferingId": "3f2504e0-4f89-41d3-9a0c-0305e82c3301",
"sim": {
"esim": true,
"imei": "356938035643809"
},
"status": "PENDING"
}
],
"validation": {
"isValid": true
},
"requirements": {
"requiresPayment": "REQUIRED",
"requiresPaymentProfile": "NOT_REQUIRED",
"requiresSigning": "NOT_REQUIRED"
},
"createdAt": "2026-07-12T17:00:00Z",
"updatedAt": "2026-07-12T17:04:00Z",
"expiresAt": "2026-07-19T17:04:00Z"
}
```
When something is missing, `validation` tells you exactly what, at both the order level and per line item:
```json
{
"isValid": false,
"missingFields": ["billing.address"],
"lineItemValidation": [
{
"lineItemId": "line-item-1",
"isValid": false,
"missingFields": ["subscriber.name", "sim.iccid"]
}
]
}
```
Fix missing fields with `PUT /orders/{orderId}` (order details) and `PUT /orders/{orderId}/line-items/{lineItemId}` (line item details), then re-fetch.
##### Step 6: Calculate the price
On a US order the platform calculates the tax per jurisdiction, from the addresses on the
order. Call `POST /orders/{orderId}/calculate-price` to get the exact amount due before you
collect the payment. The call takes no request body. The result is cached, so a second call on
an unchanged order returns the same numbers.
```bash
curl -X POST "{BASE_URL}/orders/296af5b6-f3b3-4128-b307-5ddc9190502f/calculate-price" \
-H "Authorization: Bearer YOUR_ACCESS_TOKEN" \
-H "X-API-Key: YOUR_API_KEY"
```
```json
{
"pricing": {
"subtotalMinor": 2999,
"taxAmountMinor": 450,
"totalMinor": 2749,
"taxIncluded": false,
"currency": "USD",
"recurringCosts": {
"subtotalMinor": 2299,
"totalMinor": 2299,
"taxIncluded": false,
"billingCycle": {
"period": "MONTHLY",
"interval": 1
}
},
"lineItems": [
{
"lineItemId": "line-item-1",
"description": "Seamless 10GB",
"subtotalMinor": 2999,
"discounts": [
{ "name": "Standard discount", "amountMinor": 500 },
{ "name": "12-month commitment", "amountMinor": 200 }
],
"totalDiscountsMinor": 700,
"taxAmountMinor": 450,
"taxIncluded": false,
"totalMinor": 2749,
"recurringAmountMinor": 2299
}
],
"calculatedAt": "2026-07-12T17:05:00Z"
}
}
```
This is where the discounts of the offering turn into money. The catalog listed Seamless 10GB
at `2999` in Step 1, and it still does. Here that `2999` is the `subtotalMinor`. The
`standardDiscount` and the `bindingContract.discount` of the offering come off as
`totalDiscountsMinor`. The platform calculates the tax on what is left, and `totalMinor` is the
amount to charge.
Three more discounts apply at this same point. A promo code on the order. A price list
assigned to the customer. A discount on the subscription.
> **Note**
>
> The platform cannot price an invalid order. If this operation returns an error, get the order and
> correct the `validation` problems first.
Amounts are integers in the minor units of `currency`, so `2749` is $27.49. The `subtotalMinor`
field gives the amount before discounts and tax. The platform reports the discounts of each line
item, so the total is `2999`, less the `700` of `totalDiscountsMinor`, plus the `450` of tax.
In the US, `recurringCosts` does not include `taxAmountMinor`. The platform calculates the tax on
a recurring charge when it makes the invoice. It does not estimate that tax here.
##### Step 7: Meet the submission requirements and submit
The `requirements` object of the order tells you what must happen before you submit it. Each
requirement is `NOT_REQUIRED`, `OPTIONAL`, or `REQUIRED`. What you get depends on the platform
configuration and on the contents of the order. A prepaid order of free items alone can need
nothing. A postpaid order normally requires a card capture or a signature.
| Requirement | When `REQUIRED` | Provide on submit |
| ------------------------ | ---------------------------------------------------- | ---------------------------------------------------------------------------------------- |
| `requiresPayment` | The order total must be paid before fulfillment | an `externalPayment` reference, or pay through a payment session — no submit call needed |
| `requiresPaymentProfile` | A stored payment method is needed for future billing | `paymentProfileSessionId` from a completed profile session |
| `requiresSigning` | The customer must digitally sign the order | `signingSessionId` from a completed signing session |
[Payment processing](/developer-guide/use-cases/payment-processing.md) covers how to create and
complete a payment session and a payment profile session. The [API reference](/api-reference.md)
documents a signing session.
An order that pays through a payment session or a payment link moves to `PENDING_PAYMENT`. The
platform submits it as soon as the payment succeeds. If the customer paid outside the platform,
pass an `externalPayment` object on submit, with a `reference` in it. The order then counts as
paid.
Jane's order has `requiresPayment: "REQUIRED"` and she pays through a hosted payment session, so there is no submit call to make. Once her payment succeeds, the platform submits the order — poll it until it leaves `PENDING_PAYMENT`:
```bash
curl "{BASE_URL}/orders/296af5b6-f3b3-4128-b307-5ddc9190502f" \
-H "Authorization: Bearer YOUR_ACCESS_TOKEN" \
-H "X-API-Key: YOUR_API_KEY"
```
```json
{
"orderId": "296af5b6-f3b3-4128-b307-5ddc9190502f",
"state": "SUBMITTED",
"paymentSessionId": "a1b2c3d4-e5f6-7890-1234-56789abcdef0",
"submittedAt": "2026-07-12T17:08:00Z"
}
```
The submit endpoint accepts an order in the `PENDING` state only, and a payment can start on a
complete order only. A payment session and a payment link run the same validation as a submit,
so an order in `PENDING_PAYMENT` is known to be submittable already. Call submit yourself when
the requirements are met outside a payment session: an `externalPayment` reference, a payment
profile session, or a signing session.
##### Step 8: Track the order to completion
After the submit, the order moves through `SUBMITTED` → `PROCESSING` → `COMPLETED`. It can
also go to `PENDING_APPROVAL` or `FAILED` on the way. Poll `GET /orders/{orderId}` for the
state. To poll nothing, subscribe to the `order.statusChanged` and
`order.lineItemStatusChanged` webhook events.
```bash
curl -X GET "{BASE_URL}/orders/296af5b6-f3b3-4128-b307-5ddc9190502f" \
-H "Authorization: Bearer YOUR_ACCESS_TOKEN" \
-H "X-API-Key: YOUR_API_KEY"
```
On completion, `createdEntities` maps each line item to what it produced — Jane's subscription, with her newly assigned number:
```json
{
"orderId": "296af5b6-f3b3-4128-b307-5ddc9190502f",
"state": "COMPLETED",
"customer": {
"customerId": "b47ac10b-58cc-4372-a567-0e02b2c3d479",
"customerType": "CONSUMER",
"name": "Jane Smith",
"newCustomer": true
},
"lineItems": [
{
"type": "SUBSCRIPTION",
"lineItemId": "line-item-1",
"productOfferingId": "3f2504e0-4f89-41d3-9a0c-0305e82c3301",
"status": "COMPLETED"
}
],
"createdEntities": {
"subscriptions": [
{
"subscriptionId": "d5f7a2b1-3c4e-4f5a-8b9c-0d1e2f3a4b5c",
"status": "ACTIVATED",
"msisdn": "+14155550111",
"display": "(415) 555-0111",
"createdByLineItem": "line-item-1"
}
]
},
"submittedAt": "2026-07-12T17:08:00Z",
"completedAt": "2026-07-12T17:11:00Z"
}
```
> **Warning**
>
> Read the `status` of every line item before you tell the customer that the service is live. Each
> line item carries its own fulfillment `status`: `PENDING`, `RUNNING`, `COMPLETED`, or `FAILED`. An
> order reaches `COMPLETED` even when one line item is still `RUNNING` or already `FAILED`, because
> one failed item does not block the others.
##### Canceling a draft order
If the customer abandons the purchase, cancel the order. The cancel releases the resources that
the order reserved. Only an order in the `PENDING` state can be canceled. The optional body
accepts `metadata` for your own bookkeeping. An abandoned order that nobody cancels expires by
itself at its `expiresAt`.
```bash
curl -X POST "{BASE_URL}/orders/296af5b6-f3b3-4128-b307-5ddc9190502f/cancel" \
-H "Authorization: Bearer YOUR_ACCESS_TOKEN" \
-H "X-API-Key: YOUR_API_KEY" \
-H "Content-Type: application/json" \
-d '{
"metadata": {
"reason": "customer abandoned checkout"
}
}'
```
```json
{
"orderId": "296af5b6-f3b3-4128-b307-5ddc9190502f",
"state": "CANCELLED"
}
```
#### Error handling
All order endpoints return a consistent error body with a human-readable `message`, a machine-readable `code`, optional per-field `details`, and a `hint` for resolution:
```json
{
"message": "Order cannot be submitted",
"code": "failed_precondition",
"details": [
{
"message": "A completed payment session is required to submit this order",
"code": "missing_payment_session",
"property": "paymentSessionId"
}
],
"hint": "Fetch the order to review its validation state and requirements, then retry."
}
```
Your order flow must handle these statuses:
| Status | When it happens |
| ------ | ----------------------------------------------------------------------------------------------------------------------------------------------------------------------- |
| `400` | Malformed request — inspect `details` for the offending property. |
| `401` | Missing or expired access token. |
| `403` | The API key or token does not grant access to this resource. |
| `404` | Unknown `orderId` or `lineItemId`. |
| `409` | The order is not in a state that allows the operation — for example, modifying or canceling an order after submission. |
| `412` | Submission preconditions are not met — the order is invalid or a `REQUIRED` requirement is unfulfilled. Re-fetch the order and inspect `validation` and `requirements`. |
| `429` | Rate limited — back off and retry. |
| `500` | Unexpected server error — safe to retry. |
Every order endpoint that changes something accepts an `X-Idempotency-Key` header. Send one
unique key per logical operation, and a retry becomes safe. The same key on the same request
returns the original result. The same key on a modified request gets a `409`. A key expires
after 24 hours.
#### Next steps
- [Order fulfillment](/developer-guide/use-cases/order-fulfillment.md) — Follow the order after submission: provisioning, activation, and fulfillment monitoring
- [Payment processing](/developer-guide/use-cases/payment-processing.md) — Create payment sessions and payment profiles to satisfy order requirements
### Order fulfillment
Canonical URL: https://docs.telnesstech.com/developer-guide/use-cases/order-fulfillment
Automate the complete order fulfillment process from order submission to service activation. This use case covers the workflows needed to provision telecommunications services, handle payments, and activate subscriptions for customers.
#### Prerequisites
You need all of these before you start:
- **Order management**: Understanding of order creation and submission flows
- **Payment processing**: Integration with payment collection systems
- **Service provisioning**: Access to subscription and license management endpoints
- **Inventory management**: Phone number inventory for mobile services
#### Overview
Order fulfillment encompasses the complete process after order creation:
1. Submit orders for processing
2. Handle payment collection and validation
3. Provision services and create subscriptions
4. Activate services and manage inventory
5. Monitor fulfillment status and handle exceptions
#### Step-by-step implementation
##### Step 1: Submit Order for Fulfillment
Transform draft orders into submitted orders ready for processing:
```bash
# Submit order for fulfillment
curl -X POST "{BASE_URL}/orders/{orderId}/submit" \
-H "Authorization: Bearer YOUR_ACCESS_TOKEN" \
-H "X-API-Key: YOUR_API_KEY" \
-H "Content-Type: application/json"
# Monitor order status
curl -X GET "{BASE_URL}/orders/{orderId}" \
-H "Authorization: Bearer YOUR_ACCESS_TOKEN" \
-H "X-API-Key: YOUR_API_KEY" \
-H "Content-Type: application/json"
```
##### Step 2: Handle payment collection
Create payment sessions to collect payment for orders:
```bash
# Create payment session
curl -X POST "{BASE_URL}/payment-sessions" \
-H "Authorization: Bearer YOUR_ACCESS_TOKEN" \
-H "X-API-Key: YOUR_API_KEY" \
-H "Content-Type: application/json" \
-d '{
"orderId": "296af5b6-f3b3-4128-b307-5ddc9190502f",
"paymentProvider": "STRIPE",
"hosted": true,
"returnUrl": "https://yourstore.com/success",
"cancelUrl": "https://yourstore.com/cancel"
}'
# Check payment status
curl -X GET "{BASE_URL}/payment-sessions/{paymentSessionId}" \
-H "Authorization: Bearer YOUR_ACCESS_TOKEN" \
-H "X-API-Key: YOUR_API_KEY" \
-H "Content-Type: application/json"
```
##### Step 3: Reserve phone numbers (for mobile services)
Reserve phone numbers from inventory before service activation:
```bash
# Lease phone numbers
curl -X POST "{BASE_URL}/inventory/lease-numbers" \
-H "Authorization: Bearer YOUR_ACCESS_TOKEN" \
-H "X-API-Key: YOUR_API_KEY" \
-H "Content-Type: application/json" \
-d '{
"quantity": 1,
"region": "SE",
"numberType": "mobile",
"preferences": {
"areaCode": "08"
}
}'
```
##### Step 4: Activate subscriptions
Activate subscription services after successful payment:
```bash
# List subscriptions for order
curl -X GET "{BASE_URL}/subscriptions?orderId={orderId}" \
-H "Authorization: Bearer YOUR_ACCESS_TOKEN" \
-H "X-API-Key: YOUR_API_KEY" \
-H "Content-Type: application/json"
# Activate subscription
curl -X POST "{BASE_URL}/subscriptions/{subscriptionId}/activate" \
-H "Authorization: Bearer YOUR_ACCESS_TOKEN" \
-H "X-API-Key: YOUR_API_KEY" \
-H "Content-Type: application/json" \
-d '{
"activationDate": "2024-01-15T10:00:00Z"
}'
```
#### Error handling and retry logic
Handle common fulfillment scenarios with proper error handling:
```javascript
// Comprehensive error handling for fulfillment
const handleFulfillmentError = async (error, orderId, step) => {
console.error(`Fulfillment error at step ${step}:`, error.message);
const errorHandling = {
payment_failed: {
action: 'retry_payment',
message: 'Payment collection failed - customer needs to retry payment',
},
inventory_unavailable: {
action: 'wait_inventory',
message: 'Phone numbers unavailable - waiting for inventory replenishment',
},
activation_failed: {
action: 'manual_review',
message: 'Service activation failed - requires manual intervention',
},
network_error: {
action: 'retry_with_backoff',
message: 'Network connectivity issue - will retry automatically',
},
};
const handling = errorHandling[error.code] || {
action: 'escalate',
message: 'Unknown error - escalating to support',
};
// Log error for monitoring
await logFulfillmentError(orderId, step, error, handling);
// Take appropriate action
switch (handling.action) {
case 'retry_payment':
return await createPaymentSession(orderId);
case 'wait_inventory':
return await retryWithBackoff(() => processStep(orderId, step));
case 'retry_with_backoff':
return await retryWithBackoff(() => processStep(orderId, step));
case 'manual_review':
return await escalateToSupport(orderId, error);
default:
throw error;
}
};
// Retry with exponential backoff
const retryWithBackoff = async (operation, maxRetries = 3) => {
for (let attempt = 1; attempt <= maxRetries; attempt++) {
try {
return await operation();
} catch (error) {
if (attempt === maxRetries) throw error;
const delay = Math.pow(2, attempt) * 1000; // Exponential backoff
console.log(`Retry attempt ${attempt} failed, waiting ${delay}ms`);
await new Promise((resolve) => setTimeout(resolve, delay));
}
}
};
```
#### Webhook Integration
Set up webhooks to handle asynchronous fulfillment events:
```javascript
// Webhook handler for fulfillment events
const handleFulfillmentWebhook = (event) => {
switch (event.type) {
case 'order.submitted':
console.log('Order submitted:', event.data.orderId);
// Start fulfillment process
return initiateFulfillment(event.data.orderId);
case 'payment.completed':
console.log('Payment completed:', event.data.paymentId);
// Proceed with service activation
return processServiceActivation(event.data.orderId);
case 'subscription.activated':
console.log('Subscription activated:', event.data.subscriptionId);
// Send welcome notifications
return sendActivationNotification(event.data);
case 'fulfillment.completed':
console.log('Fulfillment completed:', event.data.orderId);
// Final cleanup and customer notification
return completeFulfillmentNotification(event.data);
case 'fulfillment.failed':
console.error('Fulfillment failed:', event.data);
// Handle fulfillment failure
return handleFulfillmentFailure(event.data);
default:
console.log('Unknown webhook event:', event.type);
}
};
// Express webhook endpoint example
app.post('/webhooks/connect', express.raw({ type: 'application/json' }), (req, res) => {
const event = JSON.parse(req.body);
try {
handleFulfillmentWebhook(event);
res.status(200).send('OK');
} catch (error) {
console.error('Webhook handling failed:', error);
res.status(500).send('Internal Server Error');
}
});
```
#### Complete fulfillment workflow
Put the steps together in one fulfillment orchestrator:
```javascript
// Complete fulfillment orchestrator
class OrderFulfillmentOrchestrator {
async processOrder(orderId) {
try {
console.log(`Starting fulfillment for order: ${orderId}`);
// Step 1: Submit order
const submittedOrder = await this.submitOrder(orderId);
// Step 2: Handle payment
const paymentSession = await this.createPaymentSession(orderId);
await this.waitForPaymentCompletion(paymentSession.paymentSessionId);
// Step 3: Reserve resources
const resources = await this.reserveResources(submittedOrder);
// Step 4: Activate services
const subscriptions = await this.activateServices(orderId);
// Step 5: Complete fulfillment
await this.completeFulfillment(orderId, subscriptions);
console.log(`Fulfillment completed successfully for order: ${orderId}`);
return { success: true, subscriptions };
} catch (error) {
console.error(`Fulfillment failed for order ${orderId}:`, error);
await this.handleFulfillmentError(error, orderId);
throw error;
}
}
async waitForPaymentCompletion(paymentSessionId, timeout = 300000) {
const startTime = Date.now();
while (Date.now() - startTime < timeout) {
const session = await this.checkPaymentStatus(paymentSessionId);
if (session.status === 'completed') {
return session;
} else if (session.status === 'failed' || session.status === 'cancelled') {
throw new Error(`Payment ${session.status}: ${session.failureReason}`);
}
// Poll every 5 seconds
await new Promise((resolve) => setTimeout(resolve, 5000));
}
throw new Error('Payment completion timeout');
}
async reserveResources(order) {
const resources = {};
// Reserve phone numbers for mobile services
for (const lineItem of order.lineItems) {
if (lineItem.productType === 'mobile') {
const phoneNumber = await this.leasePhoneNumbers({
quantity: 1,
region: order.customer.region,
});
resources[lineItem.lineItemId] = phoneNumber;
}
}
return resources;
}
}
// Usage example
const fulfillmentOrchestrator = new OrderFulfillmentOrchestrator();
// Process order fulfillment
fulfillmentOrchestrator
.processOrder('296af5b6-f3b3-4128-b307-5ddc9190502fe4567-e89b-12d3-a456-426614174000')
.then((result) => console.log('Fulfillment successful:', result))
.catch((error) => console.error('Fulfillment failed:', error));
```
#### Best practices
##### Fulfillment monitoring
- Log every fulfillment step.
- Set up alerts for failed fulfillments or unusual delays
- Track fulfillment metrics (completion time, success rate, failure reasons)
- Use correlation IDs to trace orders through the entire process
##### Resource management
- Reserve inventory (phone numbers) early in the process
- Implement inventory validation before order submission
- Handle inventory exhaustion gracefully with customer communication
- Clean up reserved resources if fulfillment fails
##### Payment handling
- Validate payment completion before service activation
- Implement payment retry mechanisms for failed transactions
- Handle partial payments appropriately
- Secure payment session data and comply with PCI standards
#### Next steps
After implementing order fulfillment:
- [Customer self-service](/developer-guide/use-cases/self-management.md) — A customer manages their own subscriptions and services
- [Payment processing](/developer-guide/use-cases/payment-processing.md) — Set up recurring billing and ongoing payment management
#### Common questions
**Q: How long does typical fulfillment take?**
A: The fulfillment time depends on the service type. A mobile service activates in 15 to 30 minutes. A specialized service can take longer.
**Q: What happens if payment fails during fulfillment?**
A: The order remains in a pending state. Payment sessions can be retried, or new payment methods can be collected.
**Q: Can I customize the fulfillment workflow?**
A: Yes, you can implement custom fulfillment logic using webhooks and the various API endpoints to match your business requirements.
### Orders and payments
Canonical URL: https://docs.telnesstech.com/developer-guide/use-cases/orders-and-payments
An order and a payment work together on every purchase. The order records what the customer
buys. The payment satisfies the payment requirement of that order, and the order cannot be
submitted before it does. You collect the payment through your own provider, or through a
managed payment session.
#### Core concept
Every order has **requirements** that must be met before submission:
- `requiresPayment`: Whether the order needs payment before it can be fulfilled
- `requiresPaymentProfile`: Whether a stored payment method is needed for future billing
- `requiresSigning`: Whether the order requires a digital signature
Each requirement is `NOT_REQUIRED`, `OPTIONAL`, or `REQUIRED`. Read them after you calculate
the price. They tell you the correct submission flow. An order with a total of zero can need
no payment at all. Read the requirements, and do not assume that a payment is due.
> **Note**
>
> The requirements are per order. One order can need a payment where the order before it did not.
#### Quick path
**1. Create order**
Create an order and add line items for the products the customer wants to buy.
**2. Calculate price**
Calculate taxes and totals to determine the amount due.
**3. Check requirements**
Inspect the order requirements to determine if payment, a payment profile, or signing is needed.
**4. Collect payment**
Collect payment through your own provider or use a managed payment session.
**5. Submit order**
Submit the order with the external payment reference to begin fulfillment. Orders paying through
a managed payment session or payment link are submitted automatically once the payment succeeds.
#### Choosing a payment approach
You have three ways to collect a payment. Use your own payment infrastructure, or use a
managed payment session.
- **Your own provider (Recommended)** — Collect the payment on your own payment stack, such as Stripe, Adyen, or Braintree. Pass the reference when you submit the order. You keep full control of the checkout, the payment methods, and the provider relationship.
- **Hosted payment page** — Use a managed payment session with `hosted: true`. The response carries a checkout URL that the provider hosts. Send the customer there. You build no payment interface.
- **Embedded payment widget** — Use a managed payment session with `hosted: false`. The response carries the provider credentials. Render the payment form in your own interface with the SDK of the provider.
##### When to use each approach
| Approach | Best for |
| ----------------------- | ---------------------------------------------------------------------------------------------------- |
| **Your own provider** | A team that already runs a payment infrastructure and wants control of the provider and the checkout |
| **Hosted payment page** | A fast integration that needs no payment components of its own |
| **Embedded widget** | A team that wants a managed payment backend, but its own payment interface |
> **Info**
>
> Most integrations collect the payment on their own provider. That way one payment relationship
> covers everything, and the checkout stays under their control.
#### 1. Create an order and add line items
Create an order for a customer and include the products they want to purchase.
```bash
curl -X POST "{BASE_URL}/orders" \
-H "X-API-Key: $API_KEY" \
-H "Content-Type: application/json" \
-d '{
"customer": {
"customerId": "123e4567-e89b-12d3-a456-426614174000"
},
"lineItems": [
{
"type": "SUBSCRIPTION",
"lineItemId": "sub-1",
"productOfferingId": "offering-id",
"subscriber": {
"name": "Jane Doe",
"email": "jane@example.com"
}
}
]
}'
```
You can also add line items to an existing order separately:
```bash
curl -X POST "{BASE_URL}/orders/{orderId}/line-items" \
-H "X-API-Key: $API_KEY" \
-H "Content-Type: application/json" \
-d '{
"type": "ADDON",
"lineItemId": "addon-1",
"productOfferingId": "addon-offering-id",
"parentLineItemId": "sub-1"
}'
```
See [Create Order](/api-reference/orders.md#tag/orders/POST/orders) and [Add Line Items](/api-reference/orders.md#tag/orders/POST/orders/{orderId}/line-items)
#### 2. Calculate the price
Calculate taxes and totals before collecting payment.
```bash
curl -X POST "{BASE_URL}/orders/{orderId}/calculate-price" \
-H "X-API-Key: $API_KEY" \
-H "Content-Type: application/json"
```
See [Calculate Order Price](/api-reference/orders.md#tag/orders/POST/orders/{orderId}/calculate-price)
#### 3. Check order requirements
After calculating the price, inspect the order to determine what is needed before submission.
```bash
# Fetch the order and inspect the requirements object
curl "{BASE_URL}/orders/{orderId}" \
-H "X-API-Key: $API_KEY"
```
See [Get Order](/api-reference/orders.md#tag/orders/GET/orders/{orderId})
#### 4. Collect payment
Once you know the order requires payment, choose one of the following approaches.
##### Option A: Your own payment provider (recommended)
Collect the payment through your own payment provider: Stripe, Adyen, Braintree, or another
one. You keep full control of the checkout, and you keep the payment infrastructure that you
already run. This approach adds no dependency.
After collecting payment on your side, submit the order with an `externalPayment` reference:
```bash
# Step 1: Collect payment through your own provider
# (This happens in your existing payment flow)
# Step 2: Submit the order with the payment reference
curl -X POST "{BASE_URL}/orders/{orderId}/submit" \
-H "X-API-Key: $API_KEY" \
-H "Content-Type: application/json" \
-d '{
"externalPayment": {
"reference": "pi_3ABC123def456",
"receiptDescription": "Subscription activation payment",
"receiptUrl": "https://yourapp.com/receipts/abc123"
}
}'
```
The `externalPayment` object accepts:
| Field | Required | Description |
| -------------------- | -------- | ---------------------------------------------------------- |
| `reference` | Yes | The payment reference or transaction ID from your provider |
| `receiptDescription` | No | A human-readable description of the payment |
| `receiptUrl` | No | A URL to the payment receipt or confirmation page |
> **Note**
>
> When using external payments, you are responsible for collecting the correct amount and handling
> refunds through your payment provider.
See [Submit Order](/api-reference/orders.md#tag/orders/POST/orders/{orderId}/submit)
##### Option B: Hosted payment page
If you prefer a managed payment flow, create a payment session with `hosted: true` to get a checkout URL. Redirect the customer to the provider-hosted payment page.
```bash
curl -X POST "{BASE_URL}/payment-sessions" \
-H "X-API-Key: $API_KEY" \
-H "Content-Type: application/json" \
-d '{
"orderId": "{orderId}",
"paymentProvider": "STRIPE",
"hosted": true,
"returnUrl": "https://yourapp.com/payment/success",
"cancelUrl": "https://yourapp.com/payment/cancel"
}'
# Redirect the customer to provider.checkoutUrl from the response
```
After the customer completes payment, they are redirected to your `returnUrl`. There is no submit call to make — once the payment succeeds, the order is submitted automatically. Poll the order until it leaves `PENDING_PAYMENT`, or subscribe to the `order.statusChanged` webhook event.
```bash
# Poll the order state
curl "{BASE_URL}/orders/{orderId}" \
-H "X-API-Key: $API_KEY"
# When the payment succeeds, the state moves from PENDING_PAYMENT to SUBMITTED
```
See [Create Payment Session](/api-reference/payment-sessions.md#tag/payment-sessions/POST/payment-sessions) and [Get Payment Session](/api-reference/payment-sessions.md#tag/payment-sessions/GET/payment-sessions/{paymentSessionId})
##### Option C: Embedded payment widget
Create a payment session with `hosted: false` (or omit the field) to get provider credentials for rendering a payment form directly in your UI.
```bash
curl -X POST "{BASE_URL}/payment-sessions" \
-H "X-API-Key: $API_KEY" \
-H "Content-Type: application/json" \
-d '{
"orderId": "{orderId}",
"paymentProvider": "STRIPE"
}'
# Use provider.clientSecret and provider.publishableKey from the response
# to render a payment widget
```
Use the returned credentials with the provider's client SDK. For example, with Stripe Elements:
```javascript
const stripe = Stripe(publishableKey);
const elements = stripe.elements({ clientSecret });
const paymentElement = elements.create('payment');
paymentElement.mount('#payment-element');
// When the customer submits the form:
const { error } = await stripe.confirmPayment({
elements,
confirmParams: {
return_url: 'https://yourapp.com/payment/success',
},
});
```
After the payment completes, the order is submitted automatically — no submit call is needed. Poll the order until it leaves `PENDING_PAYMENT`, or subscribe to the `order.statusChanged` webhook event:
```bash
curl "{BASE_URL}/orders/{orderId}" \
-H "X-API-Key: $API_KEY"
# When the payment succeeds, the state moves from PENDING_PAYMENT to SUBMITTED
```
See [Create Payment Session](/api-reference/payment-sessions.md#tag/payment-sessions/POST/payment-sessions)
#### Zero-total orders with payment profile
An order with a total of zero can still need a stored payment method, as a trial subscription does. Submit that order with a payment profile session ID.
```bash
curl -X POST "{BASE_URL}/orders/{orderId}/submit" \
-H "X-API-Key: $API_KEY" \
-H "Content-Type: application/json" \
-d '{
"paymentProfileSessionId": "profile-session-id"
}'
```
#### Order states
| State | Description |
| ------------------ | ---------------------------------------------- |
| `PENDING` | The order is a cart. You can still change it |
| `PENDING_PAYMENT` | The order is locked and waits for the payment |
| `SUBMITTED` | You submitted the order for processing |
| `PENDING_APPROVAL` | The order waits for an approval |
| `PROCESSING` | The order is in fulfillment |
| `COMPLETED` | The platform fulfilled the order |
| `CANCELLED` | The order was canceled before it completed |
| `EXPIRED` | The order expired after a period of inactivity |
| `FAILED` | The fulfillment of the order failed |
#### Payment session statuses
| Status | Description |
| ----------------- | ------------------------------------------------- |
| `PENDING` | Session created, awaiting customer payment |
| `REQUIRES_ACTION` | The customer has one more step, such as 3D Secure |
| `COMPLETED` | Payment successfully collected |
| `FAILED` | Payment failed |
#### Requirements reference
When you retrieve an order after calculating the price, the `requirements` object tells you what is needed before submission.
| Requirement | Values | Description |
| ------------------------ | -------------------------------------- | ----------------------------------------- |
| `requiresPayment` | `NOT_REQUIRED`, `OPTIONAL`, `REQUIRED` | Whether payment must be collected |
| `requiresPaymentProfile` | `NOT_REQUIRED`, `OPTIONAL`, `REQUIRED` | Whether a stored payment method is needed |
| `requiresSigning` | `NOT_REQUIRED`, `OPTIONAL`, `REQUIRED` | Whether a digital signature is needed |
#### Next steps
- [Orders](/api-reference/orders.md) — Full order management API reference
- [Payment sessions](/api-reference/payment-sessions.md) — Managed payment session creation and management
- [Payment profiles](/api-reference/payment-profiles.md) — Stored payment methods for recurring billing
- [Webhooks](/api-reference/webhooks.md) — Set up notifications for order and payment events
### Payment processing
Canonical URL: https://docs.telnesstech.com/developer-guide/use-cases/payment-processing
This guide covers payment processing for a telecom service from end to end. It takes you
through the first collection, the stored payment methods, the billing, and a failed payment.
#### Prerequisites
You need all of these before you start:
- **Order management**: Understanding of order creation and pricing flows
- **Customer management**: Active customers with subscription services
- **Payment gateway integration**: Access to payment processors (cards, bank transfers, digital wallets)
- **Billing system**: Understanding of billing cycles and pricing models
- **Compliance**: PCI DSS compliance for handling payment data
#### Overview
Payment processing encompasses:
1. Payment session creation for secure payment collection
2. Payment profile management for stored payment methods
3. Payment processing and transaction handling
4. Payment failure management and retry logic
5. Billing and invoice management
6. Promotional pricing and discount handling
#### Step-by-step implementation
##### Step 1: Create payment sessions for orders
Create secure payment sessions to collect payment for orders:
```bash
# Create payment session for order
curl -X POST "{BASE_URL}/payment-sessions" \
-H "Authorization: Bearer YOUR_ACCESS_TOKEN" \
-H "X-API-Key: YOUR_API_KEY" \
-H "Content-Type: application/json" \
-d '{
"orderId": "123e4567-e89b-12d3-a456-426614174000",
"paymentProvider": "STRIPE",
"hosted": true,
"returnUrl": "https://yourstore.com/payment/success",
"cancelUrl": "https://yourstore.com/payment/cancel"
}'
# Check payment session status
curl -X GET "{BASE_URL}/payment-sessions/{paymentSessionId}" \
-H "Authorization: Bearer YOUR_ACCESS_TOKEN" \
-H "X-API-Key: YOUR_API_KEY" \
-H "Content-Type: application/json"
```
##### Step 2: Manage payment profiles
Set up stored payment methods for recurring billing:
```bash
# Create payment profile session
curl -X POST "{BASE_URL}/payment-profiles/sessions" \
-H "Authorization: Bearer YOUR_ACCESS_TOKEN" \
-H "X-API-Key: YOUR_API_KEY" \
-H "Content-Type: application/json" \
-d '{
"returnUrl": "https://yourstore.com/billing/payment-methods",
"paymentMethods": ["card", "bank_account"]
}'
# Get payment profiles
curl -X GET "{BASE_URL}/payment-profiles" \
-H "Authorization: Bearer YOUR_ACCESS_TOKEN" \
-H "X-API-Key: YOUR_API_KEY" \
-H "Content-Type: application/json"
```
##### Step 3: Process payments
Handle payment processing and transaction management:
```bash
# List payments
curl -X GET "{BASE_URL}/payments?customerId={customerId}&limit=50" \
-H "Authorization: Bearer YOUR_ACCESS_TOKEN" \
-H "X-API-Key: YOUR_API_KEY" \
-H "Content-Type: application/json"
# Get payment details
curl -X GET "{BASE_URL}/payments/{paymentId}" \
-H "Authorization: Bearer YOUR_ACCESS_TOKEN" \
-H "X-API-Key: YOUR_API_KEY" \
-H "Content-Type: application/json"
```
#### Handling payment failures and retries
Handle a failed payment with retry logic:
```javascript
// Payment failure handler with exponential backoff
class PaymentRetryHandler {
constructor(maxRetries = 3) {
this.maxRetries = maxRetries;
this.retryDelays = [24, 72, 168]; // Hours: 1 day, 3 days, 1 week
}
async handlePaymentFailure(paymentSessionId, failureReason) {
console.log(`Payment failed for session ${paymentSessionId}: ${failureReason}`);
// Get payment session details
const session = await checkPaymentSessionStatus(paymentSessionId);
const customer = await getOrderCustomer(session.orderId);
// Categorize failure type
const failureCategory = this.categorizeFailure(failureReason);
switch (failureCategory) {
case 'insufficient_funds':
await this.scheduleRetry(paymentSessionId, 24); // Retry in 24 hours
await this.notifyCustomer(customer.customerId, 'insufficient_funds');
break;
case 'expired_card':
await this.requestPaymentMethodUpdate(customer.customerId);
break;
case 'fraud_suspected':
await this.escalateToFraud(session);
break;
case 'technical_error':
await this.scheduleRetry(paymentSessionId, 1); // Retry in 1 hour
break;
default:
await this.escalateToSupport(session);
}
}
categorizeFailure(reason) {
const failureMap = {
insufficient_funds: 'insufficient_funds',
card_declined: 'insufficient_funds',
expired_card: 'expired_card',
invalid_cvc: 'expired_card',
fraud_suspected: 'fraud_suspected',
processing_error: 'technical_error',
network_error: 'technical_error',
};
return failureMap[reason] || 'unknown';
}
async scheduleRetry(paymentSessionId, delayHours) {
// In production, this would schedule a background job
setTimeout(
async () => {
try {
// Create new payment session with same order
const originalSession = await checkPaymentSessionStatus(paymentSessionId);
const customer = await getOrderCustomer(originalSession.orderId);
const newSession = await createOrderPaymentSession(originalSession.orderId);
// Notify customer of retry attempt
await this.notifyCustomerRetry(customer.customerId, newSession.hostedUrl);
} catch (error) {
console.error('Payment retry failed:', error);
}
},
delayHours * 60 * 60 * 1000,
);
}
async notifyCustomer(customerId, failureType) {
// Implement customer notification logic
console.log(`Notifying customer ${customerId} about ${failureType}`);
}
async requestPaymentMethodUpdate(customerId) {
// Create payment profile session for updating payment method
const session = await createPaymentProfileSession(
`${process.env.BASE_URL}/billing/update-payment`,
{ customerId },
);
// Send email with update link
await this.notifyCustomer(customerId, 'payment_method_update_required');
}
}
```
#### Promotional pricing and discounts
Handle promotional codes and discount applications:
```javascript
// Get promotion by promo code
const getPromotionByCode = async (promoCode) => {
const response = await fetch(`{BASE_URL}/discounts/promotions/promo-code/${promoCode}`, {
method: 'GET',
headers: {
Authorization: 'Bearer YOUR_ACCESS_TOKEN',
'X-API-Key': 'YOUR_API_KEY',
'Content-Type': 'application/json',
},
});
if (!response.ok) {
const error = await response.json();
throw new Error(`Invalid promo code: ${error.message}`);
}
return await response.json();
};
// Apply promo code to an order and re-price it
const applyPromoCodeToOrder = async (orderId, promoCode) => {
try {
// Validate promo code first
const promotion = await getPromotionByCode(promoCode);
// The promo code lives on the order itself
const updateResponse = await fetch(`{BASE_URL}/orders/${orderId}`, {
method: 'PUT',
headers: {
Authorization: 'Bearer YOUR_ACCESS_TOKEN',
'X-API-Key': 'YOUR_API_KEY',
'Content-Type': 'application/json',
},
body: JSON.stringify({ promoCode }),
});
if (!updateResponse.ok) {
const error = await updateResponse.json();
throw new Error(`Failed to apply promo code: ${error.message}`);
}
// Re-price the order to see the promotion applied
const pricingResponse = await fetch(`{BASE_URL}/orders/${orderId}/calculate-price`, {
method: 'POST',
headers: {
Authorization: 'Bearer YOUR_ACCESS_TOKEN',
'X-API-Key': 'YOUR_API_KEY',
},
});
if (!pricingResponse.ok) {
const error = await pricingResponse.json();
throw new Error(`Price calculation failed: ${error.message}`);
}
const { pricing } = await pricingResponse.json();
const discountsMinor = (pricing.lineItems ?? []).reduce(
(sum, item) => sum + (item.totalDiscountsMinor ?? 0),
0,
);
// Amounts are integers in the minor units of pricing.currency: 2749 is $27.49
return {
subtotalMinor: pricing.subtotalMinor,
discountsMinor,
totalMinor: pricing.totalMinor,
currency: pricing.currency,
promotion,
};
} catch (error) {
console.error('Failed to apply promo code:', error);
throw error;
}
};
// Promo code component
const PromoCodeInput = ({ orderId, onApplied, onError }) => {
const [promoCode, setPromoCode] = useState('');
const [loading, setLoading] = useState(false);
const [applied, setApplied] = useState(null);
const handleApply = async () => {
if (!promoCode.trim()) return;
setLoading(true);
try {
const result = await applyPromoCodeToOrder(orderId, promoCode);
setApplied(result);
onApplied(result);
} catch (error) {
onError(error.message);
} finally {
setLoading(false);
}
};
return (
);
};
```
#### Next steps
After implementing payment processing:
- [Order fulfillment](/developer-guide/use-cases/order-fulfillment.md) — Handle service provisioning after successful payment
- [Customer self-service](/developer-guide/use-cases/self-management.md) — A customer manages their own payment methods
#### Best practices
##### Security
- Never store raw payment card data - use tokenized payment profiles
- Implement PCI DSS compliance for card processing
- Use HTTPS for all payment-related communications
- Validate all payment webhooks and callbacks
##### User experience
- Provide clear payment status updates to customers
- Implement user-friendly error messages for payment failures
- Offer multiple payment methods when possible
- Save successful payment methods for future use
##### Reliability
- Retry a failed payment on a schedule that you control.
- Handle payment processor downtime gracefully
- Monitor payment success rates and failure patterns
- Set up alerts for payment processing issues
#### Common questions
**Q: How do I handle different currencies?**
A: The API supports more than one currency. Name the currency in the payment session. Your payment processor must support that currency.
**Q: Can I process refunds through the API?**
A: A refund normally goes through your payment processor's dashboard or API, then reflected in the API payment records.
**Q: How do I implement recurring billing?**
A: Use stored payment profiles with scheduled payment sessions. The billing system can automatically create payment sessions for recurring charges.
### Product management
Canonical URL: https://docs.telnesstech.com/developer-guide/use-cases/product-management
Everything that a customer can buy through the API is a **product offering**: a mobile plan, a
travel eSIM, an addon, and a license. This guide shows you how to find what is available and
how to read a price. It then resolves the exact set of offerings that one customer can buy.
Last, it puts an offering ID into an order and into a subscription change.
#### Prerequisites
You need all of these before you start:
- **API credentials**: A valid access token and API key for the API
- **Customer context**: Whether you are selling to `CONSUMER` or `BUSINESS` customers
- **Order basics**: Familiarity with [placing an order](/developer-guide/use-cases/place-an-order.md) helps for the later steps
#### Overview
A typical catalog integration follows this flow:
**1. Explore catalogs**
List product catalogs to understand how offerings are segmented.
**2. List offerings**
Fetch product offerings, filtered by type, category, or catalog.
**3. Interpret pricing**
Read prices, billing cycles, and promotional discounts correctly.
**4. Resolve per-customer catalogs**
Fetch the exact offerings and groups available to one customer.
**5. Sell and change**
Use offering IDs in orders, addons, and subscription changes.
#### The object model
Four concepts make up the catalog, from the technical core outward:
- **Product** — The technical definition of a service: its type, category, network provider, and included features (data, calls, SMS, coverage). Products are reusable — several offerings can wrap the same product at different prices.
- **Product offering** — A product combined with a price. This is the unit customers actually buy, and its `productOfferingId` is what you pass to orders, addons, and change endpoints.
- **Product offering group** — Organizes related offerings of the same category — for example all mobile plans. Groups are the natural unit for rendering plan pickers and upgrade ladders.
- **Product catalog** — A curated set of offerings for a context such as a customer segment, region, or sales channel. A catalog can extend the default catalog, inheriting all of its offerings.
Every offering carries its product inline, so one list call gives you the whole picture. The
`product` field says what the service is. The `price` field says what it costs. The `group`,
`name`, `description`, and `imageUrl` fields say how to present it.
##### Offering types and categories
The `product.type` field determines what buying the offering creates:
| Type | Creates | Examples |
| -------------------- | ---------------------------------------------------------- | --------------------------------------- |
| `SUBSCRIPTION` | A standalone subscription with its own lifecycle | Mobile plan, broadband, travel eSIM |
| `SUBSCRIPTION_ADDON` | A feature or resource attached to an existing subscription | Extra data package, travel eSIM package |
| `LICENSE` | A license for business/PBX features | Enterprise telephony seat |
| `EXTERNAL_PRODUCT` | A purchasable item outside the core telecom platform | Hardware, accessories |
The `product.category` field is a sub-type within each type, such as `PRODUCT_CATEGORY_SUBSCRIPTION_CELL`, `PRODUCT_CATEGORY_SUBSCRIPTION_BROADBAND`, `PRODUCT_CATEGORY_TRAVEL_ESIM`, or `PRODUCT_CATEGORY_TRAVEL_ESIM_PACKAGE`. Offerings of the same type and category are generally interchangeable — that is what makes upgrades and downgrades within a group possible.
> **Note**
>
> Addon offerings additionally carry `addonCategories`: the subscription categories the addon can be
> attached to. For example, a `PRODUCT_CATEGORY_TRAVEL_ESIM_PACKAGE` addon that applies to
> `PRODUCT_CATEGORY_TRAVEL_ESIM` subscriptions.
#### Step-by-step implementation
##### Step 1: List product catalogs
Start by listing the catalogs configured for your tenant. Catalogs segment offerings by market or channel, and their IDs can be used to filter offering lists:
```bash
# List product catalogs, optionally filtered by name
curl -X GET "{BASE_URL}/product-catalogs?filter=US&limit=100" \
-H "Authorization: Bearer YOUR_ACCESS_TOKEN" \
-H "X-API-Key: YOUR_API_KEY"
```
A catalog listing looks like this:
```json
{
"items": [
{
"productCatalogId": "f47ac10b-58cc-4372-a567-0e02b2c3d479",
"name": "US Consumer Catalog",
"description": "Consumer plans sold through the US web store",
"extendsDefault": true
},
{
"productCatalogId": "8d3e5f70-12ab-4cd6-9e8f-a01b23c45d67",
"name": "US Business Catalog",
"description": "Business plans with pooled data and licenses",
"extendsDefault": false
}
],
"pagination": {
"nextCursor": null
}
}
```
`extendsDefault` tells you how a catalog is composed. When it is `true`, the catalog inherits
every offering of the default catalog and adds its own. When it is `false`, the catalog stands
alone, and it carries only the offerings assigned to it.
##### Step 2: List product offerings
Get the offerings themselves. The `customerType` parameter is required. Every other parameter
narrows the result:
- `types` — filter by offering type (`SUBSCRIPTION`, `SUBSCRIPTION_ADDON`, `LICENSE`, `EXTERNAL_PRODUCT`)
- `categories` — filter by product category
- `productCatalogId` — only offerings belonging to a specific catalog
- `includeArchived` — include `ARCHIVED` offerings (default `false`)
- `countries` / `regions` — coverage filters for travel eSIM offerings (see below)
```bash
# List consumer subscription offerings in a specific catalog
curl -X GET "{BASE_URL}/product-offerings?customerType=CONSUMER&types=SUBSCRIPTION&productCatalogId=f47ac10b-58cc-4372-a567-0e02b2c3d479&limit=100" \
-H "Authorization: Bearer YOUR_ACCESS_TOKEN" \
-H "X-API-Key: YOUR_API_KEY"
# Fetch the next page using the cursor from the previous response
curl -X GET "{BASE_URL}/product-offerings?customerType=CONSUMER&types=SUBSCRIPTION&limit=100&cursor=NEXT_CURSOR_VALUE" \
-H "Authorization: Bearer YOUR_ACCESS_TOKEN" \
-H "X-API-Key: YOUR_API_KEY"
```
Each item is a full `ProductOffering` with its product embedded:
```json
{
"items": [
{
"productOfferingId": "0b54a9c2-7f13-4e8a-b2d6-91c37f5a04e8",
"status": "AVAILABLE",
"name": "Seamless 10GB",
"description": "10GB of high-speed data on nationwide 5G",
"customerType": "CONSUMER",
"product": {
"productId": "4c6a1e83-b25f-4d90-87ce-3f19a0d6b524",
"internalName": "seamless_cell_10gb_us",
"type": "SUBSCRIPTION",
"category": "PRODUCT_CATEGORY_SUBSCRIPTION_CELL",
"networkProviderId": "tmobile-us",
"features": {
"dataMb": 10240,
"includedCallSeconds": 60000,
"includedSms": 1000
}
},
"price": {
"netPriceMinor": 2999,
"currency": "USD",
"priceType": "RECURRING",
"billingCycle": {
"period": "MONTHLY",
"interval": 1
},
"standardDiscount": { "amountMinor": 500 },
"bindingContract": {
"duration": {
"unit": "MONTHS",
"value": 12
},
"discount": {
"amountMinor": 200
}
},
"customUpfrontPayment": {
"billingCycles": 3,
"discount": {
"amountMinor": 300
}
},
"currencyOptionsMinor": {
"USD": 2999,
"SEK": 29900
}
},
"group": {
"productOfferingGroupId": "mobile-plans",
"name": "Mobile Plans",
"description": "Cell subscriptions with data, calls, and SMS included",
"category": "PRODUCT_CATEGORY_SUBSCRIPTION_CELL"
},
"imageUrl": "https://cdn.example.com/images/seamless-10gb.png"
}
],
"pagination": {
"nextCursor": null
}
}
```
The `product.features` object tells you what the service includes. A cellular plan carries
`dataMb`, `includedCallSeconds`, and `includedSms`. A travel eSIM package carries
`validityDays`, `countries`, `regions`, and `activationType`.
> **Warning**
>
> When you show the details of an existing subscription, pass `includeArchived=true`, or get the
> offering by its ID. Nobody can order an `ARCHIVED` offering any more, but an existing subscription
> can still point at one, and the lookup then comes back empty.
To fetch a single offering — for example to render a detail page or re-validate before checkout — use its ID:
```bash
curl -X GET "{BASE_URL}/product-offerings/0b54a9c2-7f13-4e8a-b2d6-91c37f5a04e8" \
-H "Authorization: Bearer YOUR_ACCESS_TOKEN" \
-H "X-API-Key: YOUR_API_KEY"
```
##### Step 3: Understand pricing and billing cycles
Every offering carries one `price` object. Read it with these fields:
| Field | Meaning |
| ---------------------- | --------------------------------------------------------------------------------------------------------------- |
| `netPriceMinor` | The offering's configured price for one billing period, with no discount deducted |
| `currency` | The currency code, such as `USD` |
| `priceType` | `ONE_TIME` for a single charge, `RECURRING` for repeated billing |
| `billingCycle` | For recurring prices: the billing `period` (`MONTHLY`) and `interval` (1 = every month, 3 = every three months) |
| `standardDiscount` | An unconditional discount: `amountMinor` per billing period, and an optional `duration` |
| `bindingContract` | A commitment to keep the subscription for a fixed `duration`, and the `discount` granted in exchange |
| `customUpfrontPayment` | Billing cycles the customer pays for in advance at checkout, and the `discount` granted for doing so |
| `currencyOptionsMinor` | Per-currency price overrides keyed by ISO currency code, for offerings sold in multiple currencies |
> **Warning**
>
> **A price is the catalog entry, not a quote.** Do not charge a customer from it. Each field
> reports the offering exactly as it is configured. `netPriceMinor` has no discount deducted, not
> even the discounts on the same object. The price also knows nothing about the customer that reads
> it, so it carries no promotion and no negotiated price list.
The order is the one place that resolves a discount, a promotion, a price list, and the tax. Add
the offering to an order, then call [Calculate order
price](/api-reference/orders.md#tag/orders/POST/orders/{orderId}/calculate-price). That answer is
what the customer pays.
Every monetary amount is an integer in the **minor units** of its currency. A minor unit is one
hundredth of the major unit, for every currency that the platform bills in. As a result, `2999`
is $29.99 in `USD`, and 299.00 kr in `SEK`. Divide by 100 to display an amount.
Do not read the decimal `netPrice` and `currencyOptions` fields, which are deprecated. The
deprecated `discount` and `discountMinor` fields are gone from the response.
Only `currency` and `priceType` are always present. Every example in this
documentation shows the same offering with each optional field filled in, so that you see the
whole shape in one place. A real offering carries only the discounts and the currency options
that it is configured with. Read all of them as optional.
The two price types match two selling motions:
- **`RECURRING`** — A subscription, a license, and a recurring addon. The `billingCycle` gives
the cadence. `{ "period": "MONTHLY", "interval": 1 }` bills every month.
- **`ONE_TIME`** — One charge, such as a travel eSIM package or an external product. There is no
`billingCycle`.
> **Warning**
>
> **A recurring price is quoted for one billing period, not for one charge.** Bill and total
> `netPriceMinor × billingCycle.interval`, and display the per-period figure. An `interval` of more
> than 1 collects that many periods at once. A `netPriceMinor` of `2999` with a `MONTHLY` period and
> an `interval` of 3 charges `8997` every three months, not `2999`.
###### Discounts
An offering can carry up to three discounts, each with its own condition. This is the Seamless 10GB price used throughout this documentation:
```json
{
"price": {
"netPriceMinor": 2999,
"currency": "USD",
"priceType": "RECURRING",
"billingCycle": { "period": "MONTHLY", "interval": 1 },
"standardDiscount": { "amountMinor": 500 },
"bindingContract": {
"duration": { "unit": "MONTHS", "value": 12 },
"discount": { "amountMinor": 200 }
},
"customUpfrontPayment": {
"billingCycles": 3,
"discount": { "amountMinor": 300 }
},
"currencyOptionsMinor": { "USD": 2999, "SEK": 29900 }
}
}
```
Read that price this way. The plan lists at $29.99 a month. A customer that takes it as sold
pays $22.99. The $5.00 standard discount and the $2.00 binding-contract discount come off when
the order is priced. A customer that also prepays three billing cycles pays $19.99 per period,
which is $59.97 at checkout.
**None of that comes off `netPriceMinor`, which stays 2999.** Each discount has its own
condition, and the order decides which ones apply:
- **`standardDiscount`** — unconditional. It applies to every purchase of the offering.
- **`bindingContract.discount`** — applies when the subscription is bound for `duration` months.
- **`customUpfrontPayment.discount`** — applies when the customer pays `billingCycles` cycles in advance at checkout.
A discount `amountMinor` is **per billing period**, like the price itself. It is never a total.
`{ "amountMinor": 300 }` takes $3.00 off every period, not $3.00 once. On a quarterly price it
comes off all three periods of each invoice.
You can subtract the discounts yourself to show an indicative price before an order exists. That
is what the fields are for. But the order price is the number that you charge.
###### Discounts that expire
A discount can carry a `duration`, which makes it an introductory offer rather than the standing price:
```json
{
"standardDiscount": {
"amountMinor": 500,
"duration": { "unit": "MONTHS", "value": 3 }
}
}
```
That takes $5.00 off each of the first three months, $15.00 in all. After that the customer pays
the full price. A discount with no `duration` never stops.
Read `duration` to find out whether a saving that you advertise has an end date. When it does,
say so: "$24.99/mo for 3 months, then $29.99".
`currencyOptionsMinor` is the price of the same offering in the other currencies of the catalog.
This plan is $29.99 in the US and 299.00 kr in Sweden. The key that matches `currency` repeats
`netPriceMinor`.
###### Promotional pricing
Promo codes belong to the order, not to the catalog. Set `promoCode` when you create or update the order, then price it:
```bash
# Apply the promo code to the order
curl -X PUT "{BASE_URL}/orders/296af5b6-f3b3-4128-b307-5ddc9190502f" \
-H "Authorization: Bearer YOUR_ACCESS_TOKEN" \
-H "X-API-Key: YOUR_API_KEY" \
-H "Content-Type: application/json" \
-d '{ "promoCode": "SPRING25" }'
# Price it to see what the customer pays
curl -X POST "{BASE_URL}/orders/296af5b6-f3b3-4128-b307-5ddc9190502f/calculate-price" \
-H "Authorization: Bearer YOUR_ACCESS_TOKEN" \
-H "X-API-Key: YOUR_API_KEY"
```
To examine a code before an order exists, call [Get
promotion](/api-reference/product-discounts.md#tag/product-discounts/GET/discounts/promotions/promo-code/{promoCode}).
It tells you whether the code is valid, and what discount it carries.
##### Step 4: Fetch a customer's product catalog
To find out what one customer can buy, ask the API. Do not filter the global list yourself. The
customer catalog endpoint merges the default catalog with every catalog assigned to that
customer, and it returns a result that you can render directly:
```bash
# By internal customer UUID
curl -X GET "{BASE_URL}/customers/5b8f3c72-94d1-4a06-8e2b-c1d7f0a63e94/product-catalog" \
-H "Authorization: Bearer YOUR_ACCESS_TOKEN" \
-H "X-API-Key: YOUR_API_KEY"
# By external reference identifier (rid_ prefix)
curl -X GET "{BASE_URL}/customers/rid_crm-customer-12345/product-catalog" \
-H "Authorization: Bearer YOUR_ACCESS_TOKEN" \
-H "X-API-Key: YOUR_API_KEY"
```
The response contains the groups and the offerings side by side:
```json
{
"productOfferingGroups": [
{
"productOfferingGroupId": "mobile-plans",
"name": "Mobile Plans",
"description": "Cell subscriptions with data, calls, and SMS included",
"category": "PRODUCT_CATEGORY_SUBSCRIPTION_CELL"
}
],
"productOfferings": [
{
"productOfferingId": "0b54a9c2-7f13-4e8a-b2d6-91c37f5a04e8",
"status": "AVAILABLE",
"name": "Seamless 10GB",
"customerType": "CONSUMER",
"product": {
"productId": "4c6a1e83-b25f-4d90-87ce-3f19a0d6b524",
"internalName": "seamless_cell_10gb_us",
"type": "SUBSCRIPTION",
"category": "PRODUCT_CATEGORY_SUBSCRIPTION_CELL"
},
"price": {
"netPriceMinor": 2999,
"currency": "USD",
"priceType": "RECURRING",
"billingCycle": {
"period": "MONTHLY",
"interval": 1
},
"standardDiscount": { "amountMinor": 500 },
"bindingContract": {
"duration": {
"unit": "MONTHS",
"value": 12
},
"discount": {
"amountMinor": 200
}
},
"customUpfrontPayment": {
"billingCycles": 3,
"discount": {
"amountMinor": 300
}
},
"currencyOptionsMinor": {
"USD": 2999,
"SEK": 29900
}
},
"group": {
"productOfferingGroupId": "mobile-plans",
"name": "Mobile Plans",
"category": "PRODUCT_CATEGORY_SUBSCRIPTION_CELL"
}
},
{
"productOfferingId": "6d2f8e11-3c49-4b7a-a5e0-84b9d1c72f35",
"status": "AVAILABLE",
"name": "Seamless 25GB",
"customerType": "CONSUMER",
"product": {
"productId": "4c6a1e83-b25f-4d90-87ce-3f19a0d6b524",
"internalName": "seamless_cell_25gb_us",
"type": "SUBSCRIPTION",
"category": "PRODUCT_CATEGORY_SUBSCRIPTION_CELL"
},
"price": {
"netPriceMinor": 3999,
"currency": "USD",
"priceType": "RECURRING",
"billingCycle": {
"period": "MONTHLY",
"interval": 1
},
"standardDiscount": { "amountMinor": 500 },
"bindingContract": {
"duration": {
"unit": "MONTHS",
"value": 12
},
"discount": {
"amountMinor": 300
}
},
"customUpfrontPayment": {
"billingCycles": 3,
"discount": {
"amountMinor": 400
}
},
"currencyOptionsMinor": {
"USD": 3999,
"SEK": 39900
}
},
"group": {
"productOfferingGroupId": "mobile-plans",
"name": "Mobile Plans",
"category": "PRODUCT_CATEGORY_SUBSCRIPTION_CELL"
}
}
]
}
```
> **Info**
>
> Customer identifiers can be internal UUIDs or your own reference identifiers. Reference
> identifiers must be prefixed with `rid_` (for example `rid_crm-customer-12345`) so the API can
> distinguish them from UUIDs.
##### Step 5: Use offerings in orders and addons
The `productOfferingId` is the currency of the rest of the platform. In an order, each line item names the offering it purchases:
```bash
# Create an order with a subscription line item for a chosen offering
curl -X POST "{BASE_URL}/orders" \
-H "Authorization: Bearer YOUR_ACCESS_TOKEN" \
-H "X-API-Key: YOUR_API_KEY" \
-H "Content-Type: application/json" \
-d '{
"customerType": "CONSUMER",
"lineItems": [
{
"type": "SUBSCRIPTION",
"lineItemId": "line-item-1",
"productOfferingId": "0b54a9c2-7f13-4e8a-b2d6-91c37f5a04e8",
"sim": { "esim": true }
}
]
}'
```
Addon offerings (`type: SUBSCRIPTION_ADDON`) attach to an existing subscription instead. Pick an addon whose `addonCategories` includes the subscription's category, then add it:
```bash
# Add a travel eSIM package to an existing travel eSIM subscription
curl -X POST "{BASE_URL}/subscriptions/e7a12b90-45cd-4f38-9a61-08b3d5c2ef47/addons" \
-H "Authorization: Bearer YOUR_ACCESS_TOKEN" \
-H "X-API-Key: YOUR_API_KEY" \
-H "X-Idempotency-Key: addon-e7a12b90-2a91cf64" \
-H "Content-Type: application/json" \
-d '{
"productOfferingId": "2a91cf64-8e05-47d3-b18c-f60a24d9e573"
}'
```
##### Step 6: Discover and apply subscription changes
For upgrades and downgrades, never guess which offerings a subscription can move to. The change-options endpoint returns exactly what the subscription can become and **when** each change can take effect:
```bash
curl -X GET "{BASE_URL}/subscriptions/e7a12b90-45cd-4f38-9a61-08b3d5c2ef47/product-offering-options" \
-H "Authorization: Bearer YOUR_ACCESS_TOKEN" \
-H "X-API-Key: YOUR_API_KEY"
```
Each option pairs an offering with a change schedule:
```json
{
"items": [
{
"productOffering": {
"productOfferingId": "6d2f8e11-3c49-4b7a-a5e0-84b9d1c72f35",
"name": "Seamless 25GB",
"price": {
"netPriceMinor": 3999,
"currency": "USD",
"priceType": "RECURRING",
"billingCycle": {
"period": "MONTHLY",
"interval": 1
},
"standardDiscount": { "amountMinor": 500 },
"bindingContract": {
"duration": {
"unit": "MONTHS",
"value": 12
},
"discount": {
"amountMinor": 300
}
},
"customUpfrontPayment": {
"billingCycles": 3,
"discount": {
"amountMinor": 400
}
},
"currencyOptionsMinor": {
"USD": 3999,
"SEK": 39900
}
}
},
"changeSchedule": "INSTANT",
"changeScheduleDate": "2026-07-12"
},
{
"productOffering": {
"productOfferingId": "9f3b6d84-2c71-4a5e-b90d-57e1f8a3c266",
"name": "Seamless 5GB",
"price": {
"netPriceMinor": 1999,
"currency": "USD",
"priceType": "RECURRING",
"billingCycle": {
"period": "MONTHLY",
"interval": 1
},
"standardDiscount": { "amountMinor": 300 },
"bindingContract": {
"duration": {
"unit": "MONTHS",
"value": 12
},
"discount": {
"amountMinor": 200
}
},
"customUpfrontPayment": {
"billingCycles": 3,
"discount": {
"amountMinor": 200
}
},
"currencyOptionsMinor": {
"USD": 1999,
"SEK": 19900
}
}
},
"changeSchedule": "NEXT_RENEWAL_DAY",
"changeScheduleDate": "2026-08-01"
}
]
}
```
The `changeSchedule` values are:
| Schedule | Takes effect |
| --------------------- | --------------------------------------------------------- |
| `INSTANT` | Immediately |
| `FIRST_OF_NEXT_MONTH` | On the first day of the next calendar month |
| `NEXT_RENEWAL_DAY` | On the subscription's next renewal date |
| `NEXT_PAYMENT_DAY` | At the end of the prepaid period, on the next payment day |
As a rule of thumb, upgrades and lateral moves are immediate while downgrades wait for the next renewal — but always trust `changeSchedule` and `changeScheduleDate` over assumptions. To apply a change, pass the chosen offering to the change endpoint:
```bash
curl -X PUT "{BASE_URL}/subscriptions/e7a12b90-45cd-4f38-9a61-08b3d5c2ef47/product-offering-change" \
-H "Authorization: Bearer YOUR_ACCESS_TOKEN" \
-H "X-API-Key: YOUR_API_KEY" \
-H "X-Idempotency-Key: change-e7a12b90-20260712" \
-H "Content-Type: application/json" \
-d '{
"productOfferingId": "6d2f8e11-3c49-4b7a-a5e0-84b9d1c72f35"
}'
```
The same options-then-change pattern exists for addons and licenses:
- `GET /subscriptions/{subscriptionId}/addons/product-offering-options?currentProductOfferingId=...` and `PUT /subscriptions/{subscriptionId}/addons/product-offering-change` for changing an existing addon
- `GET /licenses/{licenseId}/product-offering-options` and `PUT /licenses/{licenseId}/product-offering-change` for licenses
#### Filtering travel eSIM offerings by coverage
Travel eSIM packages carry coverage in `product.features.countries` (ISO 3166-1 alpha-3 codes) and `product.features.regions`. To build a destination picker, first fetch the full coverage map:
```bash
# List all countries and regions covered by travel eSIM offerings
curl -X GET "{BASE_URL}/product-offerings/countries?customerType=CONSUMER" \
-H "Authorization: Bearer YOUR_ACCESS_TOKEN" \
-H "X-API-Key: YOUR_API_KEY"
# Then list offerings that cover the selected destination
curl -X GET "{BASE_URL}/product-offerings?customerType=CONSUMER&types=SUBSCRIPTION_ADDON&categories=PRODUCT_CATEGORY_TRAVEL_ESIM_PACKAGE&countries=MEX" \
-H "Authorization: Bearer YOUR_ACCESS_TOKEN" \
-H "X-API-Key: YOUR_API_KEY"
```
The coverage response deduplicates countries across all offerings and lists each region with its constituent countries:
```json
{
"countries": [
{ "code": "USA", "name": "United States" },
{ "code": "CAN", "name": "Canada" },
{ "code": "MEX", "name": "Mexico" }
],
"regions": [{ "region": "NORTH_AMERICA", "countries": ["USA", "CAN", "MEX"] }]
}
```
A matching travel eSIM package offering looks like this — note the one-time price, the coverage features, and `addonCategories` binding it to travel eSIM subscriptions:
```json
{
"productOfferingId": "2a91cf64-8e05-47d3-b18c-f60a24d9e573",
"status": "AVAILABLE",
"name": "North America 5GB",
"customerType": "CONSUMER",
"addonCategories": ["PRODUCT_CATEGORY_TRAVEL_ESIM"],
"product": {
"productId": "d80e6f21-5a4c-49b7-93d2-6c1e8b0f47a9",
"internalName": "travel_esim_na_5gb",
"type": "SUBSCRIPTION_ADDON",
"category": "PRODUCT_CATEGORY_TRAVEL_ESIM_PACKAGE",
"features": {
"dataMb": 5120,
"validityDays": 30,
"countries": ["USA", "CAN", "MEX"],
"regions": ["NORTH_AMERICA"],
"activationType": "FIRST_USE"
}
},
"price": {
"netPriceMinor": 1900,
"currency": "USD",
"priceType": "ONE_TIME",
"standardDiscount": {
"amountMinor": 200
},
"currencyOptionsMinor": {
"USD": 1900,
"SEK": 18900
}
}
}
```
The country filter matches an offering that lists the country, **and** an offering that belongs
to a region with that country in it. A filter of `MEX` thus finds a Mexico-only package and
this North America package.
#### Best practices
##### Catalog data handling
- Cache the catalog and the offering data with a short TTL. Do not get them on every page view.
An offering changes far less often than it is read.
- Identify an offering in your own systems by its `productOfferingId`. For a stable mapping
across environments, use `product.internalName` or `metadata`. Never match on the display
`name`.
- Price the order before checkout, and charge that number. A catalog price carries no discount,
no promotion, no price list, and no tax, so it drifts away from what the customer pays.
##### Presentation
- Drive your plan picker from `group`. Render one section per `productOfferingGroup`, and sort
the offerings in it by `price.netPriceMinor`.
- Show what a discounted price becomes when its discount ends.
`standardDiscount.duration` and `bindingContract.duration` carry the end date.
`netPriceMinor` alone does not.
- Use `richContent` on a detail page and `description` on a card. Both are optional, so keep a
fallback for each.
- Obey `customerType`. A consumer and a business see different offerings, and the parameter is
required on every list call.
##### Lifecycle safety
- Take the options endpoints as the authority on an upgrade and a downgrade. A raw catalog
listing does not know the network, the billing cycle, or the current offering of the
subscription.
- Send an `X-Idempotency-Key` header on an addon request and on a change request. Every retry
of that one request must carry the same key and the same body, and the change then happens
once. A new key starts a separate operation, and a key expires after 24 hours.
- Expect an `ARCHIVED` offering on an existing subscription, and handle it in your rendering and
in your reporting.
#### Next steps
With catalog discovery in place, put the offering IDs to work:
- [Place an order](/developer-guide/use-cases/place-an-order.md) — Turn a chosen product offering into a draft order, price it, and collect payment
- [Customer self-service](/developer-guide/use-cases/self-management.md) — Let customers browse their catalog and change plans from your own UI
#### Common questions
**Q: What is the difference between a product and a product offering?**
A: A product is the technical definition of a service: its network, its features, and its
category. A product offering wraps a product with a price and a presentation. An order and a
subscription always point at the offering, not at the product.
**Q: Why does the same offering show different prices at different times?**
A: It does not. The price of an offering is the catalog entry, and it is the same for every
caller. It changes only when somebody edits the offering. What differs per customer is what
they pay. The order resolves that amount. It reads the discounts on the offering, and the promo
code, the price list, and the tax of that customer.
**Q: Can I change a subscription to any offering in the catalog?**
A: No. Call `GET /subscriptions/{subscriptionId}/product-offering-options` for the valid
targets. The platform limits a change by category, by network setup, and by billing cycle. The
response also tells you when each change can take effect.
**Q: What happens to a subscription when its offering is archived?**
A: The subscription keeps running on the archived offering. Archiving stops a new purchase, and
nothing else. Pass `includeArchived=true` when you need an archived offering in a list response.
### Customer self-service
Canonical URL: https://docs.telnesstech.com/developer-guide/use-cases/self-management
Build a self-service portal for your end users. In it a user signs in, reads their
subscriptions and their remaining data, and changes their plan up or down. The user also buys
an addon or a topup, downloads an eSIM, and manages their invoices and payment methods. None
of this needs a call to support.
#### Prerequisites
You need all of these before you start:
- **API key**: An API key created in the portal, sent as the `X-API-Key` header on every request
- **Product management**: Familiarity with product offerings and pricing (see the [product management guide](/developer-guide/use-cases/product-management.md))
- **Active subscriptions**: Customers with provisioned subscriptions to manage
- **Payment provider**: A configured payment provider (for the saved payment method features)
#### Overview
A self-service portal implements these flows:
1. Authenticate the end user with passwordless email login
2. Load the user's profile and customer context
3. Show the user's subscriptions and current usage
4. Change plans (upgrades and downgrades)
5. Manage addons and sell data topups
6. Deliver eSIM activation QR codes
7. Show invoices and manage saved payment methods
8. Cancel service with structured churn feedback
Every request carries two credentials. Your API key in `X-API-Key` identifies your
integration. The JWT of the user in `Authorization: Bearer ...` limits the request to what
that user can see and do. A user lists their own subscriptions, invoices, and payment methods,
and nothing else. The API applies this limit whichever API key you send.
#### Step-by-step implementation
##### Step 1: Authenticate the end user
An end user signs in through a passwordless email flow. Start the login, and the API sends a
6-digit verification code. Send the code back, and the API answers with a JWT access token.
Start the login flow:
```bash
curl -X POST "{BASE_URL}/auth/email/start" \
-H "Content-Type: application/json" \
-d '{
"email": "emma.johnson@example.com"
}'
```
The endpoint always returns `202 Accepted` — even for unknown email addresses — to prevent email enumeration. The response contains a `nonce` that references this login attempt:
```json
{
"nonce": "a1b2c3d4-e5f6-7890-abcd-ef1234567890",
"expiresIn": 300,
"createdAt": "2026-07-12T10:00:00Z",
"expiresAt": "2026-07-12T10:05:00Z"
}
```
The user receives a 6-digit code by email. Verify it together with the email and nonce:
```bash
curl -X POST "{BASE_URL}/auth/email/verify" \
-H "Content-Type: application/json" \
-d '{
"email": "emma.johnson@example.com",
"nonce": "a1b2c3d4-e5f6-7890-abcd-ef1234567890",
"code": "482913"
}'
```
On success you receive an OAuth2-compatible token response:
```json
{
"accessToken": "eyJhbGciOiJSUzI1NiIsInR5cCI6IkpXVCJ9...",
"tokenType": "Bearer",
"expiresIn": 604800,
"userId": "f47ac10b-58cc-4372-a567-0e02b2c3d479"
}
```
Store the `accessToken` safely. Send it as `Authorization: Bearer YOUR_ACCESS_TOKEN` on every
later request, beside your `X-API-Key`. A verification code expires after `expiresIn` seconds,
which is 300 seconds in this example. If a code expires, start a new login.
> **Note**
>
> The two login endpoints need no authentication header. Both are rate limited, and both answer `429
> Too Many Requests` when you reach the limit.
##### Step 2: Load the user's profile
Use the `userId` from the token response to load the user's profile. The `customers` array tells you which customer accounts the user belongs to — you need a `customerId` later for invoices and payment methods.
```bash
curl -X GET "{BASE_URL}/users/f47ac10b-58cc-4372-a567-0e02b2c3d479" \
-H "Authorization: Bearer YOUR_ACCESS_TOKEN" \
-H "X-API-Key: YOUR_API_KEY"
```
```json
{
"userId": "f47ac10b-58cc-4372-a567-0e02b2c3d479",
"name": "Emma Johnson",
"email": "emma.johnson@example.com",
"msisdn": "+12065550142",
"customers": [
{
"customerId": "6b1f44a0-52d3-4f7a-9b3e-2c8d5e91f0a4",
"name": "Emma Johnson"
}
],
"createdAt": "2026-03-10T14:22:05Z",
"updatedAt": "2026-03-10T14:22:05Z"
}
```
##### Step 3: Get the user's subscriptions
List the user's subscriptions to render the portal's home screen. With a user JWT, the list is automatically scoped to subscriptions the user has access to. Filter by `status` to hide cancelled services, and page through results with `limit` and `cursor`.
```bash
# List the user's active subscriptions
curl -X GET "{BASE_URL}/subscriptions?status=ACTIVATED" \
-H "Authorization: Bearer YOUR_ACCESS_TOKEN" \
-H "X-API-Key: YOUR_API_KEY"
# Get a single subscription
curl -X GET "{BASE_URL}/subscriptions/d8174435-6378-4be5-a9f5-8b4aaadae5d4" \
-H "Authorization: Bearer YOUR_ACCESS_TOKEN" \
-H "X-API-Key: YOUR_API_KEY"
```
Each subscription embeds everything a portal detail page needs — phone number, SIM details, and the current plan with pricing:
```json
{
"subscriptionId": "d8174435-6378-4be5-a9f5-8b4aaadae5d4",
"status": "ACTIVATED",
"type": "CELL",
"display": "(206) 555-0142",
"msisdn": "+12065550142",
"customer": {
"customerId": "6b1f44a0-52d3-4f7a-9b3e-2c8d5e91f0a4",
"name": "Emma Johnson"
},
"productOffering": {
"productOfferingId": "cell-10gb",
"name": "Seamless 10GB",
"price": {
"netPriceMinor": 2999,
"currency": "USD",
"priceType": "RECURRING",
"billingCycle": {
"period": "MONTHLY",
"interval": 1
},
"standardDiscount": { "amountMinor": 500 },
"bindingContract": {
"duration": {
"unit": "MONTHS",
"value": 12
},
"discount": {
"amountMinor": 200
}
},
"customUpfrontPayment": {
"billingCycles": 3,
"discount": {
"amountMinor": 300
}
},
"currencyOptionsMinor": {
"USD": 2999,
"SEK": 29900
}
}
},
"subscriber": {
"subscriberId": "2c7e91f0-3a4b-4c5d-8e6f-7a8b9c0d1e2f",
"name": "Emma Johnson"
},
"sim": {
"esim": true,
"iccid": "89012608522901821364"
},
"activatedAt": "2026-03-15T09:30:00Z",
"createdAt": "2026-03-10T14:22:05Z",
"updatedAt": "2026-07-12T08:45:00Z"
}
```
Subscription `status` is one of `PENDING`, `ACTIVATED`, `BLOCKED`, `CANCELLED`, `PAUSED`, or `SUSPENDED`. Scheduled changes surface as `pendingStatus`, `pendingMsisdn`, and `pendingProductOffering` objects on the subscription, so the portal can show banners like "Your plan changes on August 1".
##### Step 4: Show current usage
Retrieve the current period's usage to render data, voice, and SMS meters. Usage is grouped by service (`data`, `voice`, `sms`, `mms`) and scope (`national`, `roaming`, `ild`), with one entry per package.
```bash
curl -X GET "{BASE_URL}/subscriptions/d8174435-6378-4be5-a9f5-8b4aaadae5d4/usage" \
-H "Authorization: Bearer YOUR_ACCESS_TOKEN" \
-H "X-API-Key: YOUR_API_KEY"
```
```json
{
"data": {
"national": [
{
"name": "Seamless 10GB Data",
"dataBytesUsed": 4831838208,
"dataBytesRemaining": 5905580032,
"dataBytesTotal": 10737418240,
"status": "ACTIVE",
"validFrom": "2026-07-01T00:00:00Z",
"validTo": "2026-08-01T00:00:00Z"
}
]
},
"voice": {
"national": [
{
"name": "National Minutes",
"callSeconds": 5460,
"callCount": 32,
"callRemainingSeconds": 30540,
"callTotalSeconds": 36000,
"status": "ACTIVE",
"validFrom": "2026-07-01T00:00:00Z",
"validTo": "2026-08-01T00:00:00Z"
}
]
},
"sms": {
"national": [
{
"name": "National SMS",
"smsCount": 118,
"smsRemaining": 382,
"smsTotal": 500,
"status": "ACTIVE",
"validFrom": "2026-07-01T00:00:00Z",
"validTo": "2026-08-01T00:00:00Z"
}
]
},
"updatedAt": "2026-07-12T08:45:00Z"
}
```
Data amounts are in bytes. Each package's `status` is `ACTIVE`, `NOT_ACTIVE`, or `EXPIRED`, and packages that come from an addon carry a `subscriptionAddonId` so you can label them separately from the base plan.
For an overview screen that shows usage across several subscriptions, fetch up to 100 at once:
```bash
curl -X GET "{BASE_URL}/subscriptions/usage?subscriptionIds=d8174435-6378-4be5-a9f5-8b4aaadae5d4&subscriptionIds=b9285546-7489-4cf6-b0a6-9c5bbbebf6e5" \
-H "Authorization: Bearer YOUR_ACCESS_TOKEN" \
-H "X-API-Key: YOUR_API_KEY"
```
##### Step 5: Change plan
###### Get change options for the subscription
Get all available product offerings a subscription can be changed to and when the change can take effect.
The date a subscription can change depends on the network setup, billing cycle, and current product offering. As a rule of thumb (though not always), upgrades and lateral moves are immediate, while downgrades take effect at the next renewal date.
```bash
curl -X GET "{BASE_URL}/subscriptions/d8174435-6378-4be5-a9f5-8b4aaadae5d4/product-offering-options" \
-H "Authorization: Bearer YOUR_ACCESS_TOKEN" \
-H "X-API-Key: YOUR_API_KEY"
```
```json
{
"items": [
{
"productOffering": {
"productOfferingId": "cell-unlimited",
"name": "Seamless Unlimited",
"price": {
"netPriceMinor": 5499,
"currency": "USD",
"priceType": "RECURRING",
"billingCycle": {
"period": "MONTHLY",
"interval": 1
},
"standardDiscount": { "amountMinor": 500 },
"bindingContract": {
"duration": {
"unit": "MONTHS",
"value": 12
},
"discount": {
"amountMinor": 500
}
},
"customUpfrontPayment": {
"billingCycles": 3,
"discount": {
"amountMinor": 500
}
},
"currencyOptionsMinor": {
"USD": 5499,
"SEK": 54900
}
}
},
"changeSchedule": "INSTANT",
"changeScheduleDate": "2026-07-12"
},
{
"productOffering": {
"productOfferingId": "cell-5gb",
"name": "Seamless 5GB",
"price": {
"netPriceMinor": 1999,
"currency": "USD",
"priceType": "RECURRING",
"billingCycle": {
"period": "MONTHLY",
"interval": 1
},
"standardDiscount": { "amountMinor": 300 },
"bindingContract": {
"duration": {
"unit": "MONTHS",
"value": 12
},
"discount": {
"amountMinor": 200
}
},
"customUpfrontPayment": {
"billingCycles": 3,
"discount": {
"amountMinor": 200
}
},
"currencyOptionsMinor": {
"USD": 1999,
"SEK": 19900
}
}
},
"changeSchedule": "NEXT_RENEWAL_DAY",
"changeScheduleDate": "2026-08-01"
}
]
}
```
`changeSchedule` tells you when each option takes effect:
- `INSTANT` — change takes effect immediately
- `FIRST_OF_NEXT_MONTH` — first day of the next calendar month
- `NEXT_RENEWAL_DAY` — next renewal date
- `NEXT_PAYMENT_DAY` — end of the prepaid period, the next payment day
Render `changeScheduleDate` next to each plan so users know exactly when the switch happens.
###### Change the subscription's product offering
Submit the change with the `productOfferingId` that the user selected. The offering decides
when the change takes effect, and that date follows from the network setup and the billing
cycle. You can also pass `scheduledAt` as the earliest date for the change. If the change
schedule does not permit that date, the API takes the first permitted date after it.
```bash
curl -X PUT "{BASE_URL}/subscriptions/d8174435-6378-4be5-a9f5-8b4aaadae5d4/product-offering-change" \
-H "Authorization: Bearer YOUR_ACCESS_TOKEN" \
-H "X-API-Key: YOUR_API_KEY" \
-H "X-Idempotency-Key: plan-change-7f3a2b1c" \
-H "Content-Type: application/json" \
-d '{
"productOfferingId": "cell-5gb"
}'
```
The response is the updated subscription. For a non-instant change (like this downgrade), the current plan stays in place and the scheduled change appears under `pendingProductOffering`:
```json
{
"subscriptionId": "d8174435-6378-4be5-a9f5-8b4aaadae5d4",
"status": "ACTIVATED",
"type": "CELL",
"display": "(206) 555-0142",
"msisdn": "+12065550142",
"customer": {
"customerId": "6b1f44a0-52d3-4f7a-9b3e-2c8d5e91f0a4",
"name": "Emma Johnson"
},
"productOffering": {
"productOfferingId": "cell-10gb",
"name": "Seamless 10GB",
"price": {
"netPriceMinor": 2999,
"currency": "USD",
"priceType": "RECURRING",
"billingCycle": {
"period": "MONTHLY",
"interval": 1
},
"standardDiscount": { "amountMinor": 500 },
"bindingContract": {
"duration": {
"unit": "MONTHS",
"value": 12
},
"discount": {
"amountMinor": 200
}
},
"customUpfrontPayment": {
"billingCycles": 3,
"discount": {
"amountMinor": 300
}
},
"currencyOptionsMinor": {
"USD": 2999,
"SEK": 29900
}
}
},
"pendingProductOffering": {
"scheduledAt": "2026-08-01",
"product": {
"productOfferingId": "cell-5gb",
"name": "Seamless 5GB",
"price": {
"netPriceMinor": 1999,
"currency": "USD",
"priceType": "RECURRING",
"billingCycle": {
"period": "MONTHLY",
"interval": 1
},
"standardDiscount": { "amountMinor": 300 },
"bindingContract": {
"duration": {
"unit": "MONTHS",
"value": 12
},
"discount": {
"amountMinor": 200
}
},
"customUpfrontPayment": {
"billingCycles": 3,
"discount": {
"amountMinor": 200
}
},
"currencyOptionsMinor": {
"USD": 1999,
"SEK": 19900
}
}
}
},
"sim": {
"esim": true,
"iccid": "89012608522901821364"
},
"activatedAt": "2026-03-15T09:30:00Z",
"createdAt": "2026-03-10T14:22:05Z",
"updatedAt": "2026-07-12T09:12:41Z"
}
```
For an `INSTANT` option, the response instead shows the new plan directly in `productOffering` with no `pendingProductOffering`.
##### Step 6: Manage addons
###### List active addons
Get all active and pending addons currently attached to a subscription. Filter by `status` (`PENDING`, `ACTIVE`, `CANCELLED`, `EXPIRED`) if needed.
```bash
curl -X GET "{BASE_URL}/subscriptions/d8174435-6378-4be5-a9f5-8b4aaadae5d4/addons?status=ACTIVE" \
-H "Authorization: Bearer YOUR_ACCESS_TOKEN" \
-H "X-API-Key: YOUR_API_KEY"
```
```json
{
"items": [
{
"subscriptionAddonId": "a47ac10b-58cc-4372-a567-0e02b2c3d479",
"subscriptionId": "d8174435-6378-4be5-a9f5-8b4aaadae5d4",
"status": "ACTIVE",
"productOffering": {
"productOfferingId": "addon-roaming-na",
"name": "North America Roaming",
"price": {
"netPriceMinor": 1499,
"currency": "USD",
"priceType": "RECURRING",
"billingCycle": {
"period": "MONTHLY",
"interval": 1
},
"standardDiscount": { "amountMinor": 200 },
"bindingContract": {
"duration": {
"unit": "MONTHS",
"value": 12
},
"discount": {
"amountMinor": 100
}
},
"customUpfrontPayment": {
"billingCycles": 3,
"discount": {
"amountMinor": 100
}
},
"currencyOptionsMinor": {
"USD": 1499,
"SEK": 14900
}
}
},
"addedAt": "2026-05-01T12:00:00Z",
"updatedAt": "2026-05-01T12:00:00Z"
}
]
}
```
###### Find addons available to purchase
To build a store of the addons that a user can buy, list the product offerings with
`types=SUBSCRIPTION_ADDON`. The `customerType` parameter is required. Use `categories` to
narrow the list, such as `PRODUCT_CATEGORY_EXTRA_DATA` for a data package or
`PRODUCT_CATEGORY_ABROAD` for roaming. The `addonCategories` field of an addon offering lists
the subscription categories that it attaches to.
```bash
curl -X GET "{BASE_URL}/product-offerings?types=SUBSCRIPTION_ADDON&customerType=CONSUMER" \
-H "Authorization: Bearer YOUR_ACCESS_TOKEN" \
-H "X-API-Key: YOUR_API_KEY"
```
###### Add an addon to the subscription
Add the chosen offering to the subscription. The addon activates immediately, or on `scheduledAt` if provided.
```bash
curl -X POST "{BASE_URL}/subscriptions/d8174435-6378-4be5-a9f5-8b4aaadae5d4/addons" \
-H "Authorization: Bearer YOUR_ACCESS_TOKEN" \
-H "X-API-Key: YOUR_API_KEY" \
-H "X-Idempotency-Key: add-addon-2c9e4f7a" \
-H "Content-Type: application/json" \
-d '{
"productOfferingId": "addon-roaming-na"
}'
```
Returns `201 Created` with the new addon, including its `subscriptionAddonId` for later changes or cancellation.
###### Get change options for a subscription addon
Get all product offerings an existing addon can be changed to and when the change can take effect. Pass the addon's current offering as `currentProductOfferingId` (required).
```bash
curl -X GET "{BASE_URL}/subscriptions/d8174435-6378-4be5-a9f5-8b4aaadae5d4/addons/product-offering-options?currentProductOfferingId=addon-roaming-na" \
-H "Authorization: Bearer YOUR_ACCESS_TOKEN" \
-H "X-API-Key: YOUR_API_KEY"
```
```json
{
"items": [
{
"productOffering": {
"productOfferingId": "addon-roaming-global",
"name": "Global Roaming",
"price": {
"netPriceMinor": 2499,
"currency": "USD",
"priceType": "RECURRING",
"billingCycle": {
"period": "MONTHLY",
"interval": 1
},
"standardDiscount": { "amountMinor": 300 },
"bindingContract": {
"duration": {
"unit": "MONTHS",
"value": 12
},
"discount": {
"amountMinor": 200
}
},
"customUpfrontPayment": {
"billingCycles": 3,
"discount": {
"amountMinor": 200
}
},
"currencyOptionsMinor": {
"USD": 2499,
"SEK": 24900
}
}
},
"changeSchedule": "INSTANT",
"changeScheduleDate": "2026-07-12"
}
]
}
```
###### Change a subscription addon's product offering
Change an existing addon to a different offering (upgrade or downgrade). Identify the addon with its `subscriptionAddonId`.
```bash
curl -X PUT "{BASE_URL}/subscriptions/d8174435-6378-4be5-a9f5-8b4aaadae5d4/addons/product-offering-change" \
-H "Authorization: Bearer YOUR_ACCESS_TOKEN" \
-H "X-API-Key: YOUR_API_KEY" \
-H "X-Idempotency-Key: change-addon-9b4d1e6f" \
-H "Content-Type: application/json" \
-d '{
"subscriptionAddonId": "a47ac10b-58cc-4372-a567-0e02b2c3d479",
"productOfferingId": "addon-roaming-global",
"reason": "Customer upgrade request"
}'
```
The response is the updated addon. Like plan changes, a scheduled change appears under the addon's `pendingProductOffering` until it takes effect.
###### Cancel an addon
Cancel an active addon. Without `scheduledAt`, the addon is cancelled immediately or according to the default schedule.
```bash
curl -X POST "{BASE_URL}/subscriptions/d8174435-6378-4be5-a9f5-8b4aaadae5d4/addons/cancel" \
-H "Authorization: Bearer YOUR_ACCESS_TOKEN" \
-H "X-API-Key: YOUR_API_KEY" \
-H "X-Idempotency-Key: cancel-addon-5e8c3a2d" \
-H "Content-Type: application/json" \
-d '{
"subscriptionAddonId": "a47ac10b-58cc-4372-a567-0e02b2c3d479",
"reason": "No longer needed"
}'
```
A scheduled cancellation shows up in the addon's `pendingStatus`:
```json
{
"subscriptionAddonId": "a47ac10b-58cc-4372-a567-0e02b2c3d479",
"subscriptionId": "d8174435-6378-4be5-a9f5-8b4aaadae5d4",
"status": "ACTIVE",
"productOffering": {
"productOfferingId": "addon-roaming-na",
"name": "North America Roaming",
"price": {
"netPriceMinor": 1499,
"currency": "USD",
"priceType": "RECURRING",
"billingCycle": {
"period": "MONTHLY",
"interval": 1
},
"standardDiscount": { "amountMinor": 200 },
"bindingContract": {
"duration": {
"unit": "MONTHS",
"value": 12
},
"discount": {
"amountMinor": 100
}
},
"customUpfrontPayment": {
"billingCycles": 3,
"discount": {
"amountMinor": 100
}
},
"currencyOptionsMinor": {
"USD": 1499,
"SEK": 14900
}
}
},
"pendingStatus": {
"status": "CANCELLED",
"scheduledAt": "2026-08-01"
},
"addedAt": "2026-05-01T12:00:00Z",
"updatedAt": "2026-07-12T09:30:12Z"
}
```
##### Step 7: Sell data topups
A data topup is a one-time addon: a `SUBSCRIPTION_ADDON` offering in the `PRODUCT_CATEGORY_EXTRA_DATA` category with a `ONE_TIME` price. The flow is the same as any addon purchase — find the offering, then add it to the subscription.
The `price` of an offering is the catalog price. It carries no discount, no promotion, and no
price list. Present it as the list price. The amount that the customer pays is settled when
the addon is invoiced. For the full rules, read [interpreting
pricing](/developer-guide/use-cases/product-management.md).
```bash
# Find available data top-up offerings
curl -X GET "{BASE_URL}/product-offerings?types=SUBSCRIPTION_ADDON&categories=PRODUCT_CATEGORY_EXTRA_DATA&customerType=CONSUMER" \
-H "Authorization: Bearer YOUR_ACCESS_TOKEN" \
-H "X-API-Key: YOUR_API_KEY"
# Buy the top-up
curl -X POST "{BASE_URL}/subscriptions/d8174435-6378-4be5-a9f5-8b4aaadae5d4/addons" \
-H "Authorization: Bearer YOUR_ACCESS_TOKEN" \
-H "X-API-Key: YOUR_API_KEY" \
-H "X-Idempotency-Key: topup-1d7f9c3b" \
-H "Content-Type: application/json" \
-d '{
"productOfferingId": "addon-data-5gb"
}'
```
```json
{
"subscriptionAddonId": "b58a1c7e-9d24-4f6a-8e13-5c2d7b9f0a46",
"subscriptionId": "d8174435-6378-4be5-a9f5-8b4aaadae5d4",
"status": "ACTIVE",
"productOffering": {
"productOfferingId": "addon-data-5gb",
"name": "Extra Data 5GB",
"price": {
"netPriceMinor": 1000,
"currency": "USD",
"priceType": "ONE_TIME",
"standardDiscount": {
"amountMinor": 100
},
"currencyOptionsMinor": {
"USD": 1000,
"SEK": 9900
}
}
},
"addedAt": "2026-07-12T10:15:00Z",
"updatedAt": "2026-07-12T10:15:00Z"
}
```
After the topup is active, it appears as an extra package in the usage response of Step 4, with
its `subscriptionAddonId` set. Your usage meter can then show "Extra Data 5GB: 0 of 5 GB used"
beside the base plan.
##### Step 8: Deliver eSIM activation codes
For eSIM subscriptions (`sim.esim: true`), let users retrieve their activation QR code directly from the portal instead of contacting support. The response contains both the raw LPA activation string and a hosted QR code image URL.
```bash
curl -X GET "{BASE_URL}/subscriptions/d8174435-6378-4be5-a9f5-8b4aaadae5d4/esim/qrcode" \
-H "Authorization: Bearer YOUR_ACCESS_TOKEN" \
-H "X-API-Key: YOUR_API_KEY"
```
```json
{
"subscriptionId": "d8174435-6378-4be5-a9f5-8b4aaadae5d4",
"qrCodeData": "LPA:1$rsp-prod.example.com$K2-1EA0C7-8834B2",
"qrCodeUrl": "https://esim.example.com/qr/d8174435-6378-4be5-a9f5-8b4aaadae5d4",
"expiresAt": "2026-07-13T10:15:00Z"
}
```
> **Warning**
>
> Do not cache a QR code. Request a new one when the user opens the installation screen. Anybody who
> scans a QR code can install the eSIM profile, and each code expires at its `expiresAt`.
##### Step 9: Show invoices
List the invoices of the customer for a billing history page. Filter by `status`, and by the
date ranges `fromDate`/`toDate` and `dueDateFrom`/`dueDateTo`. Get one invoice to read its
full line-item breakdown.
```bash
# List invoices for the customer
curl -X GET "{BASE_URL}/invoices?customerId=6b1f44a0-52d3-4f7a-9b3e-2c8d5e91f0a4&status=SENT&status=PAID&status=OVERDUE" \
-H "Authorization: Bearer YOUR_ACCESS_TOKEN" \
-H "X-API-Key: YOUR_API_KEY"
# Get a single invoice with line items
curl -X GET "{BASE_URL}/invoices/094f10ca-616e-441c-b264-9a2305d6692d" \
-H "Authorization: Bearer YOUR_ACCESS_TOKEN" \
-H "X-API-Key: YOUR_API_KEY"
```
A single invoice includes the line items, tax breakdown, and a hosted `invoiceUrl` you can link to for viewing or downloading:
```json
{
"invoiceId": "094f10ca-616e-441c-b264-9a2305d6692d",
"customerId": "6b1f44a0-52d3-4f7a-9b3e-2c8d5e91f0a4",
"invoiceNumber": "INV-2026-0042",
"status": "SENT",
"dueDate": "2026-07-25",
"lineItems": [
{
"description": "Seamless 10GB - (206) 555-0142",
"subscriptionId": "d8174435-6378-4be5-a9f5-8b4aaadae5d4",
"productOfferingId": "cell-10gb",
"quantity": 1,
"unitPriceMinor": 2999,
"subtotalMinor": 2999,
"taxAmountMinor": 270,
"taxIncluded": false,
"totalMinor": 3269
},
{
"description": "Extra Data 5GB - (206) 555-0142",
"subscriptionId": "d8174435-6378-4be5-a9f5-8b4aaadae5d4",
"productOfferingId": "addon-data-5gb",
"quantity": 1,
"unitPriceMinor": 1000,
"subtotalMinor": 1000,
"taxAmountMinor": 90,
"taxIncluded": false,
"totalMinor": 1090
}
],
"subtotalAmountMinor": 3999,
"taxAmountMinor": 360,
"totalAmountMinor": 4359,
"currency": "USD",
"sentAt": "2026-07-01T06:00:00Z",
"invoiceUrl": "https://invoices.example.com/094f10ca-616e-441c-b264-9a2305d6692d",
"createdAt": "2026-07-01T06:00:00Z",
"updatedAt": "2026-07-01T06:00:00Z"
}
```
Invoice `status` is one of `DRAFT`, `SENT`, `PAID`, `VOID`, or `OVERDUE` — highlight `OVERDUE` invoices prominently in the portal.
##### Step 10: Manage saved payment methods
List the customer's saved payment methods so users can see and manage what is on file. The `displayName` is safe to show as-is (for example "Visa ending in 4242").
```bash
curl -X GET "{BASE_URL}/payment-profiles?customerId=6b1f44a0-52d3-4f7a-9b3e-2c8d5e91f0a4" \
-H "Authorization: Bearer YOUR_ACCESS_TOKEN" \
-H "X-API-Key: YOUR_API_KEY"
```
```json
{
"items": [
{
"paymentProfileId": "e1f2a3b4-c5d6-7890-1234-f01234567890",
"paymentProvider": "STRIPE",
"type": "CARD",
"status": "ACTIVE",
"displayName": "Visa ending in 4242",
"isDefault": true,
"expiresAt": "2027-08-31",
"createdAt": "2026-03-10T14:25:11Z"
}
]
}
```
Profile `status` is `ACTIVE`, `INACTIVE`, `EXPIRED`, or `REQUIRES_ACTION`. Surface `EXPIRED` cards with a prompt to add a new payment method.
To save a new payment method, create a payment profile session. Then send the user to its
hosted page. A payment profile session always belongs to an order. Its purpose is an order
with a total of zero, where no payment is due but a payment method must be stored. The
[payment processing guide](/developer-guide/use-cases/payment-processing.md) explains how orders,
payment sessions, and payment profiles fit together.
```bash
# Create the session
curl -X POST "{BASE_URL}/payment-profiles/sessions" \
-H "Authorization: Bearer YOUR_ACCESS_TOKEN" \
-H "X-API-Key: YOUR_API_KEY" \
-H "X-Idempotency-Key: setup-payment-4a1c8e2f" \
-H "Content-Type: application/json" \
-d '{
"orderId": "9f8e7d6c-5b4a-3210-9876-543210987654",
"paymentProvider": "STRIPE",
"returnUrl": "https://portal.example.com/billing/payment-methods?setup=complete",
"cancelUrl": "https://portal.example.com/billing/payment-methods",
"setAsDefaultPaymentProfile": true
}'
# Check the session after the user returns
curl -X GET "{BASE_URL}/payment-profiles/sessions/69321a62-f1fe-461f-8761-a19ae6587bb2" \
-H "Authorization: Bearer YOUR_ACCESS_TOKEN" \
-H "X-API-Key: YOUR_API_KEY"
```
```json
{
"paymentProfileSessionId": "69321a62-f1fe-461f-8761-a19ae6587bb2",
"orderId": "9f8e7d6c-5b4a-3210-9876-543210987654",
"paymentProvider": "STRIPE",
"status": "PENDING",
"hostedUrl": "https://payments.example.com/setup/69321a62-f1fe-461f-8761-a19ae6587bb2",
"metadata": {},
"createdAt": "2026-07-12T10:40:00Z",
"updatedAt": "2026-07-12T10:40:00Z"
}
```
Session `status` moves through `PENDING`, `REQUIRES_ACTION`, and finally `COMPLETED`, `FAILED`, or `CANCELED`. When the user lands back on your `returnUrl`, fetch the session and refresh the payment profile list once it is `COMPLETED`. You can abandon an in-progress session with `POST /payment-profiles/sessions/{paymentProfileSessionId}/cancel`.
To remove a saved payment method:
```bash
curl -X DELETE "{BASE_URL}/payment-profiles/e1f2a3b4-c5d6-7890-1234-f01234567890" \
-H "Authorization: Bearer YOUR_ACCESS_TOKEN" \
-H "X-API-Key: YOUR_API_KEY"
```
> **Warning**
>
> Deletion is permanent, and the customer's default payment profile cannot be deleted — another
> profile must be made the default first. Attempting to delete the default returns `409 Conflict`.
##### Step 11: Cancel a Subscription
Offer self-service cancellation with structured churn feedback. The `cancelAt` field accepts exactly one of three timing options: `{"nextDay": true}`, `{"nextMonth": true}` (beginning of next month), or `{"date": "2026-09-01"}` for a specific date.
```bash
curl -X POST "{BASE_URL}/subscriptions/d8174435-6378-4be5-a9f5-8b4aaadae5d4/cancel" \
-H "Authorization: Bearer YOUR_ACCESS_TOKEN" \
-H "X-API-Key: YOUR_API_KEY" \
-H "X-Idempotency-Key: cancel-sub-8f2b6d4a" \
-H "Content-Type: application/json" \
-d '{
"cancelAt": { "nextMonth": true },
"churn": "NO_NEED",
"comment": "Moving abroad later this year"
}'
```
The response is the subscription with the scheduled cancellation in `pendingStatus`:
```json
{
"subscriptionId": "d8174435-6378-4be5-a9f5-8b4aaadae5d4",
"status": "ACTIVATED",
"type": "CELL",
"display": "(206) 555-0142",
"msisdn": "+12065550142",
"customer": {
"customerId": "6b1f44a0-52d3-4f7a-9b3e-2c8d5e91f0a4",
"name": "Emma Johnson"
},
"pendingStatus": {
"status": "CANCELLED",
"scheduledAt": "2026-08-01"
},
"sim": {
"esim": true,
"iccid": "89012608522901821364"
},
"activatedAt": "2026-03-15T09:30:00Z",
"createdAt": "2026-03-10T14:22:05Z",
"updatedAt": "2026-07-12T11:02:33Z"
}
```
Valid `churn` values: `BETTER_DEAL_PRICE`, `NOT_HAPPY_MISSING_FUNCTIONS`, `NOT_HAPPY_COVERAGE_SLA`, `NOT_HAPPY_COMPLEX_ADMIN`, `NOT_HAPPY_SUPPORT_ENGAGEMENT`, `FRAUD`, `FRAUD_ATTEMPT`, `TEST_OR_MARKETING`, `NO_NEED`, `WRONG_ORDER`, and `OTHER`. If the user picks `OTHER`, also collect a `comment`. Present these as a dropdown in the cancellation flow — the standardized reasons feed churn reporting.
#### Error handling
All errors share a common shape with a machine-readable `code`, a human-readable `message`, optional per-field `details`, and sometimes a `hint`:
```json
{
"message": "The request was malformed or invalid.",
"code": "BAD_REQUEST",
"details": [
{
"message": "must match pattern ^[0-9]{6}$",
"code": "INVALID_FORMAT",
"property": "code"
}
],
"hint": "Check the verification code and try again."
}
```
Handle the statuses that matter most in a portal:
- **401 Unauthorized** — the JWT is missing or expired. Send the user back through the email login flow (Step 1).
- **403 Forbidden** — the token of the user does not reach that resource. Stop there. Never
show the data of another customer, and never retry the request.
- **404 Not Found** — the resource does not exist or is outside the user's scope.
- **409 Conflict** — a conflicting change is already pending, or an `X-Idempotency-Key` was reused with a modified request body. Refresh the resource and let the user retry deliberately.
- **429 Too Many Requests** — rate limited (the login endpoints in particular). Back off exponentially before retrying.
```javascript
const withPortalErrorHandling = async (operation) => {
try {
return await operation();
} catch (error) {
if (error.status === 401) {
return redirectToLogin();
}
if (error.status === 429) {
return retryWithBackoff(operation);
}
console.error('Portal request failed:', error.message);
showErrorToast('Something went wrong. Please try again.');
throw error;
}
};
const retryWithBackoff = async (operation, maxRetries = 3) => {
for (let attempt = 1; attempt <= maxRetries; attempt++) {
try {
return await operation();
} catch (error) {
if (attempt === maxRetries) throw error;
const delay = Math.pow(2, attempt) * 1000;
await new Promise((resolve) => setTimeout(resolve, delay));
}
}
};
```
Send an `X-Idempotency-Key` header on every call that changes something: a plan change, an
addon purchase, and a cancellation. The same change then never happens twice after a
double-click or a retried request. A key expires after 24 hours. Use a new key for each
distinct operation.
#### Best practices
- **Scope with the JWT of the user, not with a filter.** A list endpoint already restricts its
results to what the authenticated user can reach. Do not use a `customerId` filter in your
own code as access control.
- **Show every pending change.** `pendingProductOffering`, `pendingStatus`, and `pendingMsisdn`
tell the user what is scheduled already. Show all three. A user who sees them does not
request the same change twice.
- **Get the change options first.** Offer only the plans and the addons that the
`product-offering-options` endpoints return, and show `changeScheduleDate` before the user
accepts the change. An offering that is not in the options fails on submit.
- **Refresh the usage when the user opens the view, not on a timer.** The usage carries an
`updatedAt` timestamp. Show it, as in "Updated 5 minutes ago".
- **Keep a token short-lived on a shared device.** The `expiresIn` of an access token is the
maximum, not a target. Erase the token at logout and authenticate again.
#### Next steps
- [Payment processing](/developer-guide/use-cases/payment-processing.md) — Handle payment sessions, recurring billing, and payment failures
- [Product management](/developer-guide/use-cases/product-management.md) — Model plans, addons, and pricing that power your self-service store
#### Common questions
**Q: How do end users get API access — do they need their own API keys?**
A: No. Your integration uses one API key, and each end user authenticates with the passwordless email flow to get a personal JWT. The JWT scopes every request to that user's own subscriptions, invoices, and payment methods.
**Q: Why is there no dedicated topup endpoint?**
A: Topups are modeled as one-time addons: `SUBSCRIPTION_ADDON` offerings in the `PRODUCT_CATEGORY_EXTRA_DATA` category with a `ONE_TIME` price. Purchasing one through the addons endpoint immediately grants an extra usage package.
**Q: When does a plan change actually take effect?**
A: It depends on the offering's `changeSchedule`: `INSTANT` changes apply immediately, while `FIRST_OF_NEXT_MONTH`, `NEXT_RENEWAL_DAY`, and `NEXT_PAYMENT_DAY` changes are scheduled and appear under the subscription's `pendingProductOffering` until they land.
### Travel eSIM
Canonical URL: https://docs.telnesstech.com/developer-guide/use-cases/travel-esim
Travel eSIM provides prepaid international data connectivity for travelers. This guide walks you through the Travel eSIM integration, from browsing available packages to provisioning and topups.
#### Core concept
A Travel eSIM consists of two components:
- **Subscription**: The eSIM container that holds the SIM reference (ICC, MSISDN)
- **Data package (Addon)**: Contains the actual data allowance, validity period, and supported countries/regions
> **Note**
>
> A subscription always requires at least one data package to be usable. Topups are handled by
> adding additional packages to an existing subscription.
#### Quick path
**1. Browse packages**
List available Travel eSIM data packages filtered by country or region.
**2. Create order**
Create an order with both the subscription and initial data package.
**3. Calculate price**
Calculate taxes and totals before payment.
**4. Collect payment**
Collect payment through your own provider or use a managed payment session.
**5. Submit order**
Submit the order to provision the eSIM and activate the data package.
#### Order structure
When creating a Travel eSIM order, you need two line items:
1. **Subscription line item** (`TRAVEL_ESIM`): Creates the eSIM profile
2. **Addon line item** (`TRAVEL_ESIM_PACKAGE`): Activates the data package
```
Order
├── Line Item 1: Subscription (TRAVEL_ESIM)
│ └── Gets ICC, MSISDN from provisioning
│
└── Line Item 2: Addon (TRAVEL_ESIM_PACKAGE)
├── dataGb
├── validityDays
├── countries[] (ISO 3166-1 alpha-2: "ES", "FR")
├── regions[] (EUROPE, AMERICAS, ASIA_PACIFIC, GLOBAL)
└── activationType (INSTANT, FIRST_USE)
```
> **Info**
>
> Use `parentLineItemId` to link the addon to a new subscription in the same order. Use
> `subscriptionId` when adding packages to an existing subscription.
#### 1. Browse available packages
List Travel eSIM data packages available for purchase. You can filter by country or region to show relevant options to your customers.
```bash
# List all Travel eSIM addon packages
curl "{BASE_URL}/products/offerings?categories=TRAVEL_ESIM_PACKAGE" \
-H "X-API-Key: $API_KEY"
```
##### Filter by country
```bash
# List packages available in Spain
curl "{BASE_URL}/products/offerings?categories=TRAVEL_ESIM_PACKAGE&countries=ES" \
-H "X-API-Key: $API_KEY"
```
##### Filter by region
```bash
# List packages for Europe
curl "{BASE_URL}/products/offerings?categories=TRAVEL_ESIM_PACKAGE®ions=EUROPE" \
-H "X-API-Key: $API_KEY"
```
Available regions: `EUROPE`, `AMERICAS`, `ASIA_PACIFIC`, `GLOBAL`
See [List Product Offerings](/api-reference/product-offerings.md#tag/product-offerings/GET/product-offerings)
#### 2. Create order
Create an order with both the subscription (eSIM container) and the initial data package.
```bash
curl -X POST "{BASE_URL}/orders" \
-H "X-API-Key: $API_KEY" \
-H "Content-Type: application/json" \
-d '{
"customer": {
"customerId": "123e4567-e89b-12d3-a456-426614174000"
},
"lineItems": [
{
"type": "SUBSCRIPTION",
"lineItemId": "esim-container",
"productOfferingId": "travel-esim-subscription-offering-id",
"subscriber": {
"name": "John Doe",
"email": "john@example.com"
},
"sim": {
"esim": true
}
},
{
"type": "ADDON",
"lineItemId": "data-package",
"productOfferingId": "europe-5gb-30days-offering-id",
"parentLineItemId": "esim-container"
}
]
}'
```
> **Warning**
>
> Orders with a `TRAVEL_ESIM` subscription must include at least one `TRAVEL_ESIM_PACKAGE` line
> item. The order will be rejected if no data package is included.
See [Create Order](/api-reference/orders.md#tag/orders/POST/orders)
#### 3. Calculate order price
Calculate taxes and totals before collecting payment.
```bash
curl -X POST "{BASE_URL}/orders/{orderId}/calculate-price" \
-H "X-API-Key: $API_KEY" \
-H "Content-Type: application/json"
```
See [Calculate Order Price](/api-reference/orders.md#tag/orders/POST/orders/{orderId}/calculate-price)
#### 4. Collect payment
Travel eSIM orders require prepaid payment before submission. You can collect payment through your own payment provider or use a managed payment session.
##### Option A: Your own payment provider (recommended)
Collect the payment through your own payment provider, such as Stripe, Adyen, or Braintree.
Then pass the payment reference when you submit the order. You keep full control of the
checkout, and you keep the payment infrastructure that you already run.
```bash
# Step 1: Collect payment through your own provider
# (This happens in your existing payment flow)
# Step 2: Submit the order with the payment reference
curl -X POST "{BASE_URL}/orders/{orderId}/submit" \
-H "X-API-Key: $API_KEY" \
-H "Content-Type: application/json" \
-d '{
"externalPayment": {
"reference": "pi_3ABC123def456",
"receiptDescription": "Travel eSIM data package",
"receiptUrl": "https://yourapp.com/receipts/abc123"
}
}'
```
> **Note**
>
> When using external payments, you are responsible for collecting the correct amount and handling
> refunds through your payment provider.
##### Option B: Payment session API
If you prefer a managed payment flow, use the Payment Session API to create a payment session. You can use a hosted checkout page or an embedded payment widget.
```bash
curl -X POST "{BASE_URL}/payment-sessions" \
-H "X-API-Key: $API_KEY" \
-H "Content-Type: application/json" \
-d '{
"orderId": "{orderId}",
"paymentProvider": "STRIPE",
"hosted": true,
"returnUrl": "https://yourapp.com/payment/success",
"cancelUrl": "https://yourapp.com/payment/cancel"
}'
# Redirect customer to provider.checkoutUrl from the response for payment
```
See [Create Payment Session](/api-reference/payment-sessions.md#tag/payment-sessions/POST/payment-sessions)
#### 5. Submit order
Submit the order to provision the eSIM and activate the data package. If you used external payment (Option A), the order is already submitted from step 4. If you used a payment session (Option B), submit the order with the payment session ID.
```bash
curl -X POST "{BASE_URL}/orders/{orderId}/submit" \
-H "X-API-Key: $API_KEY" \
-H "Content-Type: application/json" \
-d '{
"paymentSessionId": "{paymentSessionId}"
}'
# The created subscription ID is in createdEntities.subscriptions in the response
```
See [Submit Order](/api-reference/orders.md#tag/orders/POST/orders/{orderId}/submit)
#### 6. Retrieve eSIM QR code
After the order is submitted, retrieve the eSIM QR code for the customer to install on their device.
```bash
curl "{BASE_URL}/subscriptions/{subscriptionId}/esim/qrcode" \
-H "X-API-Key: $API_KEY"
# Display the returned QR code to the customer for eSIM installation
```
See [Get eSIM QR Code](/api-reference/subscriptions.md#tag/subscriptions/GET/subscriptions/{subscriptionId}/esim/qrcode)
#### Topup to add more data
When a customer needs more data, create a new order with an addon line item linked to the existing subscription.
```bash
curl -X POST "{BASE_URL}/orders" \
-H "X-API-Key: $API_KEY" \
-H "Content-Type: application/json" \
-d '{
"customer": {
"customerId": "123e4567-e89b-12d3-a456-426614174000"
},
"lineItems": [
{
"type": "ADDON",
"lineItemId": "topup-package",
"productOfferingId": "europe-10gb-30days-offering-id",
"subscriptionId": "{subscriptionId}"
}
]
}'
# Continue with calculate-price, payment, and submit as above
```
> **Note**
>
> Multiple data packages can coexist on one subscription, even covering different regions. Each
> package has its own validity period and data allowance.
#### Check usage
Monitor data consumption for a Travel eSIM subscription.
```bash
curl "{BASE_URL}/subscriptions/{subscriptionId}/usage" \
-H "X-API-Key: $API_KEY"
```
See [Get Subscription Usage](/api-reference/subscription-usage.md#tag/subscription-usage/GET/subscriptions/{subscriptionId}/usage)
#### Subscription states
| State | Description |
| ----------- | -------------------------------------- |
| `PENDING` | Order submitted, awaiting provisioning |
| `ACTIVE` | eSIM provisioned and ready for use |
| `CANCELLED` | Subscription terminated |
> **Info**
>
> The subscription stays `ACTIVE` even when data packages expire. Customers can always add more
> packages to continue using the eSIM.
#### Data package states
| State | Description |
| ----------- | ------------------------------------ |
| `PENDING` | Package ordered, awaiting activation |
| `ACTIVE` | Package activated and data available |
| `EXPIRED` | Validity period ended |
| `CANCELLED` | Package canceled before expiration |
#### Activation types
Data packages support two activation types:
- **INSTANT**: Package activates immediately upon order submission
- **FIRST_USE**: Package activates when the customer first connects to the network
#### Cancel subscription
To cancel a Travel eSIM subscription:
```bash
curl -X POST "{BASE_URL}/subscriptions/{subscriptionId}/cancel" \
-H "X-API-Key: $API_KEY"
```
See [Cancel Subscription](/api-reference/subscriptions.md#tag/subscriptions/POST/subscriptions/{subscriptionId}/cancel)
#### Next steps
- [Product offerings](/api-reference/product-offerings.md) — Browse and filter available Travel eSIM packages
- [Orders](/api-reference/orders.md) — Learn more about order management
- [Subscription usage](/api-reference/subscription-usage.md) — Monitor data consumption and usage patterns
- [Webhooks](/api-reference/webhooks.md) — Set up notifications for order and subscription events
### MCP server
Canonical URL: https://docs.telnesstech.com/developer-guide/mcp
Seamless OS ships a remote [Model Context Protocol](https://modelcontextprotocol.io) server.
Through it an AI agent reads and manages the customers, the subscriptions, the licenses, and
the product catalogs on your platform, in natural language. ChatGPT, Cursor, VS Code Copilot,
and your own agent can all connect to it.
The server is deployed per brand, beside your API. Every tool runs with the permissions of the
signed-in user, so an agent sees and changes only what the person who authorized it can. The
server is in preview. Its tools, its resources, and their schemas can still change.
A separate server, with no authentication, exposes this documentation site to an agent. Read
[Docs for agents](/developer-guide/docs-for-agents.md).
#### Endpoint
| Transport | URL | Notes |
| --------------- | ----------------------------- | ---------------------------------------------------------- |
| Streamable HTTP | `https://mcp.example.com/mcp` | Recommended for all current MCP clients. |
| SSE (legacy) | `https://mcp.example.com/sse` | For clients that have not yet migrated to Streamable HTTP. |
Replace `mcp.example.com` with the MCP domain of your deployment. It sits next to your API
domain.
#### Statelessness
The `/mcp` endpoint implements the stateless Streamable HTTP transport of the [2026-07-28 MCP
revision](https://modelcontextprotocol.io/specification/2026-07-28/basic/transports/streamable-http).
Every request is one self-contained HTTP POST, and the server keeps no state between two
requests.
- The server speaks protocol versions 2025-03-26 to 2026-07-28, which is every revision of
Streamable HTTP. A client on an older revision opens with an `initialize` handshake and
still works. The server answers the handshake, but it never issues a session. A client on
the 2024-11-05 revision predates Streamable HTTP, so it uses the legacy `/sse` transport.
- The server issues no `Mcp-Session-Id` header, and it ignores one that an older client sends.
No session exists, so no session expires. A long-running agent never loses its connection
state between two calls.
- `GET` and `DELETE` on `/mcp` answer `405 Method Not Allowed`. There is no separate
server-push stream. An older protocol revision requires a client to tolerate exactly this
from a server with no sessions and no push stream.
- When the client closes the response stream, the server cancels the request, and it cancels
the API calls that the request started.
Each request carries everything that the server needs. A load balancer can send it
to any replica, with no session affinity.
#### Authentication
The server implements the standard MCP authorization flow: OAuth 2.0 with dynamic client
registration and metadata discovery. The two discovery documents are
`/.well-known/oauth-authorization-server` and `/.well-known/oauth-protected-resource`.
As a result, you configure nothing. Put the server URL into an MCP client. The client registers
itself and opens a browser window, and you sign in there with your ordinary Seamless OS
account. The sign-in is the login page of the brand portal, or a hosted page for your email
address and a verification code. Which one you get depends on the deployment. The client then
holds a token scoped to your user, and every tool call is authorized as you.
#### Connect a client
**Claude Code**
```bash
claude mcp add --transport http seamless-os https://mcp.example.com/mcp
```
Claude Code discovers the OAuth configuration and prompts you to sign in on first use.
**ChatGPT**
In ChatGPT, turn on developer mode at **Settings → Connectors → Advanced → Developer mode**.
Developer mode is available on a paid plan. Then go to **Settings → Connectors → Create** and
enter this URL:
```
https://mcp.example.com/mcp
```
ChatGPT opens the sign-in flow when you create the connector. Then enable the connector in a
conversation to use its tools.
**Cursor**
Add the server to `.cursor/mcp.json`:
```json
{
"mcpServers": {
"seamless-os": {
"url": "https://mcp.example.com/mcp"
}
}
}
```
Cursor handles OAuth registration and sign-in automatically.
**VS Code**
Add the server to `.vscode/mcp.json`:
```json
{
"servers": {
"seamless-os": {
"type": "http",
"url": "https://mcp.example.com/mcp"
}
}
}
```
VS Code handles OAuth registration and sign-in automatically.
#### Tools
Each data tool is a thin wrapper around the [API](/api-reference.md). Its response matches the
schema in the API reference.
| Tool | What it does |
| ------------------------------------------- | ------------------------------------------------------------------------------------------------------------------- |
| `list_customers` | List customers on the platform. Requires administrative privileges. |
| `get_customers_by_id` | Fetch one or more customers by ID, scoped to what the signed-in user can access. |
| `list_subscriptions` | List a customer's subscriptions with embedded product offering and price, filterable by type and status. Paginated. |
| `get_subscriptions_by_id` | Fetch one or more subscriptions by ID, including product offering with price, subscriber and SIM. |
| `get_subscription_product_offering_options` | List the product offerings a subscription can move to, with the price and the date each change takes effect. |
| `update_subscription_product_offering` | Move a subscription onto a different plan, permanently. For a one-off extra, add an addon instead. |
| `get_subscription_topup_offerings` | List the addon (topup) offerings available for a subscription, such as extra data packages. |
| `list_licenses` | List a customer's licenses with embedded product offering and price. |
| `get_product_catalog` | Get a customer's personalized product catalog: available offerings, groups, and prices. |
| `get_current_user` | Get the signed-in user behind the session. |
| `get_app_config` | Get platform basics: country, currency, brand name, and portal URL. |
| `get_available_enums_by_name` | List valid enum values for an entity, useful before filtering or updating. |
| `get_domain_help` | Explain the platform's entities and how they relate — the fastest way for an agent to learn the domain model. |
##### Irreversible tools
A tool whose effect the MCP server cannot undo is not registered by default.
`cancel_subscription` is one of these. An agent that cannot get to the plan a user asked for
must report that, and not cancel the subscription and order a new one. A deployment that wants
the tool sets `MCPSERVER_IRREVERSIBLE_TOOLS_ENABLED`. Without that flag, a cancellation
happens in the portal only.
This rule is narrower than the `destructiveHint` annotation that the server puts on each tool.
`restore_subscription` undoes both, so those two tools stay available.
#### Resources
Beside the tools, the server publishes MCP resources that an agent reads directly:
- **Entity descriptions**: Prose about each entity and how the entities fit together. The
entities are `customer`, `subscription`, `license`, `product_catalog`, `user`, and
`app_config`. The `get_domain_help` tool returns the same content.
- **`json://products/catalogs/{customer_id}`** — a customer's product catalog as a resource.
- **`json://config/enums/{entity_name}`** — valid enum values per entity.
#### Next steps
- [API reference](/api-reference.md) — The API the MCP tools are built on.
- [Authentication](/api-reference/authentication.md) — How Seamless OS authenticates users and API calls.
### Docs for agents
Canonical URL: https://docs.telnesstech.com/developer-guide/docs-for-agents
Everything on this site is published in machine-readable form. Point your own agent at any of
the surfaces on this page. All of them are public, and none of them needs authentication.
#### Markdown pages
Every page has a markdown version at the same URL plus `.md`:
```
https://docs.telnesstech.com/api-reference/errors HTML
https://docs.telnesstech.com/api-reference/errors.md markdown
```
On an API reference page the markdown carries every schema level. The HTML puts the deepest
levels behind a click.
The server also negotiates on the `Accept` header. A request that ranks `text/markdown` above
`text/html` gets the markdown at the page URL itself.
```bash
curl -H 'Accept: text/markdown' https://docs.telnesstech.com/api-reference/errors
```
Every HTML page links its markdown version two ways: with `` and with a `Link` response header. The page header also has a **Copy
page** button that copies the markdown.
#### The llms.txt indexes
| File | Contents |
| ---------------------------------------------- | ------------------------------------------------------------------------- |
| [/llms.txt](/llms.txt) | Index of every page with a one-line description, grouped like the sidebar |
| [/llms-full-guides.txt](/llms-full-guides.txt) | Every guide, concept, and resource page in one document |
| [/llms-full-api.txt](/llms-full-api.txt) | Every endpoint, webhook, and schema in one document |
| [/llms-full.txt](/llms-full.txt) | Both halves in one document |
Start with `/llms.txt`, then get the pages that you need. The three full-text files are in the
order of the sidebar. If you read one from the start, it takes you from orientation, through
the guides, to the reference.
Take `/llms-full-guides.txt` for the prose, or `/llms-full-api.txt` for the endpoints.
`/llms-full.txt` is both halves at once, and it is larger than most context windows. Prefer
one half, the markdown of one page, or the OpenAPI spec.
#### Docs MCP server
The docs are exposed over the [Model Context Protocol](https://modelcontextprotocol.io) at:
```
https://docs.telnesstech.com/mcp
```
The transport is Streamable HTTP. There is no authentication and no session state. The server
implements the 2026-07-28 protocol revision, and it stays compatible with a client on an
earlier initialization-based revision.
The server has two tools:
- `search_docs`: The same search as the ⌘K dialog of the site. It covers the
content, the endpoint names, the schema field names, and the webhook events, and each result
carries a deep-link anchor. The index splits a word on its case and punctuation boundaries,
so `line item`, `lineItems`, and `line-items` all match each other.
- `get_page`: Get one page as markdown by its path, such as `/api-reference/subscriptions`.
Connect from Claude Code:
```bash
claude mcp add --transport http seamless-docs https://docs.telnesstech.com/mcp
```
Any client that speaks Streamable HTTP can take `https://docs.telnesstech.com/mcp` directly.
There is no sign-in step. The endpoint does not serve the older HTTP+SSE transport. If your
client offers a choice, select the HTTP or Streamable HTTP option, not SSE.
The server publishes discovery cards under `/.well-known/mcp/`, for a client or a registry
that probes a domain for an MCP server. The [Discovery](#discovery) section lists them.
This server reads the documentation only. To read and manage the live platform data — the
customers, the subscriptions, and the catalogs — use the [Seamless OS MCP
server](/developer-guide/mcp.md). That server is deployed per brand, and it authorizes as the
signed-in user.
#### OpenAPI spec
The bundled OpenAPI 3.1 document the reference is rendered from:
```
https://docs.telnesstech.com/bundled_openapi.json
```
Use it for code generation and for exact request, response, and webhook schemas. The API reference pages are rendered from this same file, so the two cannot disagree.
#### Search index
The prebuilt index behind the site's search is public JSON:
```
https://docs.telnesstech.com/search-index.json
```
Each document carries a page `href`, a title, and a list of entries with anchor links. An entry
is a heading, a piece of prose, a schema field, or an enum value. If you do not want to rank
the results yourself, use the `search_docs` tool of the MCP server. It runs the ranking of the
site over this same index.
#### Discovery
An agent that has nothing but the domain can find every surface above from the root:
| Path | Contents |
| ---------------------------------------------------------------------- | ----------------------------------------------------------------------------------------------------------------------------------- |
| [/.well-known/api-catalog](/.well-known/api-catalog) | Linkset ([RFC 9727](https://www.rfc-editor.org/rfc/rfc9727)) pointing at the OpenAPI spec, the reference, and the docs MCP endpoint |
| [/.well-known/mcp/server-card.json](/.well-known/mcp/server-card.json) | Server card for the docs MCP server: identity and connection details, also served at `/mcp/server-card` |
| [/.well-known/mcp/server.json](/.well-known/mcp/server.json) | The same server described for MCP registries |
Every HTML and markdown response also carries `Link` headers with the `api-catalog`, `service-desc`, `service-doc`, and `describedby` relations, so one request to any page reveals the rest:
```bash
curl -sI https://docs.telnesstech.com/ | grep -i '^link:'
```
The API's own base URL is not listed, because each brand runs on its own host. The OpenAPI document declares its server as a `BASE_URL` variable rather than a fixed origin.
#### Crawling and training
`robots.txt` allows AI crawlers, for both training and retrieval, and declares `Content-Signal: search=yes, ai-input=yes, ai-train=yes`. The sitemap is at [/sitemap-index.xml](/sitemap-index.xml).
## Concepts
### Conventions
Canonical URL: https://docs.telnesstech.com/api-reference/conventions
The Seamless OS API keeps to the same design principles on every endpoint. Read these
conventions once, and the rest of the API behaves the way you expect.
#### Identifier naming
**Specific identifier names.** An identifier field carries the name of its entity:
`subscriptionId`, `customerId`, `productOfferingId`. We do not use a generic `id` field, so a
payload never leaves the entity type in doubt.
**One name in every object.** The same entity always has the same identifier field name. You
can join and filter on that one name across every endpoint and every response.
##### Common identifier patterns
| Entity | Identifier Field |
| ---------------- | ------------------- |
| Customer | `customerId` |
| Subscription | `subscriptionId` |
| Order | `orderId` |
| Product Offering | `productOfferingId` |
| Payment Link | `paymentLinkId` |
| Payment Session | `paymentSessionId` |
| Invoice | `invoiceId` |
| License | `licenseId` |
#### Backward compatibility
The API changes continuously. This contract tells you which changes to expect at any time,
and which changes we treat as breaking.
##### Changes to expect at any time
Your integration has to tolerate all of these:
- **New fields in a response.** Response objects are open. We add fields to them as the
platform grows, and a field you never saw before can appear in any response.
- **New endpoints**, beside the existing ones.
- **New optional fields in a request body.** These never change what is already required.
- **New webhook event types**, and new fields in the payload of an existing one.
Your code has to do one thing for this: **ignore fields that you do not recognize**. If you
generate a client from our specification, examine how that client treats an unknown property.
Some generators reject an unfamiliar field outright. A routine addition on our side then
becomes a failed request on yours. Most generators have a flag for this.
##### Changes we treat as breaking
We never make one of these silently, and we tell integrators before we make it at all:
- We remove or rename a field, an endpoint, or a webhook event type.
- We make an optional request field required, or we narrow what a field accepts.
- We change the type or the meaning of an existing field.
- **We add a value to an existing enum.** A generated client turns an enum into a closed set
of constants, so a new value fails to decode. This makes the addition breaking in practice,
whatever the specification permits.
##### Request bodies are strict
A request body is the mirror image of a response. We reject a body that carries a field the
endpoint does not define, and we do not ignore it. A misspelled property name gets a `400`
that names the offending field, not a value that disappears without a word.
### Authentication
Canonical URL: https://docs.telnesstech.com/api-reference/authentication
The Seamless OS API authenticates a caller in two layers. An API key carries the trust
between your service and ours. A user token narrows one request to the permissions of one
user.
#### Quick start
Every request needs an API key in the `X-API-Key` header. For an operation on behalf of one
user, add a JWT token in the `Authorization` header.
```bash
# API key only (full permissions)
curl "{BASE_URL}/customers" \
-H "X-API-Key: $API_KEY"
# API key + user token (user's permissions only)
curl "{BASE_URL}/customers" \
-H "X-API-Key: $API_KEY" \
-H "Authorization: Bearer $USER_TOKEN"
```
#### API keys
An API key carries the trust between your application and the Seamless OS API. It grants full
access to every resource in the scope of your organization.
##### Security model
**An API key gives complete access to the system.** Treat it like a root password:
- **Keep it out of frontend code.** An API key belongs on your own backend servers.
- **Rotate it.** Generate a new key every month, and again after a security incident.
- **Separate your environments.** Use a different key for development, for staging, and for
production.
- **Store it safely.** Put the key in an environment variable or in a credential manager.
##### Getting an API key
Create and manage your API keys in the Seamless OS portal. Each key belongs to your
organization and reaches every resource that you have permission to manage.
##### Usage
Put your API key in the `X-API-Key` header of every request:
```bash
curl "{BASE_URL}/subscriptions" \
-H "X-API-Key: $API_KEY" \
-H "Content-Type: application/json"
```
#### User authentication
With a user token you can act on behalf of one user. The token limits the request to what that
user has permission to reach.
##### JWT bearer tokens
A user token is a JWT. Put it in the `Authorization` header with the `Bearer` scheme:
```bash
# Include user token in Authorization header
curl "{BASE_URL}/subscriptions" \
-H "X-API-Key: $API_KEY" \
-H "Authorization: Bearer $USER_TOKEN"
```
##### Permission scoping
When a request carries both an API key and a user token, three rules apply:
1. The **API key** authenticates the right of your application to use the API.
2. The **user token** identifies the one user and their permissions.
3. The **effective permissions** are the intersection of the two.
Your API key has full access, but the request reaches only what the authenticated user can
reach.
**Example scenarios:**
- An admin user token reaches every customer and every subscription.
- A limited user token reaches only the customer accounts assigned to that user.
- A support user token reads a subscription, but it cannot change one.
##### Integration patterns
**Backend integration.** Send the API key alone for a system-level operation: bulk
processing, reporting, or an administrative task.
**User-facing operations.** Add a user token to every action that one user starts in your
application.
```bash
# System operation - API key only
curl "{BASE_URL}/subscriptions" \
-H "X-API-Key: $API_KEY"
# User operation - API key + user token
curl "{BASE_URL}/subscriptions" \
-H "X-API-Key: $API_KEY" \
-H "Authorization: Bearer $USER_TOKEN"
```
#### Security best practices
##### API key management
- **Server side only.** Never put an API key in client-side JavaScript or in a mobile app.
- **Environment variables.** Store the key in the `API_KEY` environment variable.
- **Key rotation.** Replace the key on a schedule, and at once after a suspected compromise.
- **Monitoring.** Watch the traffic of each API key, so an unusual pattern reaches you.
##### Token handling
- **Secure transmission.** Send every request over HTTPS.
- **Token expiration.** Refresh an access token before it expires.
- **Minimal scope.** Request only the permissions that your application needs.
##### Request security
```javascript
// ✅ Good - Secure backend request
const response = await fetch('/api/v2/orders', {
method: 'POST',
headers: {
'X-API-Key': process.env.API_KEY, // From secure environment
Authorization: `Bearer ${validUserToken}`, // From authenticated session
'Content-Type': 'application/json',
},
body: JSON.stringify(orderData),
});
// ❌ Bad - Never expose API keys client-side
const response = await fetch('/api/v2/orders', {
headers: {
'X-API-Key': 'api_123abc456def', // Exposed in browser!
},
});
```
#### Email authentication flow
The Seamless OS API has a passwordless email flow that gives your application a JWT token.
The flow has two steps, and it sends a code to the email address of the user.
##### Step 1: Start email login
Ask the API to send a login code to the email address of the user:
```bash
curl -X POST "{BASE_URL}/auth/email/start" \
-H "X-API-Key: $API_KEY" \
-H "Content-Type: application/json" \
-d '{
"email": "user@example.com"
}'
```
The user gets an email with a verification code.
##### Step 2: Verify the code
After the user enters the code, send it to the API. The response carries a JWT token:
```bash
curl -X POST "{BASE_URL}/auth/email/verify" \
-H "X-API-Key: $API_KEY" \
-H "Content-Type: application/json" \
-d '{
"email": "user@example.com",
"code": "123456"
}'
```
Send the `accessToken` as a Bearer token on every later request. Store the `refreshToken`
safely. With it you can get a new access token when the current one expires.
#### Troubleshooting
**401 Unauthorized.** The credentials are absent or invalid. Make sure that your API key is
valid, that the `X-API-Key` header carries it in the correct format, and that the user token
is not expired.
**403 Forbidden.** The credentials are valid, but they do not carry the permissions of the
operation. With a user token, make sure that the user has those permissions. The API applies
the most restrictive permissions of the two: what your API key can do, and what the user is
assigned.
### Errors
Canonical URL: https://docs.telnesstech.com/api-reference/errors
The Seamless OS API answers with a standard HTTP status code and a structured error body. The
body names the fault in a form that a person can read and in a form that your code can match
on.
#### Error response structure
Every error response has the same structure:
```json
{
"message": "Validation failed for the request",
"code": "VALIDATION_ERROR",
"details": [
{
"message": "Email address is required",
"code": "FIELD_REQUIRED",
"property": "email"
},
{
"message": "Msisdn format is invalid",
"code": "INVALID_FORMAT",
"property": "msisdn"
}
],
"hint": "Ensure all required fields are provided with valid values"
}
```
#### Error fields
**`message`** (required): A description of the fault for a developer to read in a log or in a
console.
**`code`** (required): A stable machine-readable code. The same fault always carries the same
code, so your code can branch on it.
**`details`** (optional): A list of the individual validation faults. Each entry carries these
fields:
- `message`: A description of the one fault for a person to read.
- `code`: The machine-readable code of the one fault.
- `property`: The field or the parameter that caused the fault.
- `suggestion`: A correct value, when the API can propose one.
**`hint`** (optional): One more sentence about how to correct the request.
#### HTTP status codes
The status code gives the category of the fault:
| Status Code | Description |
| ----------- | ----------------------------------------------------------------------------------------------------------------- |
| `400` | **Bad Request** - Invalid request syntax, or a validation fault |
| `401` | **Unauthorized** - The authentication credentials are absent or invalid |
| `403` | **Forbidden** - The credentials are valid, but the permissions are not sufficient |
| `404` | **Not Found** - The requested resource does not exist |
| `409` | **Conflict** - The request conflicts with the current state, such as a reused idempotency key with different data |
| `429` | **Too Many Requests** - You reached the rate limit |
| `500` | **Internal Server Error** - An unexpected fault on our side |
### Idempotency
Canonical URL: https://docs.telnesstech.com/api-reference/idempotency
With the `X-Idempotency-Key` header you can retry a request without the risk of a duplicate
operation. When a request carries an idempotency key, the operation happens exactly once, even
when you send the request many times.
#### How it works
**The first request.** We do the operation and cache the whole response against your
idempotency key. The cache holds the status code, the headers, and the body.
**Every later request.** When a request arrives with the same key, we answer with the cached
response at once. We do not do the operation again.
#### Key requirements
**One key per operation.** Generate a new identifier for each distinct operation. Never reuse
a key for a different operation.
**The request fingerprint must not change.** These parts of a retry must be identical to the
first request:
- The request method, such as POST or PUT.
- The request URL, with its path and its query parameters.
- The request body, byte for byte.
- The request headers that change the result, such as `Content-Type` and `Authorization`.
**A modified request gets rejected.** If you send the same idempotency key with different
request data, the API answers `409 Conflict`. This rejection catches the mistake of a key
reused for another operation.
#### Response behavior
| Scenario | Response |
| --------------------------------- | ---------------------------------------------------------------------- |
| First request with key | Normal processing, response cached |
| Retry with identical request | Cached response returned (same status, headers, body) |
| **Concurrent identical requests** | `409 Conflict` with `idempotency_key_locked` (retry after brief delay) |
| Retry with **modified** request | `409 Conflict` with `idempotency_key_mismatch` (do not retry) |
##### Error handling guidance
**A concurrent collision** (`idempotency_key_locked`) means that another request with the same
key is still in progress. This state is temporary. Wait 100 to 500 ms, then send the identical
request again.
**A request mismatch** (`idempotency_key_mismatch`) means that the key already carried
different request parameters. This is a fault in your code. Generate a new idempotency key for
the new operation.
#### Expiration
An idempotency key expires 24 hours after its first use. After that, the same key starts a new
operation.
#### Best practices
- Generate the key in your own code, before you send the request.
- Store the key with your request context, so a retry can carry the same key.
- Use an idempotency key on every operation that is not idempotent by itself: POST and PATCH.
- Generate the key from cryptographically random values. A timestamp and a sequential
identifier are both predictable.
#### Example
```bash
# First request
curl -X POST "{BASE_URL}/orders" \
-H "X-Idempotency-Key: 550e8400-e29b-41d4-a716-446655440000" \
-H "X-API-Key: $API_KEY" \
-H "Content-Type: application/json" \
-d '{"customerId": "cust_123", "items": [...]}'
# Response: 201 Created
# {"orderId": "1b11f175-f0e6-4b6c-8c4b-4eee806123a3", "status": "CONFIRMED", ...}
# Retry (network timeout, uncertain state)
# Use the same idempotency key and request data
curl -X POST "{BASE_URL}/orders" \
-H "X-Idempotency-Key: 550e8400-e29b-41d4-a716-446655440000" \
-H "X-API-Key: $API_KEY" \
-H "Content-Type: application/json" \
-d '{"customerId": "cust_123", "items": [...]}'
# Response: 201 Created (identical to first request)
# {"orderId": "1b11f175-f0e6-4b6c-8c4b-4eee806123a3", "status": "CONFIRMED", ...}
# No duplicate order created
```
### Rate limiting
Canonical URL: https://docs.telnesstech.com/api-reference/rate-limiting
The Seamless OS API limits how many requests one API key can send. The limits sit well above
what an integration needs, so they catch a runaway caller and leave normal traffic alone.
#### How it works
**The limits are high.** A normal integration never reaches one. You do not have to pace your
requests to stay under a limit during ordinary work.
**The limits protect every tenant.** One caller that sends too many requests degrades the
service for everybody. We find that pattern and limit it. We do not restrict legitimate
traffic.
**The window resets on its own.** A short spike in your traffic has no lasting effect on your
integration.
#### When limits apply
Each limit applies per API key. The limits catch these callers:
- A runaway script, or an infinite loop.
- A bulk operation that sends every request at once.
- A request volume far above your normal business pattern.
#### Rate limit exceeded
When you reach a limit, the API answers `429 Too Many Requests` with a `Retry-After` header.
The header gives the wait in seconds:
```
HTTP/1.1 429 Too Many Requests
Retry-After: 60
```
```json
{
"message": "Rate limit exceeded",
"code": "RATE_LIMIT_EXCEEDED",
"hint": "Wait before retrying or reduce request frequency"
}
```
#### Best practices
**Obey `Retry-After`.** When the API answers `429`, wait the number of seconds in the header
before you send the request again.
**Use exponential backoff.** If a response carries no `Retry-After` header, back off
exponentially and add jitter. The jitter prevents a thundering herd.
**Send bulk work in batches.** Process a bulk operation in batches with a delay between them.
Do not send every request at the same time.
**Cache what does not change.** A cached response is one request that you do not send.
#### Example retry logic
```javascript
async function makeRequestWithRetry(url, options, maxRetries = 3) {
for (let attempt = 0; attempt <= maxRetries; attempt++) {
const response = await fetch(url, options);
if (response.status !== 429) {
return response;
}
if (attempt === maxRetries) {
throw new Error('Rate limit exceeded after max retries');
}
// Use Retry-After header if provided, otherwise exponential backoff with jitter
const retryAfter = response.headers.get('Retry-After');
const backoff = Math.pow(2, attempt) * 1000;
const delay = retryAfter ? parseInt(retryAfter) * 1000 : backoff + Math.random() * backoff;
await new Promise((resolve) => setTimeout(resolve, delay));
}
}
```
### Webhooks
Canonical URL: https://docs.telnesstech.com/api-reference/webhooks
A webhook tells you about an event in the Seamless OS platform as it happens, so you do not
have to poll the API. Your endpoint gets an HTTPS POST directly after a subscription is
created, a payment succeeds, or usage passes a threshold.
#### Enabling webhooks
You manage webhook delivery from **Admin → Advanced → Webhooks** in the Seamless OS portal.
Your portal user needs the **View webhooks** permission to open that page. On the page you do
four things:
1. **Add an endpoint.** This is the HTTPS URL that gets the deliveries.
2. **Subscribe to event types** from the catalog. The catalog lists every event that we send.
3. **Copy the signing secret** of that endpoint. It starts with `whsec_`.
4. **Send a test event.** The endpoint must answer before you depend on it.
Each endpoint has its own signing secret. The same page shows the delivery attempts, the
response codes, and the payload of every message. You can examine a failed delivery and send
it again without our help. An endpoint can also carry custom request headers. Use one for a
static token when your gateway needs a token before your handler verifies the signature.
> **Note**
>
> Webhook delivery is enabled per deployment. If the page is absent, write to us and we enable it
> for your environment.
#### Quick start
Every delivery carries a full snapshot of the resource in the same envelope. One event holds
everything that you need to update your own systems.
##### Basic integration
1. **Configure your endpoint** to accept an HTTPS POST request.
2. **Verify the signature** over the raw request body, before you read the body.
3. **Parse the JSON payload** and take the `eventId` for deduplication.
4. **Put the event on a durable queue.** Do this before you answer.
5. **Answer HTTP 200** to acknowledge the delivery.
6. **Process the event out of band.** A slow handler blocks the next delivery.
##### The verification pattern
```javascript
import { Webhook } from 'svix';
const webhook = new Webhook(process.env.WEBHOOK_SIGNING_SECRET);
// The raw body is required: verification runs over the exact bytes we signed,
// so a JSON body parser on this route breaks it.
app.post('/webhooks/telness', express.raw({ type: 'application/json' }), async (req, res) => {
let event;
try {
event = webhook.verify(req.body, req.headers);
} catch {
return res.status(400).send('Invalid signature');
}
const { eventId, type, data } = event;
try {
// Atomic lock acquisition to prevent duplicate processing
const acquired = await redis.setnx(`webhook:${eventId}`, 'processing');
if (!acquired) {
return res.status(200).send('OK'); // Already processed
}
// Set expiration in case of crash
await redis.expire(`webhook:${eventId}`, 3600);
// Queue event for async processing
await eventQueue.add('process-webhook', { eventId, type, data });
// Mark as completed only after successful queuing
await redis.set(`webhook:${eventId}`, 'completed', 'EX', 86400);
res.status(200).send('OK');
} catch (error) {
// Clean up on failure to allow retry
await redis.del(`webhook:${eventId}`);
console.error('Webhook processing error:', error);
res.status(500).send('Internal Server Error');
}
});
```
#### Verifying signatures
Your webhook endpoint is a public HTTPS URL, so anyone who discovers it can post to
it. Every delivery is signed, and **verifying that signature is what tells you a
request came from us** rather than from someone who guessed the URL.
> **Warning**
>
> Treat an unverified payload as untrusted input. Without verification, an attacker who knows your
> endpoint can fabricate any event on this page, including payment and subscription state changes.
##### Use the official libraries
Deliveries are signed in the [Svix](https://docs.svix.com/receiving/verifying-payloads/how)
format, which has maintained libraries for most languages. They handle the signature
comparison, the timestamp check, and secret rotation for you:
```bash
npm install svix # JavaScript / TypeScript
pip install svix # Python
go get github.com/svix/svix-webhooks/go # Go
composer require svix/svix # PHP
```
Pass the raw request body and the request headers, and the library either returns the
parsed event or throws:
```javascript
import { Webhook } from 'svix';
const webhook = new Webhook(process.env.WEBHOOK_SIGNING_SECRET);
const event = webhook.verify(rawRequestBody, requestHeaders);
```
##### Signature headers
If you verify by hand, three headers carry what you need:
| Header | Description |
| ---------------- | ------------------------------------------------------------------- |
| `svix-id` | Unique message identifier, stable across retries of one delivery |
| `svix-timestamp` | Delivery timestamp, in seconds since the Unix epoch |
| `svix-signature` | Space-delimited list of versioned signatures, such as `v1,` |
The signature is an HMAC-SHA256 over `{svix-id}.{svix-timestamp}.{rawBody}`. The key is the
part of your signing secret after the `whsec_` prefix, base64-decoded. The result is encoded
as base64. Compare it in constant time.
`svix-signature` can list more than one signature. During a secret rotation, the old secret
and the new secret both sign each delivery. A verifier that reads the first entry only breaks
in the middle of the rotation. Accept the delivery when **one** of the listed signatures
matches.
##### Replay protection
Include `svix-timestamp` in the signed content, and reject deliveries whose timestamp
is outside a tolerance you choose. Five minutes is a reasonable default. Without that
check a signature stays valid forever, so a captured request can be replayed
indefinitely. The official libraries enforce this by default.
The timestamp check does not replace `eventId` deduplication. A retry of a genuine failed
delivery arrives with a new timestamp and a valid signature. Your handler must tolerate it.
##### Two things verification does not give you
- **It is not authentication of a user.** A verified delivery proves the payload came
from your Seamless OS deployment, nothing about who triggered it.
- **It is not a freshness guarantee for the resource.** The payload is a snapshot from
when the event occurred, and a retry can arrive hours later. Re-fetch through the API
when you need current state.
#### Event structure
All webhook payloads use the same envelope format with complete resource snapshots:
```jsonc
{
"eventId": "8d7e6c5b-4a3f-2e1d-9c0b-112233445566",
"type": "subscription.activated",
"occurredAt": "2025-09-30T12:34:56Z",
"data": {
"subscriptionId": "123e4567-e89b-12d3-a456-426614174000",
"status": "ACTIVATED",
"customer": {
"customerId": "987f6543-21cb-a0ed-654f-987654321000",
"name": "Acme Corporation",
},
"productOffering": {
"productOfferingId": "456a789b-cd12-34ef-567g-890123456789",
"name": "Seamless 10GB",
"price": {
"netPriceMinor": 2999,
"currency": "USD",
"priceType": "RECURRING",
"billingCycle": { "period": "MONTHLY", "interval": 1 },
"standardDiscount": { "amountMinor": 500 },
"bindingContract": {
"duration": { "unit": "MONTHS", "value": 12 },
"discount": { "amountMinor": 200 },
},
"customUpfrontPayment": {
"billingCycles": 3,
"discount": { "amountMinor": 300 },
},
"currencyOptionsMinor": { "USD": 2999, "SEK": 29900 },
},
},
"subscriber": {
"msisdn": "+46701234567",
"email": "user@acme.com",
},
"createdAt": "2025-09-25T08:15:30Z",
"updatedAt": "2025-09-30T12:34:56Z",
},
}
```
##### Envelope fields
| Field | Description |
| ------------ | ------------------------------------------------------------------------- |
| `eventId` | Unique identifier for this logical event (stable across delivery retries) |
| `type` | Dot-namespaced event identifier (domain.action) |
| `occurredAt` | When the underlying business event happened |
| `data` | Complete snapshot of the affected resource at that moment |
#### API integration
A webhook payload carries the same resource data as the API endpoints. The `data` object has
the schema of the matching GET response, so one model covers your events and your API calls.
**Example correlations:**
- `subscription.created` → GET `/subscriptions/{subscriptionId}`
- `paymentLink.expired` → GET `/payment-links/{paymentLinkId}`
- `order.submitted` → GET `/orders/{orderId}`
As a result, you can use the webhook data as it arrives. You can also get more detail from the
API with the identifiers in the payload.
#### Delivery guarantees
**Reliability.** Delivery is at least once. A failed delivery is retried with exponential
backoff for about one day.
**Idempotency.** Use the `eventId` field as your deduplication key. Every retry of one logical
event carries the same `eventId`.
**Ordering.** Events on different resource types can arrive in any order. Events on one
resource normally arrive in causal order. Your handler must be idempotent either way.
**Payload format.** The payload carries the full snapshot of the resource, where a snapshot
applies.
##### When retries run out
A message that uses up its retries is marked failed, not dropped. You can retry it, or
recover a whole batch, from **Admin → Advanced → Webhooks**. That is the path back after an
outage longer than the retry window. An endpoint that fails continuously for days is
**disabled automatically**. Examine the state of the endpoint before you read a quiet period
as quiet traffic.
#### Implementation guide
##### Recommended processing flow
1. **Parse the JSON payload** and validate its structure.
2. **Find duplicates** with `eventId`, before you do anything else.
3. **Put the event on a durable queue.** Your business logic then runs outside the handler.
4. **Acknowledge with HTTP 200,** after the queue accepted the event and not before.
5. **Do the side effects out of band:** the database writes and the notifications.
##### Idempotency best practices
- **Use `eventId` as your deduplication key.** It is stable across every retry.
- **Look for the key first.** Always find out whether you handled the event already.
- **Mark the event processed only after it succeeds.** Otherwise a failure drops it.
- **Put a TTL on every lock.** A crash or a timeout then cannot leave a lock behind.
- **Erase the lock after a failure,** so the retry can take it.
For more idempotency patterns, read the [Idempotency guide](/api-reference/idempotency.md).
##### Error handling
**We read the HTTP status code only. We ignore the response body.** Answer with a 2xx status
code after the event is queued or processed, and not before. Any other status code starts a
retry with exponential backoff.
**Best practices:**
- Answer 200 for an event that you processed, and for a duplicate.
- Answer 4xx for a malformed payload. This stops the retries.
- Answer 5xx for a temporary fault. This starts a retry.
- Put nothing in the response body. We do not read it.
#### Troubleshooting
**Missing events.** Make sure that your endpoint answers HTTP 200, and that it answers in less
than 10 seconds.
**Duplicate processing.** Look up the `eventId` before every operation that is not idempotent.
**Event ordering.** Build your handler for events in any order. Do not depend on chronological
delivery.
**Large payloads.** An event carries the full snapshot of its resource. That snapshot is large
for a complex order or subscription.
#### Anything missing?
We add to the platform continuously. If you want a webhook event or a feature that is not
here, write to us.
## Resources
### Billing
Canonical URL: https://docs.telnesstech.com/resources/billing
Billing covers the whole billing lifecycle of a customer. It generates the bill, delivers it,
and collects the payment. A brand can bill on several cycles, and each customer can have their
own delivery preference.
#### Billing entity
Billing in the API holds four parts:
- **Bill generation**: The bill is created from the subscription charges and the usage.
- **Billing cycles**: The cycle is monthly, quarterly, or annual.
- **Bill delivery**: The bill goes out by email, by SMS, on paper, or through the customer
portal.
- **Payment collection**: Payment processing settles the bill.
#### Key capabilities
- **Automated billing** — Generate a bill from the subscription charges and the usage of the customer.
- **Billing cycles** — Bill on the cycle that the customer and the business want.
- **Multi-channel delivery** — Deliver a bill by email, by paper mail, by SMS, or in the self-service portal.
- **Payment integration** — Collect a bill automatically, or take a manual payment for it.
#### Common use cases
- **Subscription billing** — Bill a recurring telecom subscription or service plan.
- **Usage billing** — Bill variable usage: a data overage, or a premium service.
- **Bill delivery** — Send a bill on the channel and in the format that the customer selected.
- **Payment collection** — Collect a bill through the payment processing that the brand uses.
#### Related resources
A billing entity connects to these API resources:
- **Customers**: The billing preferences and the billing relationship of one customer.
- **Subscriptions**: The service charges and the subscription fees on the bill.
- **Invoices**: The formal statement that the billing lifecycle generates.
- **Payments**: The payment that settles the bill.
- **Usage**: The consumption that a usage-based charge is calculated from.
- **Taxes**: The tax that the platform calculates and puts on the bill.
#### Next steps
- [View invoices](/api-reference/invoices.md) — Read the invoice records and the billing statements.
- [Manage payments](/api-reference/payment-intents.md) — Track the payment transactions and the collections.
### Customers
Canonical URL: https://docs.telnesstech.com/resources/customers
A customer is a billable entity: one person, or one organization. The customer owns the
subscriptions and pays for them. Billing and service management in the API are built around
this entity.
#### Customer entity
A customer in the API represents:
- **Billable entity**: Individual person or organization responsible for payments
- **Service owner**: Entity that owns telecommunications subscriptions and licenses
- **Billing configuration**: Payment methods, billing cycles, and financial preferences
- **Contact information**: Communication details for service notifications and support
#### Key capabilities
- **Customer lifecycle** — Create a customer, update it, and hold its profile and its billing configuration.
- **User management** — Add or remove users from customer accounts to manage access permissions and service administration.
- **Billing configuration** — Configure billing methods, payment preferences, and financial settings per customer.
- **Service ownership** — Track all subscriptions, licenses, and services owned by each customer entity.
#### Common use cases
- **Customer onboarding** — Create new customer accounts with required billing and contact information during signup flows.
- **Account management** — Update customer profiles, billing preferences, and contact details through self-service portals.
- **Multi-user access** — Associate multiple users with business customers for shared service management and administration.
- **Billing administration** — Configure billing methods, payment schedules, and financial settings for automated revenue collection.
#### Related resources
Customer entities are closely integrated with other API resources:
- **Users**: Platform access and permissions for customer account management
- **Subscriptions**: Telecommunications services owned by the customer
- **Orders**: Purchase requests and service provisioning for the customer
- **Payments**: Financial transactions and billing for customer services
- **Billing settings**: Configure billing methods, preferences, and payment automation per customer
- **Licenses**: Software licenses and digital services owned by the customer
#### Next steps
- [List customers](/api-reference/customers.md#tag/customers/GET/customers) — Retrieve all customers you have access to
- [Create customer](/api-reference/customers.md#tag/customers/POST/customers) — Create a new customer account
- [Update customer](/api-reference/customers.md#tag/customers/PUT/customers/{customerId}) — Modify customer details and preferences
### Discounts
Canonical URL: https://docs.telnesstech.com/resources/discounts
A discount reduces a price through a promo code or a special offer. With a discount you can
change the price of a product offering, and the total of an order.
#### Discount entity
A discount in the API represents:
- **Promotional code**: Alphanumeric code that unlocks special pricing or offers
- **Pricing adjustment**: Percentage or fixed amount reductions in product costs
- **Eligibility rules**: Customer type, geographic, and product-specific restrictions
- **Campaign management**: Time-limited offers and promotional campaign tracking
#### Key capabilities
- **Promo code management** — Create and manage promotional codes with configurable discounts and eligibility rules.
- **Dynamic pricing** — Apply percentage or fixed amount discounts to product offerings and order totals.
- **Campaign tracking** — Monitor promotional code usage and campaign performance metrics.
- **Eligibility control** — Configure customer, product, and geographic restrictions for targeted promotions.
#### Common use cases
- **Promotional campaigns** — Launch time-limited promotional campaigns with trackable promo codes.
- **Customer incentives** — Provide targeted discounts to specific customer segments or new subscribers.
- **Partner offers** — Create partner-specific promotional codes for reseller and affiliate programs.
- **Seasonal promotions** — Manage holiday sales, back-to-school offers, and seasonal promotional pricing.
#### Related resources
Discount entities integrate with other API resources:
- **Orders**: Promo codes are applied during order configuration and pricing calculation
- **Product catalogs**: Promotional pricing within specific catalog contexts
- **Product offerings**: Discounted pricing on individual telecommunications products
- **Customers**: Customer-specific promotional eligibility and usage tracking
- **Payments**: Adjusted pricing reflected in payment sessions and billing
#### Next steps
- [Validate promo code](/api-reference/product-discounts.md#tag/product-discounts/GET/discounts/promotions/promo-code/{promoCode}) — Verify and retrieve promotional code details
### Inventory
Canonical URL: https://docs.telnesstech.com/resources/inventory
Inventory holds the telecom resources of a brand: the phone numbers, the SIM cards, and the
hardware devices. With it you find what is available, reserve an item, and track where each
item went. It covers physical assets and virtual ones.
#### Inventory entity
Inventory in the API represents:
- **Resource management**: Physical and virtual telecommunications assets including phone numbers and SIM cards
- **Availability tracking**: Real-time inventory levels and resource availability status
- **Reservation system**: Temporary holds on inventory items during order processing
- **Allocation control**: Assignment of resources to specific customers and subscriptions
#### Key capabilities
- **Resource availability** — Check real-time availability of phone numbers, SIM cards, and hardware devices.
- **Inventory reservation** — Reserve inventory items temporarily during order configuration and checkout processes.
- **Asset allocation** — Assign telecommunications resources to specific customers and service subscriptions.
- **Stock management** — Track inventory levels, replenishment needs, and resource utilization metrics.
#### Common use cases
- **Number selection** — Browse and select available phone numbers during service activation workflows.
- **SIM provisioning** — Check SIM card availability and allocate cards for new service activations.
- **Hardware fulfillment** — Manage device inventory for customer equipment orders and replacement programs.
- **Resource planning** — Monitor inventory levels and plan resource procurement based on demand forecasting.
#### Related resources
Inventory entities integrate with other API resources:
- **Orders**: Inventory allocation during order configuration and fulfillment
- **Subscriptions**: Resource assignment to active telecommunications services
- **Product offerings**: Available inventory determines product offering availability
- **Customers**: Customer-specific inventory assignments and service resources
- **Licenses**: Software licenses and digital resource allocation
#### Next steps
- [Lease phone numbers](/api-reference/inventory.md#tag/inventory/POST/inventory/lease-numbers) — Reserve phone numbers for service activation
### Invoices
Canonical URL: https://docs.telnesstech.com/resources/invoices
An invoice is the formal billing statement for a telecom service. It carries the charge
breakdown, the payment terms, and the billing details of the customer. The platform issues an
invoice on any billing cycle, and collects it through any payment method that the brand
supports.
#### Invoice entity
An invoice in the API represents:
- **Billing statement**: Formal document detailing charges for telecommunications services and products
- **Charge breakdown**: Itemized listing of subscription fees, usage charges, taxes, and adjustments
- **Payment terms**: Due dates, payment methods, and collection policies for invoice settlement
- **Legal documentation**: Compliant billing records for regulatory requirements and customer disputes
#### Key capabilities
- **Detailed billing** — Generate an invoice with the itemized charges, the taxes, and the service details.
- **Payment integration** — Enable direct payment collection through integrated payment links and hosted flows.
- **Billing cycles** — Support various billing frequencies including monthly, quarterly, and annual cycles.
- **Tax compliance** — Automatic tax calculation and compliance with regional tax requirements and regulations.
#### Common use cases
- **Recurring billing** — Generate monthly or periodic invoices for subscription services and recurring charges.
- **Usage billing** — Create invoices for variable usage charges including data overages and premium services.
- **Payment collection** — Collect an invoice through a payment link or the customer portal.
- **Billing support** — Provide detailed billing documentation for customer service and dispute resolution.
#### Related resources
Invoice entities integrate with other API resources:
- **Customers**: Customer-specific invoicing with billing preferences and contact information
- **Subscriptions**: Service charges and subscription fees itemized on customer invoices
- **Payments**: Payment allocation and invoice settlement tracking
- **Payment links**: Direct payment collection through shareable invoice payment links
- **Taxes**: Automatic tax calculation and compliance for invoice line items
- **Usage**: Usage-based charges and consumption billing integrated into invoices
#### Next steps
- [List invoices](/api-reference/invoices.md#tag/invoices/GET/invoices) — Retrieve all invoices for your customers
- [Get invoice](/api-reference/invoices.md#tag/invoices/GET/invoices/{invoiceId}) — View detailed invoice information and line items
### Licenses
Canonical URL: https://docs.telnesstech.com/resources/licenses
A license is an entitlement to a piece of software or to a digital service. Licenses control
access to an application, to a software feature, and to a digital service that a brand sells
beside its telecom products.
#### License entity
A license in the API represents:
- **Software entitlement**: Rights to use specific software applications or digital services
- **Usage control**: License terms, restrictions, and permitted usage parameters
- **Activation management**: License activation, deactivation, and transfer capabilities
- **Compliance tracking**: License usage monitoring and compliance with software terms
#### Key capabilities
- **License provisioning** — Provision and activate software licenses for customers and their telecommunications services.
- **Usage monitoring** — Track the usage of a license, and keep to the terms of the software.
- **Entitlement management** — Manage customer entitlements to software features and digital service access.
- **License lifecycle** — Handle license activation, renewal, transfer, and termination workflows.
#### Common use cases
- **Bundle activation** — Activate software licenses included with telecommunications service bundles and packages.
- **Feature enablement** — Enable premium features and capabilities through license provisioning and activation.
- **Corporate licensing** — Manage enterprise software licenses for business telecommunications customers.
- **License compliance** — Watch the usage of a license, and keep to the terms of the software vendor.
#### Related resources
License entities integrate with other API resources:
- **Subscriptions**: Software licenses associated with active telecommunications subscriptions
- **Customers**: Customer-owned licenses with entitlement and usage tracking
- **Product offerings**: Software licenses included in telecommunications product bundles
- **Orders**: License provisioning following successful order completion and payment
- **Subscribers**: Individual license assignments to specific service users
#### Next steps
- [List licenses](/api-reference/licenses.md#tag/licenses/GET/licenses) — Retrieve all licenses you have access to
- [Create license](/api-reference/licenses.md#tag/licenses/POST/licenses) — Provision a new software license
- [Get license](/api-reference/licenses.md#tag/licenses/GET/licenses/{licenseId}) — Retrieve detailed license information
- [Cancel license](/api-reference/licenses.md#tag/licenses/POST/licenses/{licenseId}/cancel) — Terminate an active license
### Orders
Canonical URL: https://docs.telnesstech.com/resources/orders
An order is the purchase request of a customer for telecom products and services. It carries
the whole ordering flow: the first configuration, the submit, and the coordination of
fulfillment.
#### Order entity
An order in the API represents:
- **Purchase request**: Customer intent to purchase specific telecommunications products
- **Configuration management**: Product selection, pricing calculation, and line item management
- **Workflow orchestration**: Multi-step ordering process with validation and approval stages
- **Fulfillment coordination**: Integration with payment processing and service provisioning
#### Key capabilities
- **Order configuration** — Build and configure orders with multiple product line items and pricing calculations.
- **Progressive workflow** — Guide customers through step-by-step ordering with validation at each stage.
- **Price calculation** — Real-time pricing updates with promotional codes and dynamic discounting.
- **Submission management** — Submit completed orders for payment processing and service fulfillment.
#### Common use cases
- **Product selection** — Configure orders with multiple telecommunications products and service addons.
- **Pricing calculation** — Calculate real-time pricing with promotional codes and customer-specific discounts.
- **Multi-step checkout** — Guide customers through progressive order configuration and validation workflows.
- **Bulk ordering** — Manage enterprise orders with multiple subscribers and service configurations.
#### Related resources
Order entities coordinate with other API resources:
- **Product offerings**: Products selected and configured within order line items
- **Product catalogs**: Product availability and pricing context for order configuration
- **Customers**: Order ownership and billing responsibility
- **Discounts**: Promotional codes and pricing adjustments applied to orders
- **Payment sessions**: Payment processing for submitted order configurations
- **Subscriptions**: Service provisioning and activation following successful order fulfillment
#### Next steps
- [List orders](/api-reference/orders.md#tag/orders/GET/orders) — Retrieve all orders you have access to
- [Create order](/api-reference/orders.md#tag/orders/POST/orders) — Create a new order configuration
- [Calculate price](/api-reference/orders.md#tag/orders/POST/orders/{orderId}/calculate-price) — Calculate pricing for order configurations
- [Submit order](/api-reference/orders.md#tag/orders/POST/orders/{orderId}/submit) — Submit order for payment and fulfillment
### Payment links
Canonical URL: https://docs.telnesstech.com/resources/payment-links
A payment link is a URL that you can send to a customer. The customer pays through it without
a login and without an account. Use a payment link to collect an invoice, an order, or a
service payment.
#### Payment link entity
A payment link in the API represents:
- **Shareable payment URL**: Secure link that enables payment collection without authentication requirements
- **Payment context**: Pre-configured payment information including amount, description, and customer details
- **Distribution channel**: Links distributed via email, SMS, QR codes, or embedded in communications
- **Expiration management**: Time-limited links with configurable expiration and usage policies
#### Key capabilities
- **Link generation** — Generate secure, shareable payment links for any payment scenario or customer interaction.
- **Multi-channel distribution** — Distribute payment links through email, SMS, QR codes, and customer communications.
- **Payment tracking** — Monitor payment link usage, completion rates, and transaction success metrics.
- **Configuration** — Configure payment amounts, descriptions, customer information, and expiration policies.
#### Common use cases
- **Invoice collection** — Send payment links for outstanding invoices and billing statements via email or SMS.
- **Remote checkout** — Enable order completion for customers without requiring account login or registration.
- **Customer support** — Provide payment links during customer service interactions for immediate payment resolution.
- **Marketing campaigns** — Include payment links in promotional communications and marketing materials.
#### Related resources
Payment Link entities integrate with other API resources:
- **Payment sessions**: Payment links redirect to hosted payment sessions for secure processing
- **Payments**: Track payments collected through payment link interactions
- **Invoices**: Generate payment links for specific invoices and billing statements
- **Orders**: Create payment links for order completion and checkout processes
- **Customers**: Associate payment links with customer accounts for tracking and management
- **Payment profiles**: Enable payment profile creation through payment link completions
#### Next steps
- [List payment links](/api-reference/payment-links.md#tag/payment-links/GET/payment-links) — View all created payment links
- [Create payment link](/api-reference/payment-links.md#tag/payment-links/POST/payment-links) — Generate a new shareable payment link
- [Get payment link](/api-reference/payment-links.md#tag/payment-links/GET/payment-links/{paymentLinkId}) — Retrieve payment link details and status
- [Cancel payment link](/api-reference/payment-links.md#tag/payment-links/POST/payment-links/{paymentLinkId}/cancel) — Deactivate a payment link
### Payment profiles
Canonical URL: https://docs.telnesstech.com/resources/payment-profiles
A payment profile stores the payment method of a customer for a recurring payment and for a
later one. The platform stores it as a token under PCI DSS. As a result, the customer enters
their card details once, not on every payment.
#### Payment profile entity
A payment profile in the API represents:
- **Secure storage**: Tokenized payment method information stored with PCI DSS compliance
- **Customer association**: Payment methods linked to specific customer accounts for easy access
- **Multi-Method support**: Credit cards, bank accounts, digital wallets, and alternative payment methods
- **Recurring integration**: Seamless integration with subscription billing and automatic payment processing
#### Key capabilities
- **Secure tokenization** — Store payment methods securely using industry-standard tokenization and encryption.
- **Multi-method storage** — Support various payment methods including cards, bank accounts, and digital wallets.
- **Customer management** — A customer adds, updates, and removes a stored payment method in your self-service portal.
- **Recurring payments** — Bill a subscription automatically, and take the recurring payment for it.
#### Common use cases
- **Subscription billing** — Enable automatic recurring payments for telecommunications subscriptions and services.
- **Quick checkout** — Provide one-click payment experiences using previously stored payment methods.
- **Payment management** — Allow customers to manage their stored payment methods through self-service portals.
- **Backup payment methods** — Maintain multiple payment profiles for billing redundancy and payment failure recovery.
#### Related resources
Payment Profile entities integrate with other API resources:
- **Payment sessions**: Create payment profiles from successful hosted payment completions
- **Payments**: Process payments using stored payment profile information
- **Customers**: Customer-owned payment profiles for account-specific payment management
- **Subscriptions**: Automatic billing using customer payment profiles for recurring charges
- **Payment profile sessions**: Dedicated flows for adding and updating payment profiles
- **Invoices**: Payment profile selection for invoice payment and settlement
#### Next steps
- [List payment profiles](/api-reference/payment-profiles.md#tag/payment-profiles/GET/payment-profiles) — Retrieve all stored payment methods
- [Get payment profile](/api-reference/payment-profiles.md#tag/payment-profiles/GET/payment-profiles/{paymentProfileId}) — View specific payment profile details
- [Delete payment profile](/api-reference/payment-profiles.md#tag/payment-profiles/DELETE/payment-profiles/{paymentProfileId}) — Remove a stored payment method
### Payment profile sessions
Canonical URL: https://docs.telnesstech.com/resources/payment-profile-sessions
A payment profile session is a hosted flow in which a customer adds, updates, or removes a
payment method. The session does that one job. It processes no order and it collects no
payment.
#### Payment profile session entity
A payment profile session in the API represents:
- **Profile management flow**: Hosted interface specifically for payment method addition and updates
- **Security context**: PCI DSS compliant environment for handling sensitive payment information
- **Customer integration**: Seamless integration with customer accounts and existing payment profiles
- **Validation framework**: Real-time payment method validation and fraud detection
#### Key capabilities
- **Profile creation** — Secure hosted flows for customers to add new payment methods to their accounts.
- **Profile updates** — A customer updates the details of a payment method and its billing information.
- **Method validation** — Real-time validation of payment methods with fraud detection and verification.
- **Seamless integration** — Embed payment profile management directly into customer portals and applications.
#### Common use cases
- **Account setup** — Guide new customers through payment method setup during account registration.
- **Profile management** — Enable existing customers to manage their stored payment methods through self-service.
- **Payment recovery** — Assist customers in updating payment methods when automatic billing fails.
- **Method verification** — Verify customer payment methods for compliance and fraud prevention requirements.
#### Related resources
Payment Profile Session entities coordinate with other API resources:
- **Payment profiles**: Create and update payment profiles through dedicated hosted sessions
- **Customers**: Customer-specific payment profile management and account integration
- **Payment sessions**: Standard payment flows that can also create payment profiles
- **Subscriptions**: Payment profile updates for subscription billing and automatic payments
- **Payments**: Use updated payment profiles for immediate and future payment processing
#### Next steps
- [Create profile session](/api-reference/payment-profile-sessions.md#tag/payment-profile-sessions/POST/payment-profiles/sessions) — Start a new payment profile management flow
- [Get profile session](/api-reference/payment-profile-sessions.md#tag/payment-profile-sessions/GET/payment-profiles/sessions/{paymentProfileSessionId}) — Check payment profile session status
- [Cancel profile session](/api-reference/payment-profile-sessions.md#tag/payment-profile-sessions/POST/payment-profiles/sessions/{paymentProfileSessionId}/cancel) — Cancel an active profile management session
### Payment sessions
Canonical URL: https://docs.telnesstech.com/resources/payment-sessions
A payment session is a hosted flow that collects a payment from start to end. The interface
is built for you. It carries the fraud protection and the payment methods that the brand
supports.
#### Payment session entity
A payment session in the API represents:
- **Hosted payment flow**: Secure, pre-built payment interface managed by the platform
- **Session management**: Temporary payment collection context with configurable timeout and validation
- **Security layer**: PCI DSS compliant payment processing with tokenization and fraud detection
- **Integration bridge**: Seamless connection between your application and payment processing infrastructure
#### Key capabilities
- **Hosted payment UI** — Provide secure, branded payment interfaces without handling sensitive payment data.
- **Multiple payment methods** — Support credit cards, digital wallets, bank transfers, and alternative payment methods.
- **Session security** — Implement time-limited sessions with automatic expiration and security validation.
- **Real-time updates** — Receive instant payment status updates and transaction completion notifications.
#### Common use cases
- **Checkout integration** — Integrate secure payment flows into order completion and service activation processes.
- **Self-service payments** — A customer pays in your self-service portal or in your mobile app.
- **Balance management** — Provide secure payment options for account balance topups and outstanding charges.
- **Mobile payments** — Deliver optimized payment experiences for mobile devices and applications.
#### Related resources
Payment Session entities coordinate with other API resources:
- **Payments**: Individual payment transactions processed through hosted sessions
- **Payment profiles**: Customer payment methods stored from successful session completions
- **Orders**: Order-specific payment sessions for checkout and purchase completion
- **Customers**: Customer-specific payment sessions with profile and preference management
- **Subscriptions**: Subscription-related payment collection and recurring payment setup
- **Payment links**: Shareable payment links generated from payment sessions
#### Next steps
- [Create payment session](/api-reference/payment-sessions.md#tag/payment-sessions/POST/payment-sessions) — Create a new hosted payment flow
- [Get payment session](/api-reference/payment-sessions.md#tag/payment-sessions/GET/payment-sessions/{paymentSessionId}) — Retrieve payment session status and details
- [Cancel payment session](/api-reference/payment-sessions.md#tag/payment-sessions/POST/payment-sessions/{paymentSessionId}/cancel) — Cancel an active payment session
### Payments
Canonical URL: https://docs.telnesstech.com/resources/payments
A payment is one charge against a telecom service, an order, or a bill. The platform records
every payment transaction, on any payment method that the brand supports.
#### Payment entity
A payment in the API represents:
- **Transaction processing**: Individual payment transactions for services, orders, or outstanding balances
- **Payment methods**: Support for credit cards, bank transfers, digital wallets, and alternative payment methods
- **Security compliance**: PCI DSS compliant payment processing with tokenization and fraud protection
- **Transaction records**: Complete audit trail of payment attempts, successes, and failures
#### Key capabilities
- **Secure processing** — Process payments securely with PCI DSS compliance and fraud detection mechanisms.
- **Multiple methods** — Support various payment methods including cards, bank transfers, and digital wallets.
- **Transaction tracking** — Keep a record of every payment transaction and every status change.
- **Refund management** — Process refunds and payment reversals with proper accounting and audit trails.
#### Common use cases
- **Order checkout** — Process payments during order completion and service activation workflows.
- **Balance settlement** — A customer pays an outstanding balance and settles their account.
- **Usage payments** — Handle overage payments for data usage, international calls, and premium services.
- **Service restoration** — Process reconnection payments for suspended services and account reinstatement.
#### Related resources
Payment entities integrate with other API resources:
- **Payment sessions**: Hosted payment flows and secure payment collection
- **Payment profiles**: Stored payment methods for recurring and future payments
- **Orders**: Payment processing for order completion and service activation
- **Customers**: Customer payment history and transaction records
- **Invoices**: Payment allocation to specific invoices and billing periods
- **Subscriptions**: Service-related payments and usage-based billing
#### Next steps
- [List payments](/api-reference/payment-intents.md#tag/payment-intents/GET/payment-intents) — Retrieve all payment transactions
- [Get payment](/api-reference/payment-intents.md#tag/payment-intents/GET/payment-intents/{paymentIntentId}) — View detailed payment transaction information
### Product catalogs
Canonical URL: https://docs.telnesstech.com/resources/product-catalogs
A product catalog is a set of product offerings for one customer segment, one market, or one
business context. With catalogs you present each customer the products that they are eligible
for.
#### Product catalog entity
A product catalog in the API represents:
- **Product collection**: Curated set of product offerings for specific customer segments
- **Market segmentation**: Products organized by geography, customer type, or business model
- **Promotional context**: Special pricing, offers, and promotional campaigns
- **Customer experience**: Branded and customized product presentation
#### Key capabilities
- **Segmented products** — Organize products by customer type, geography, or business segment for targeted offerings.
- **Default selection** — Automatically select appropriate catalogs based on customer context and preferences.
- **Promotional pricing** — Apply promotional codes and special pricing within specific catalog contexts.
- **Brand customization** — Present products with brand-specific styling and customized experiences.
#### Common use cases
- **Customer segmentation** — Present relevant products to different customer types and market segments.
- **Geographic targeting** — Show region-specific products and comply with local market requirements.
- **Promotional campaigns** — Manage special offers, discounts, and promotional pricing campaigns.
- **Partner channels** — Provide partner-specific product catalogs with appropriate pricing and terms.
#### Catalog selection
You can select a catalog four ways:
- **Default catalog**: Automatically selected based on customer context
- **Specific catalog**: Directly access catalogs by identifier
- **Promotional codes**: Apply promo codes to access special catalog pricing
- **Customer context**: Dynamic selection based on customer type and location
#### Related resources
Product Catalogs connect with other API resources:
- **Product offerings**: Individual products organized within catalogs
- **Customers**: Catalog selection based on customer type and preferences
- **Orders**: Products selected from catalogs during the ordering process
- **Discounts**: Promotional codes and special offers within catalogs
- **Pricing**: Catalog-specific pricing and promotional adjustments
#### Next steps
- [List product offerings](/api-reference/product-offerings.md#tag/product-offerings/GET/product-offerings) — Browse available product offerings
- [Get product offering](/api-reference/product-offerings.md#tag/product-offerings/GET/product-offerings/{productOfferingId}) — Get details for a specific product offering
### Product offerings
Canonical URL: https://docs.telnesstech.com/resources/product-offerings
A product offering is one telecom product or service that a customer can buy. It joins the
specification of the product to its price. The offerings define what a customer can order and
subscribe to through the API.
#### Product offering entity
A product offering in the API represents:
- **Service definition**: Telecommunications service with features, limitations, and specifications
- **Pricing information**: Cost structure, billing cycles, and pricing tiers
- **Availability rules**: Geographic, customer type, and eligibility restrictions
- **Product metadata**: Categories, descriptions, and marketing information
#### Key capabilities
- **Product catalog** — Browse available telecommunications products with detailed specifications and pricing.
- **Pricing transparency** — Read the price of an offering: the recurring charges and the one-time ones.
- **Feature comparison** — Compare product features, limitations, and service specifications.
- **Availability check** — Verify product availability based on customer location and eligibility.
#### Common use cases
- **Product selection** — Display available products to customers during the ordering and signup process.
- **Plan comparison** — A customer compares the offerings side by side before they buy.
- **Pricing display** — Show accurate pricing information including promotional offers and discounts.
- **Eligibility check** — Verify customer eligibility for specific products based on location and criteria.
#### Related resources
Product Offerings integrate with other API resources:
- **Product catalogs**: Organized collections of product offerings for different customer segments
- **Orders**: Product offerings are selected and configured during the ordering process
- **Subscriptions**: Active services based on purchased product offerings
- **Pricing**: Detailed cost information and promotional pricing
- **Discounts**: Promotional codes and special offers for product offerings
#### Next steps
- [List product offerings](/api-reference/product-offerings.md#tag/product-offerings/GET/product-offerings) — Browse all available telecommunications products
- [Get product offering](/api-reference/product-offerings.md#tag/product-offerings/GET/product-offerings/{productOfferingId}) — Retrieve detailed product specifications and pricing
### Signing
Canonical URL: https://docs.telnesstech.com/resources/signing
Signing collects a digital signature on a telecom service agreement, and it manages the
contract afterwards. A signature made this way is legally binding. Use it for a service
contract, for the terms of service, and for a regulatory document.
#### Signing entity
Signing in the API represents:
- **Digital contracts**: Electronic service agreements and terms of service for telecommunications
- **Signature workflows**: Multi-party signing processes for complex business agreements
- **Legal compliance**: Regulatory compliance documentation and signature requirements
- **Document management**: Secure storage and retrieval of signed agreements and contracts
#### Key capabilities
- **Digital signatures** — Enable secure digital signature collection for service agreements and regulatory documents.
- **Contract workflows** — Manage multi-step contract execution with approval workflows and signature collection.
- **Legal compliance** — Keep to the digital signature laws and the telecom regulations.
- **Document security** — Maintain secure document storage with audit trails and tamper-proof verification.
#### Common use cases
- **Service onboarding** — Collect digital signatures during customer onboarding and service activation processes.
- **Contract management** — Manage telecommunications service contracts with digital signature workflows.
- **Regulatory compliance** — Keep to the telecom regulations that require the consent and the signature of a customer.
- **Business agreements** — Execute complex business-to-business telecommunications agreements with multi-party signatures.
#### Related resources
Signing entities integrate with other API resources:
- **Customers**: Customer-specific contract management and signature collection
- **Orders**: Contract execution as part of service ordering and activation workflows
- **Subscriptions**: Service agreements associated with active telecommunications subscriptions
- **Users**: User authentication and signature authority for contract execution
### Subscribers
Canonical URL: https://docs.telnesstech.com/resources/subscribers
A subscriber is the end user of a telecom service. The entity holds the profile of that user
and their service preferences. A subscriber uses the mobile service. A customer owns it and
pays for it. The two are not the same entity.
#### Subscriber entity
A subscriber in the API represents:
- **Service user**: Individual who actually uses the telecommunications service
- **Profile information**: Personal details, preferences, and service configuration
- **Service association**: Connection to subscriptions and active services
- **Usage tracking**: Individual usage patterns and service consumption
#### Key capabilities
- **Profile management** — Maintain detailed subscriber profiles with personal information and service preferences.
- **Service configuration** — Configure service settings, preferences, and usage parameters for individual subscribers.
- **Usage tracking** — Monitor individual subscriber usage patterns and service consumption metrics.
- **Service personalization** — Customize service experiences based on subscriber preferences and behavior.
#### Subscriber vs customer
These two entities are not the same. Four facts separate them:
- **Customer**: The billable entity that owns the services and pays for them. It is one
organization or one person.
- **Subscriber**: The end user that consumes the telecom service.
- **Relationship**: One customer can have many subscribers, such as a family plan or a set of
business users.
- **Billing**: The platform bills the customer. The subscriber uses the service.
#### Common use cases
- **Individual profiles** — Manage subscriber profiles for personalized service delivery and customer support.
- **Family plans** — Handle multiple subscribers under a single customer account for family or group plans.
- **Enterprise users** — Manage employee subscribers for corporate telecommunications services.
- **Service customization** — Configure individual subscriber preferences for personalized service experiences.
#### Related resources
Subscriber entities are connected to other API resources:
- **Customers**: Subscribers belong to customer accounts for billing and management
- **Subscriptions**: Subscribers are associated with active telecommunications services
- **Orders**: Subscriber information collected during service ordering and activation
#### Next steps
- [List subscribers](/api-reference/subscribers.md#tag/subscribers/GET/subscribers) — Retrieve all subscribers you have access to
- [Get subscriber](/api-reference/subscribers.md#tag/subscribers/GET/subscribers/{subscriberId}) — Retrieve detailed information about a specific subscriber
- [Update subscriber](/api-reference/subscribers.md#tag/subscribers/PUT/subscribers/{subscriberId}) — Modify subscriber profile and preferences
### Subscriptions
Canonical URL: https://docs.telnesstech.com/resources/subscriptions
A subscription is an active telecom service that a customer bought and now uses. It carries
the whole service lifecycle: the activation, the usage tracking, the billing, and the
termination or the upgrade at the end.
#### Subscription entity
A subscription in the API represents:
- **Active service**: Live telecommunications service with ongoing usage and billing
- **Service configuration**: Specific service parameters, allowances, and feature settings
- **Billing relationship**: Recurring charges, usage tracking, and payment collection
- **Lifecycle management**: Service activation, modifications, suspensions, and terminations
#### Key capabilities
- **Service management** — Manage active telecommunications services with configuration updates and feature changes.
- **Usage tracking** — Monitor service consumption including data usage, voice minutes, and feature utilization.
- **Billing integration** — Track recurring charges, usage-based billing, and subscription payment collection.
- **Lifecycle control** — Handle service modifications, upgrades, downgrades, suspensions, and terminations.
#### Common use cases
- **Service activation** — Activate new telecommunications services following successful order completion and payment.
- **Usage monitoring** — Track customer usage patterns and service consumption for billing and analytics.
- **Service changes** — Process subscription modifications, plan changes, and feature additions or removals.
- **Account management** — Enable customer self-service for subscription management and configuration changes.
#### Related resources
Subscription entities integrate with other API resources:
- **Customers**: Customer-owned subscriptions with billing and service relationships
- **Subscribers**: End users associated with specific subscription services
- **Product offerings**: Service definitions and pricing for subscription activation
- **Orders**: Subscription creation following successful order fulfillment
- **Invoices**: Recurring billing and usage charges for active subscriptions
- **Payments**: Payment collection for subscription charges and usage-based billing
- **Licenses**: Software licenses and digital services associated with subscriptions
#### Next steps
- [List subscriptions](/api-reference/subscriptions.md#tag/subscriptions/GET/subscriptions) — Retrieve all subscriptions you have access to
- [Create subscription](/api-reference/subscriptions.md#tag/subscriptions/POST/subscriptions) — Create a new telecommunications subscription
- [Get subscription](/api-reference/subscriptions.md#tag/subscriptions/GET/subscriptions/{subscriptionId}) — Retrieve detailed subscription information
- [Manage subscription](/api-reference/subscriptions.md#tag/subscriptions/POST/subscriptions/{subscriptionId}/activate) — Activate, modify, or cancel subscriptions
### Subscription addons
Canonical URL: https://docs.telnesstech.com/resources/subscription-addons
A subscription addon is an extra service or feature on an active telecom subscription. With
an addon a customer adds an allowance, a premium feature, or another service to what they
already have.
#### Addon entity
A subscription addon in the API represents:
- **Supplementary service**: Additional feature or allowance attached to a base subscription
- **Independent configuration**: You add, change, and remove an addon without touching the base subscription.
- **Independent billing**: Separate pricing and billing cycles for addon services
- **Lifecycle management**: Addon activation, modifications, and cancellation workflows
#### Key capabilities
- **Addon management** — Add, modify, and remove supplementary services from active subscriptions.
- **Product changes** — Change addon product offerings to upgrade or downgrade service features.
- **Availability check** — View available addon options compatible with specific subscriptions.
- **Status tracking** — Monitor addon status, activation dates, and service availability.
#### Common use cases
- **Service enhancement** — Allow customers to enhance their subscriptions with additional features and allowances.
- **Temporary coverage** — Add temporary services like travel roaming packages for specific periods.
- **Upgrades and downgrades** — Enable gradual service upgrades without changing the base subscription plan.
- **Targeted features** — Provide specialized features for specific customer needs and use cases.
#### Related resources
Subscription addons integrate with other API resources:
- **Subscriptions**: Base subscriptions to which addons are attached
- **Product offerings**: Addon product definitions with pricing and features
- **Orders**: Addon purchases and provisioning workflows
- **Invoices**: Addon charges included in subscription billing
- **Payments**: Payment collection for addon services
#### Next steps
- [List active addons](/api-reference/subscription-addons.md#tag/subscription-addons/GET/subscriptions/{subscriptionId}/addons) — View all addons attached to a subscription
- [Add addon](/api-reference/subscription-addons.md#tag/subscription-addons/POST/subscriptions/{subscriptionId}/addons) — Attach a new addon to a subscription
- [Cancel addon](/api-reference/subscription-addons.md#tag/subscription-addons/POST/subscriptions/{subscriptionId}/addons/cancel) — Remove an addon from a subscription
### Subscription usage
Canonical URL: https://docs.telnesstech.com/resources/subscription-usage
Subscription usage shows what an active telecom subscription consumed. It covers the data,
the voice minutes, the SMS messages, and the other allowances. Billing, customer
notifications, and service management all read these numbers.
#### Usage entity
Subscription usage in the API represents:
- **Real-time tracking**: Current period consumption of data, voice, SMS, and other services
- **Allowance monitoring**: Usage relative to subscription plan limits and allowances
- **Billing integration**: Usage data for billing calculations and overage charges
- **Notification support**: Usage thresholds for customer alerts and service warnings
#### Key capabilities
- **Current usage** — View real-time consumption of data, voice, and SMS services for active subscriptions.
- **Allowance tracking** — Monitor usage against subscription plan allowances and remaining balances.
- **Multi-subscription view** — Retrieve usage data for multiple subscriptions simultaneously for bulk operations.
- **Period tracking** — Track usage within billing periods for accurate billing and reporting.
#### Common use cases
- **Usage monitoring** — A customer reads their own consumption in your self-service portal.
- **Overage prevention** — Send notifications when customers approach usage limits to prevent unexpected charges.
- **Billing accuracy** — Provide accurate usage data for billing calculations and invoice generation.
- **Service analytics** — Analyze usage patterns for service optimization and product recommendations.
#### Related resources
Subscription usage integrates with other API resources:
- **Subscriptions**: Base subscriptions for which usage is tracked
- **Invoices**: Usage data included in customer billing statements
- **Product offerings**: Plan allowances defining usage limits
- **Webhooks**: Usage threshold events for proactive customer notifications
- **Topups**: Usage monitoring to identify topup opportunities
#### Next steps
- [Get subscription usage](/api-reference/subscription-usage.md#tag/subscription-usage/GET/subscriptions/{subscriptionId}/usage) — Retrieve current usage for a specific subscription
- [Get multiple usage](/api-reference/subscription-usage.md#tag/subscription-usage/GET/subscriptions/usage) — Get usage data for multiple subscriptions at once
### Tools
Canonical URL: https://docs.telnesstech.com/resources/tools
The tools are utility endpoints for the work around an integration: validation, testing, and
troubleshooting. Use them while you build against the API, and when you need to find out why
a request behaves the way it does.
#### Tools entity
Tools in the API represent:
- **Developer utilities**: Helper endpoints for API integration and development workflows
- **Validation services**: Data validation, format checking, and input verification tools
- **Testing support**: Sandbox environments and testing utilities for safe development
- **Diagnostic tools**: API health checks, connectivity testing, and troubleshooting resources
#### Key capabilities
- **API validation** — Validate data formats, API requests, and integration patterns before production deployment.
- **Testing environment** — Access sandbox environments and testing tools for safe API development and integration.
- **Health monitoring** — Monitor API health, connectivity status, and service availability through diagnostic endpoints.
- **Developer support** — Access developer resources, documentation helpers, and integration assistance tools.
#### Tool categories
The API provides various utility tools:
- **Address validation**: Verify and standardize customer addresses
- **Number porting**: Check phone number portability and porting eligibility
- **Device information**: Retrieve device specifications and compatibility details
- **Network coverage**: Verify network coverage and service availability by location
#### Common use cases
- **Integration testing** — Test API integrations safely using sandbox environments and validation tools.
- **Data validation** — Validate customer data, phone numbers, and service configurations before processing.
- **Health monitoring** — Monitor API health and service availability for production applications and integrations.
- **Development support** — Use the developer tools that make an integration and its troubleshooting faster.
#### Related resources
Tools integrate with all API resources to provide:
- **Orders**: Address validation and device information for order processing
- **Subscriptions**: Number porting and network coverage verification
- **Customers**: Address validation for customer profile management
- **Inventory**: Device information for hardware allocation
#### Next steps
- [Validate address](/api-reference/tools.md#tag/tools/POST/tools/validate-address) — Verify and standardize customer addresses
- [Check porting eligibility](/api-reference/tools.md#tag/tools/POST/tools/check-porting-eligibility) — Verify if a phone number can be ported
- [Get device info](/api-reference/tools.md#tag/tools/POST/tools/get-device-info) — Retrieve device specifications and details
- [Check network coverage](/api-reference/tools.md#tag/tools/POST/tools/check-network-coverage) — Verify network availability by location
### Users
Canonical URL: https://docs.telnesstech.com/resources/users
A user is a person with access to the platform. A user acts on behalf of a customer. The
entity carries the authentication, the authorization, and the access control of that person.
#### User entity
A user in the API represents:
- **Platform access**: Individual with authentication credentials and permissions
- **Customer association**: Users can be associated with one or more customer entities
- **Permission scope**: Access rights and operational capabilities within the platform
- **Identity management**: Unique identification and profile information
#### Key capabilities
- **User authentication** — Manage user credentials, authentication tokens, and secure platform access.
- **Customer access** — Associate users with customer entities to enable service management and administration.
- **Permission management** — Control user access levels and operational permissions within the platform.
- **Profile management** — Maintain user profile information, contact details, and preferences.
#### Common use cases
- **User onboarding** — Create new user accounts with appropriate permissions and customer associations.
- **Access management** — Manage user permissions, customer associations, and operational access rights.
- **Multi-tenant access** — Enable users to access multiple customer accounts with appropriate permission scoping.
- **API integration** — Create API users for system integrations and automated service management.
#### Related resources
User entities interact with other API resources:
- **Customers**: Users are associated with customers to enable account management
- **Authentication**: Bearer tokens and API keys provide secure platform access
- **Orders**: Users can create and manage orders on behalf of customers
- **Subscriptions**: Users can manage subscriptions for their associated customers
#### Next steps
- [List users](/api-reference/users.md#tag/users/GET/users) — Retrieve all users you have access to
- [Create user](/api-reference/users.md#tag/users/POST/users) — Create a new user account
- [Get user](/api-reference/users.md#tag/users/GET/users/{userId}) — Retrieve detailed information about a specific user
- [Update user](/api-reference/users.md#tag/users/PUT/users/{userId}) — Modify user details and preferences
### Workflows
Canonical URL: https://docs.telnesstech.com/resources/workflows
With a workflow your platform accepts a webhook from an external system and starts an
automated process from it. The workflow webhook endpoint is one universal receiver. It routes
each event to a handler by the path of the request.
#### Workflow entity
Workflows in the API represent:
- **Webhook reception**: Receive incoming webhooks from external systems and services
- **Event routing**: Route events to appropriate handlers based on path patterns
- **Process automation**: Trigger automated workflows in response to external events
- **Integration bridge**: Connect external systems with internal business processes
#### Key capabilities
- **Universal receiver** — Receive webhooks from any external system using a single configurable endpoint.
- **Path-based routing** — Route incoming events to different handlers based on the webhook path.
- **Process triggers** — Automatically trigger internal workflows and business processes from external events.
- **Integration ready** — Connect with external payment processors, notification systems, and third-party services.
#### Common use cases
- **Payment callbacks** — Receive payment status updates from external payment processors and gateways.
- **Third-party events** — Process notifications from external services and partner systems.
- **System integration** — Bridge external systems with internal automation and business logic.
- **Event processing** — Handle incoming events and trigger appropriate downstream actions.
#### Related resources
Workflow webhooks integrate with other API resources:
- **Payments**: Process payment status callbacks and transaction notifications
- **Subscriptions**: Handle external events affecting subscription lifecycle
- **Orders**: Receive fulfillment updates and external order status changes
#### Next steps
- [Receive webhook](/api-reference/workflows.md#tag/workflows/POST/workflows/webhook/{path...}) — Configure and receive webhooks from external systems